ADR Policies
ADR (Application Detection & Response) policies help security teams detect and respond to threats in application and runtime environments, including Kubernetes workloads, containers, hosts, and VMs.
Use ADR policies to control where runtime activity is monitored, which detection rules are applied, and how detections are handled. Policies can be configured to report incidents for review, send alerts to external systems, open tickets in integrated ticketing tools, or apply supported automatic response actions.
When a selected rule matches the policy scope and conditions, the detection is reported as an incident in the Runtime incidents dashboard.
An ADR policy includes:
- Scope — the accounts, clusters, namespaces, workloads, labels, or other runtime assets the policy monitors.
- Criteria — additional conditions used to refine when the policy applies, such as risk factor (external exposure, privileged access, or specific CVEs.)
- Detection rules — the runtime threat behaviors the policy detects.
- Actions and notifications — how detections are handled, including incident classification triggers, dashboard reporting, alerts, ticket creation, and supported automatic response actions.
When to use ADR policies
ADR policies are useful when you need tailored detection coverage for specific environments, workloads, teams, or risk levels.
Common use cases include:
- Applying tailored detection coverage to production environments, critical workloads, sensitive namespaces, or high-risk assets.
- Detecting suspicious runtime behavior, such as unexpected command execution, privilege escalation, or lateral movement.
- Routing detections to the right teams, alerting channels, or ticketing systems.
- Applying supported response actions when active threats need to be contained.
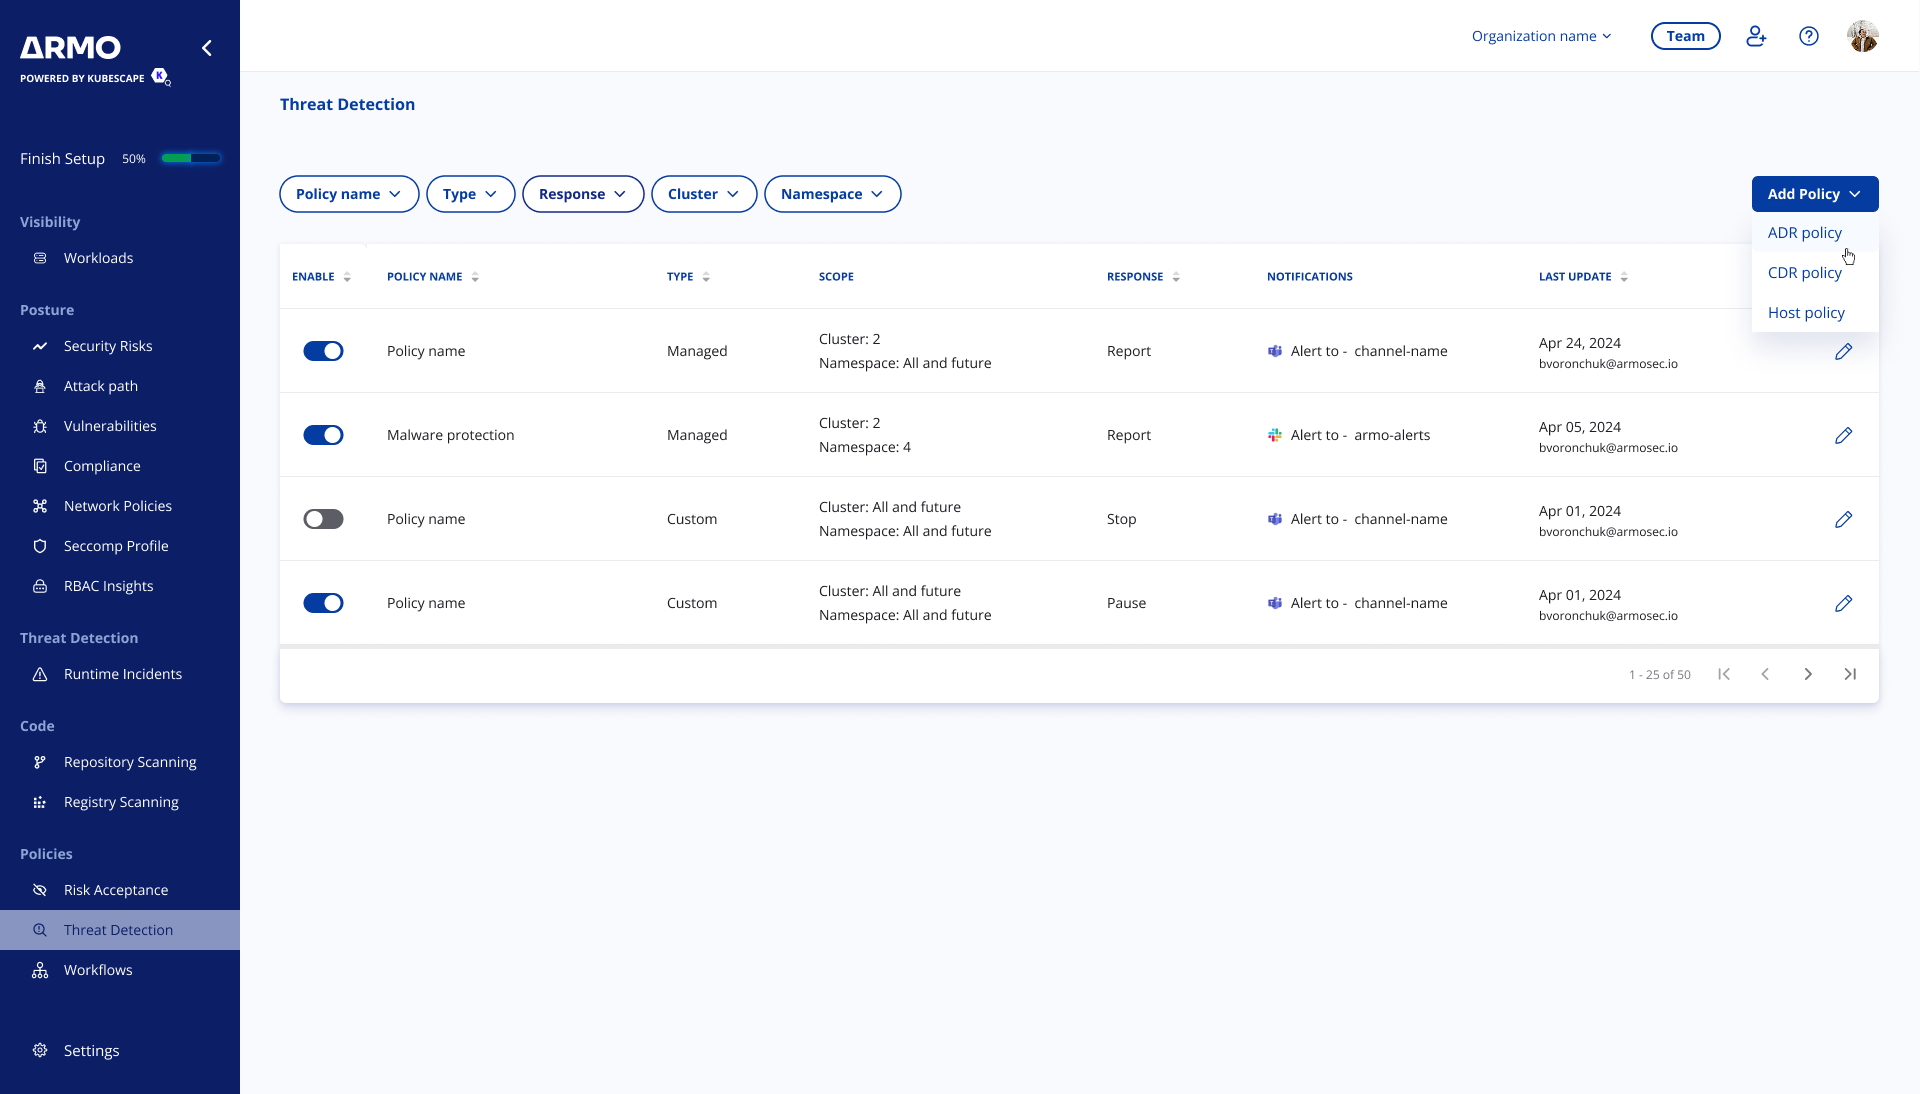
Create an ADR policy
Create an ADR policy to define where runtime activity is monitored, which detection rules are applied, and how detections are handled through reporting, notifications, ticket creation, or supported automatic response actions.
To create an ADR policy:
- In the ARMO platform, go to Policies > Threat Detection.
- Click Add Policy.
- Select Add ADR Policy.
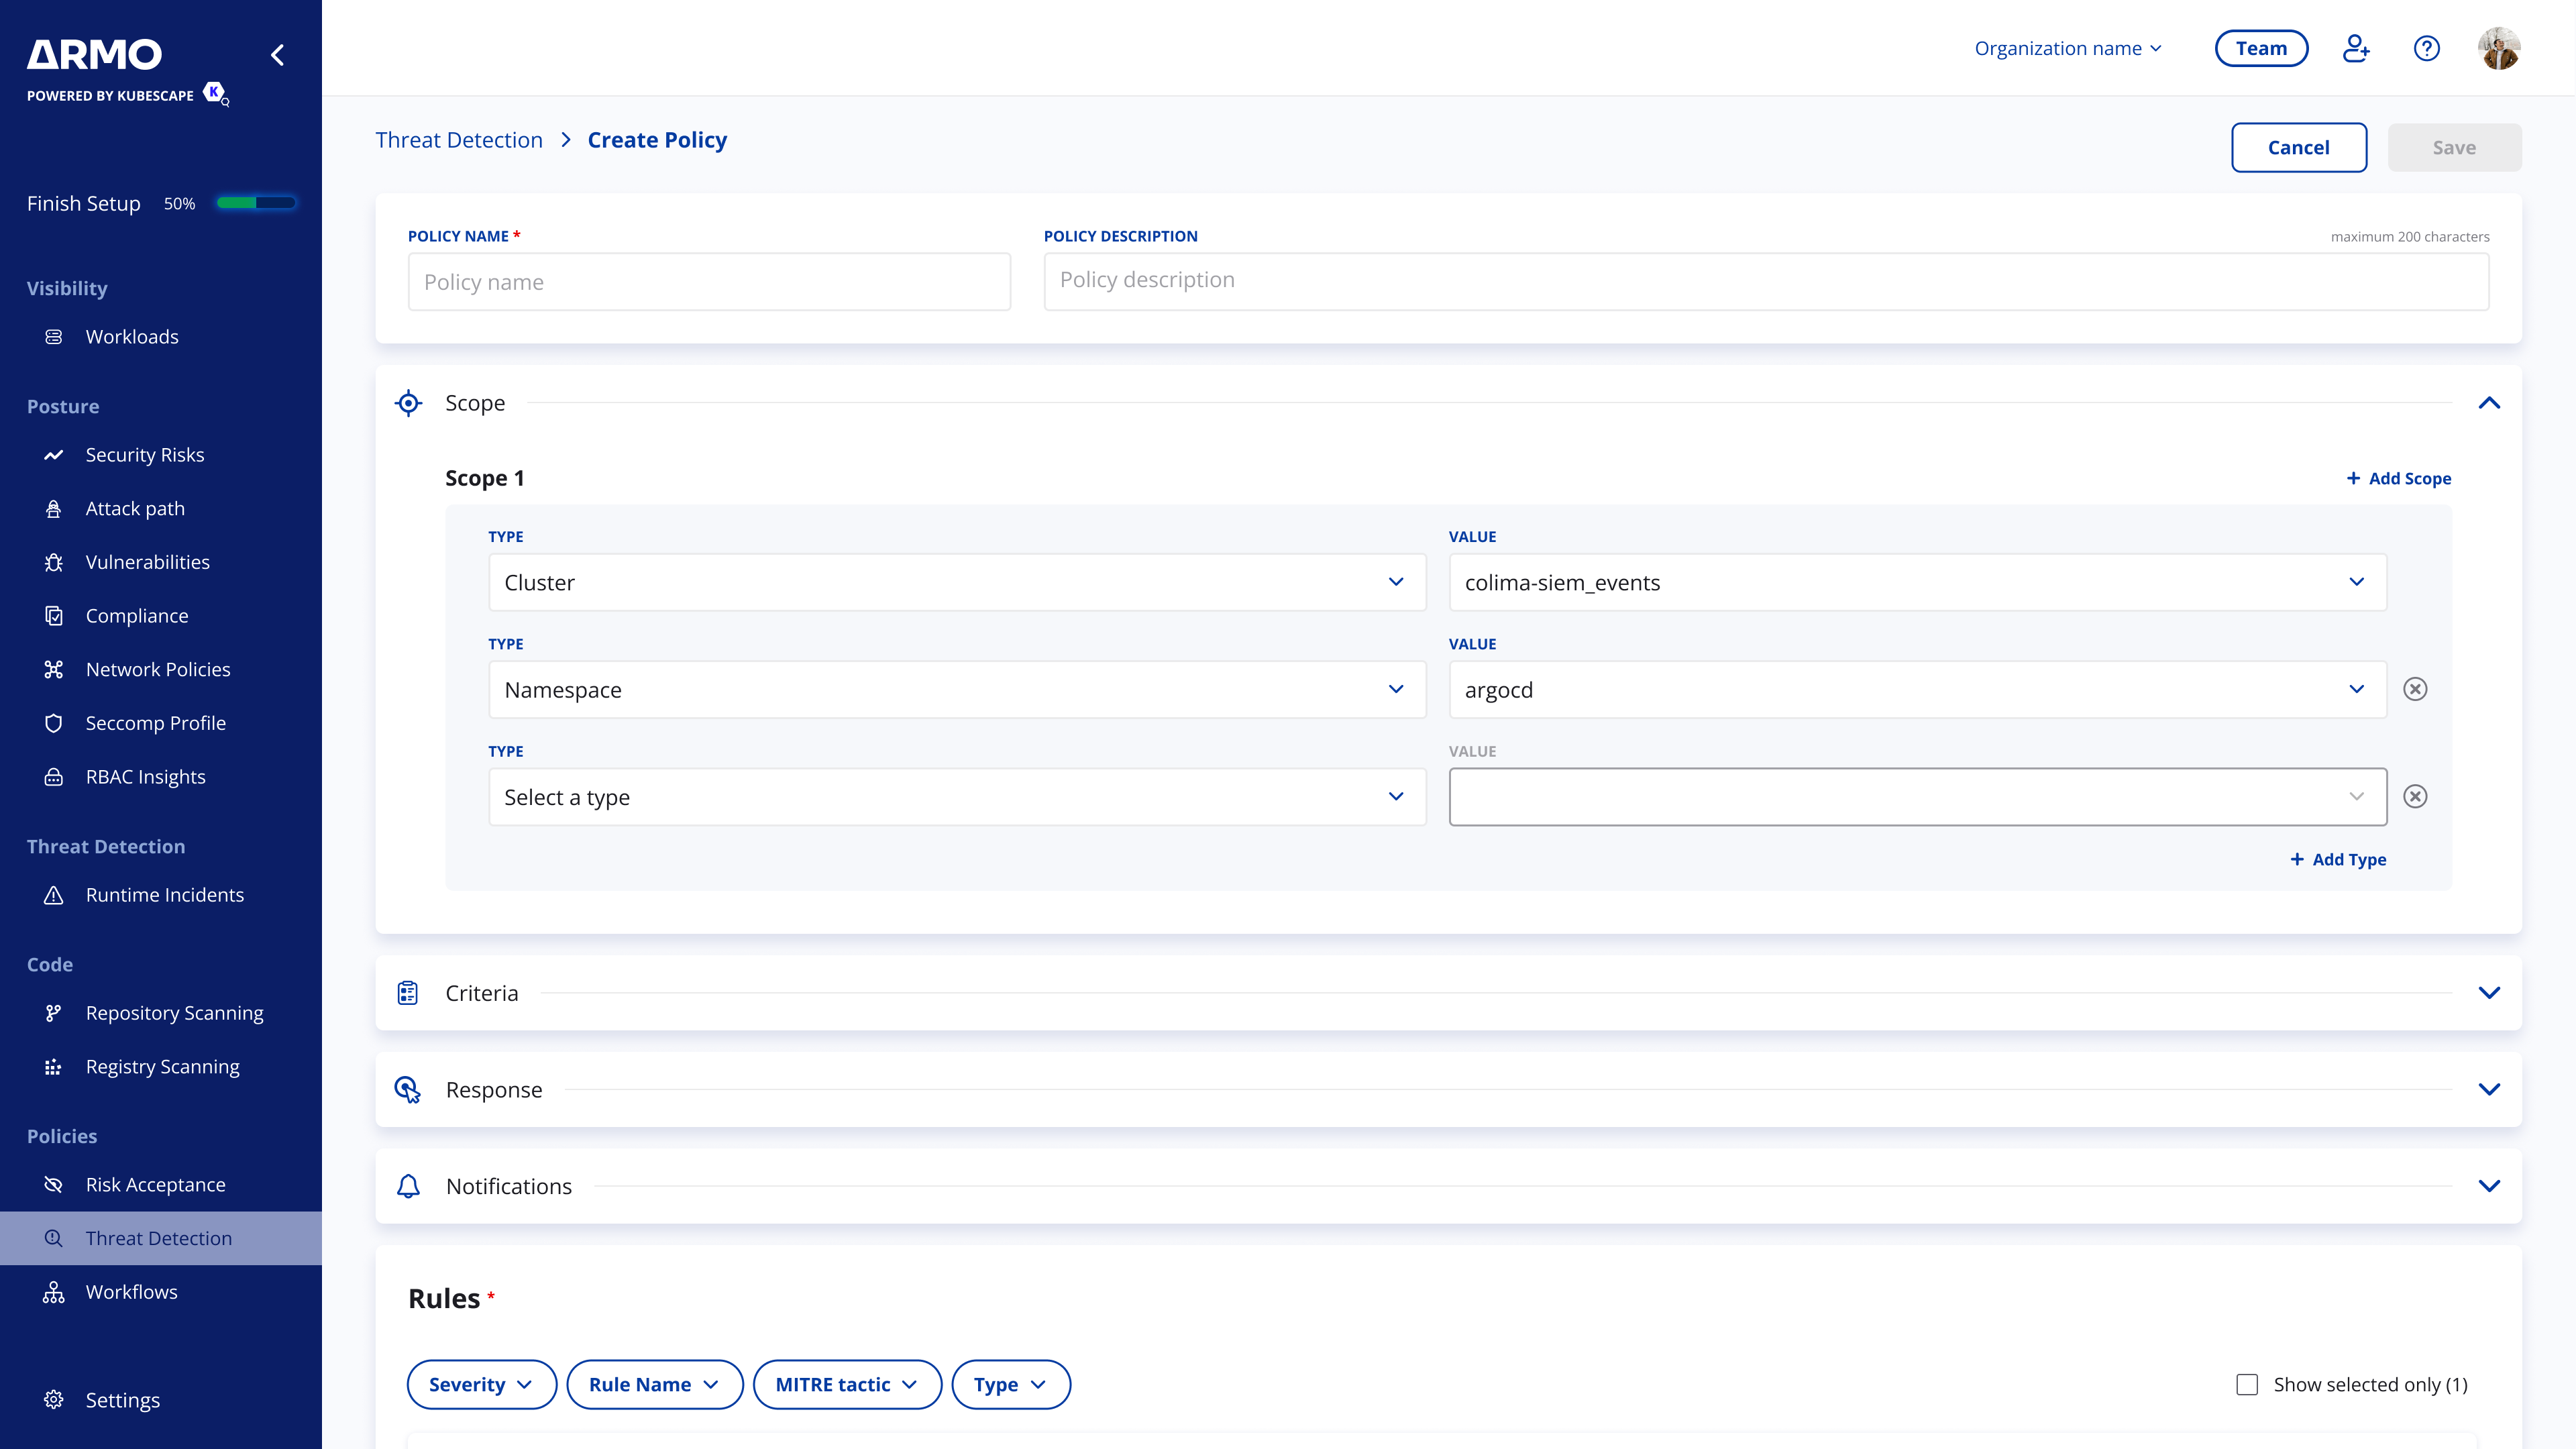
Step 1: Add policy details
Enter the basic policy details:
- Policy name — a unique name that helps identify the policy.
- Description — an optional description that explains the policy’s purpose or intended scope.
Use a clear name that describes where or why the policy is used, such as Production runtime monitoring or Critical workloads ADR policy.
Step 2: Define the scope
Define the scope to control which runtime assets the policy monitors.
You can scope an ADR policy by selecting one or more resource attributes, such as account, cluster, namespace, workload, or labels. Use scope filters to apply the policy broadly across an environment or narrow it to specific workloads.
To define the scope:
- Expand the Scope section.
- Select a scope type, such as Account, Cluster, Namespace, or Workload.
- Select one or more values from the available resources.
- Add additional scope filters to narrow the policy further.
- Add another scope if you want the policy to apply to more than one independent set of resources.
Filters added to the same scope are combined to narrow the policy target. For example, selecting a cluster and a namespace applies the policy only to matching resources in that namespace.
If you add multiple scopes, each scope is evaluated separately. The policy applies when a resource matches any of the configured scopes.
If no scope is selected, the policy applies to the full environment where runtime detection is deployed. if an account is selected but no cluster, Namespace or workload is selected the policy apply to all resources under this specific account.
For example, you can create a scope that applies only to workloads in a specific production namespace, and add another scope for a separate cluster, account, or team-owned environment as relevant.
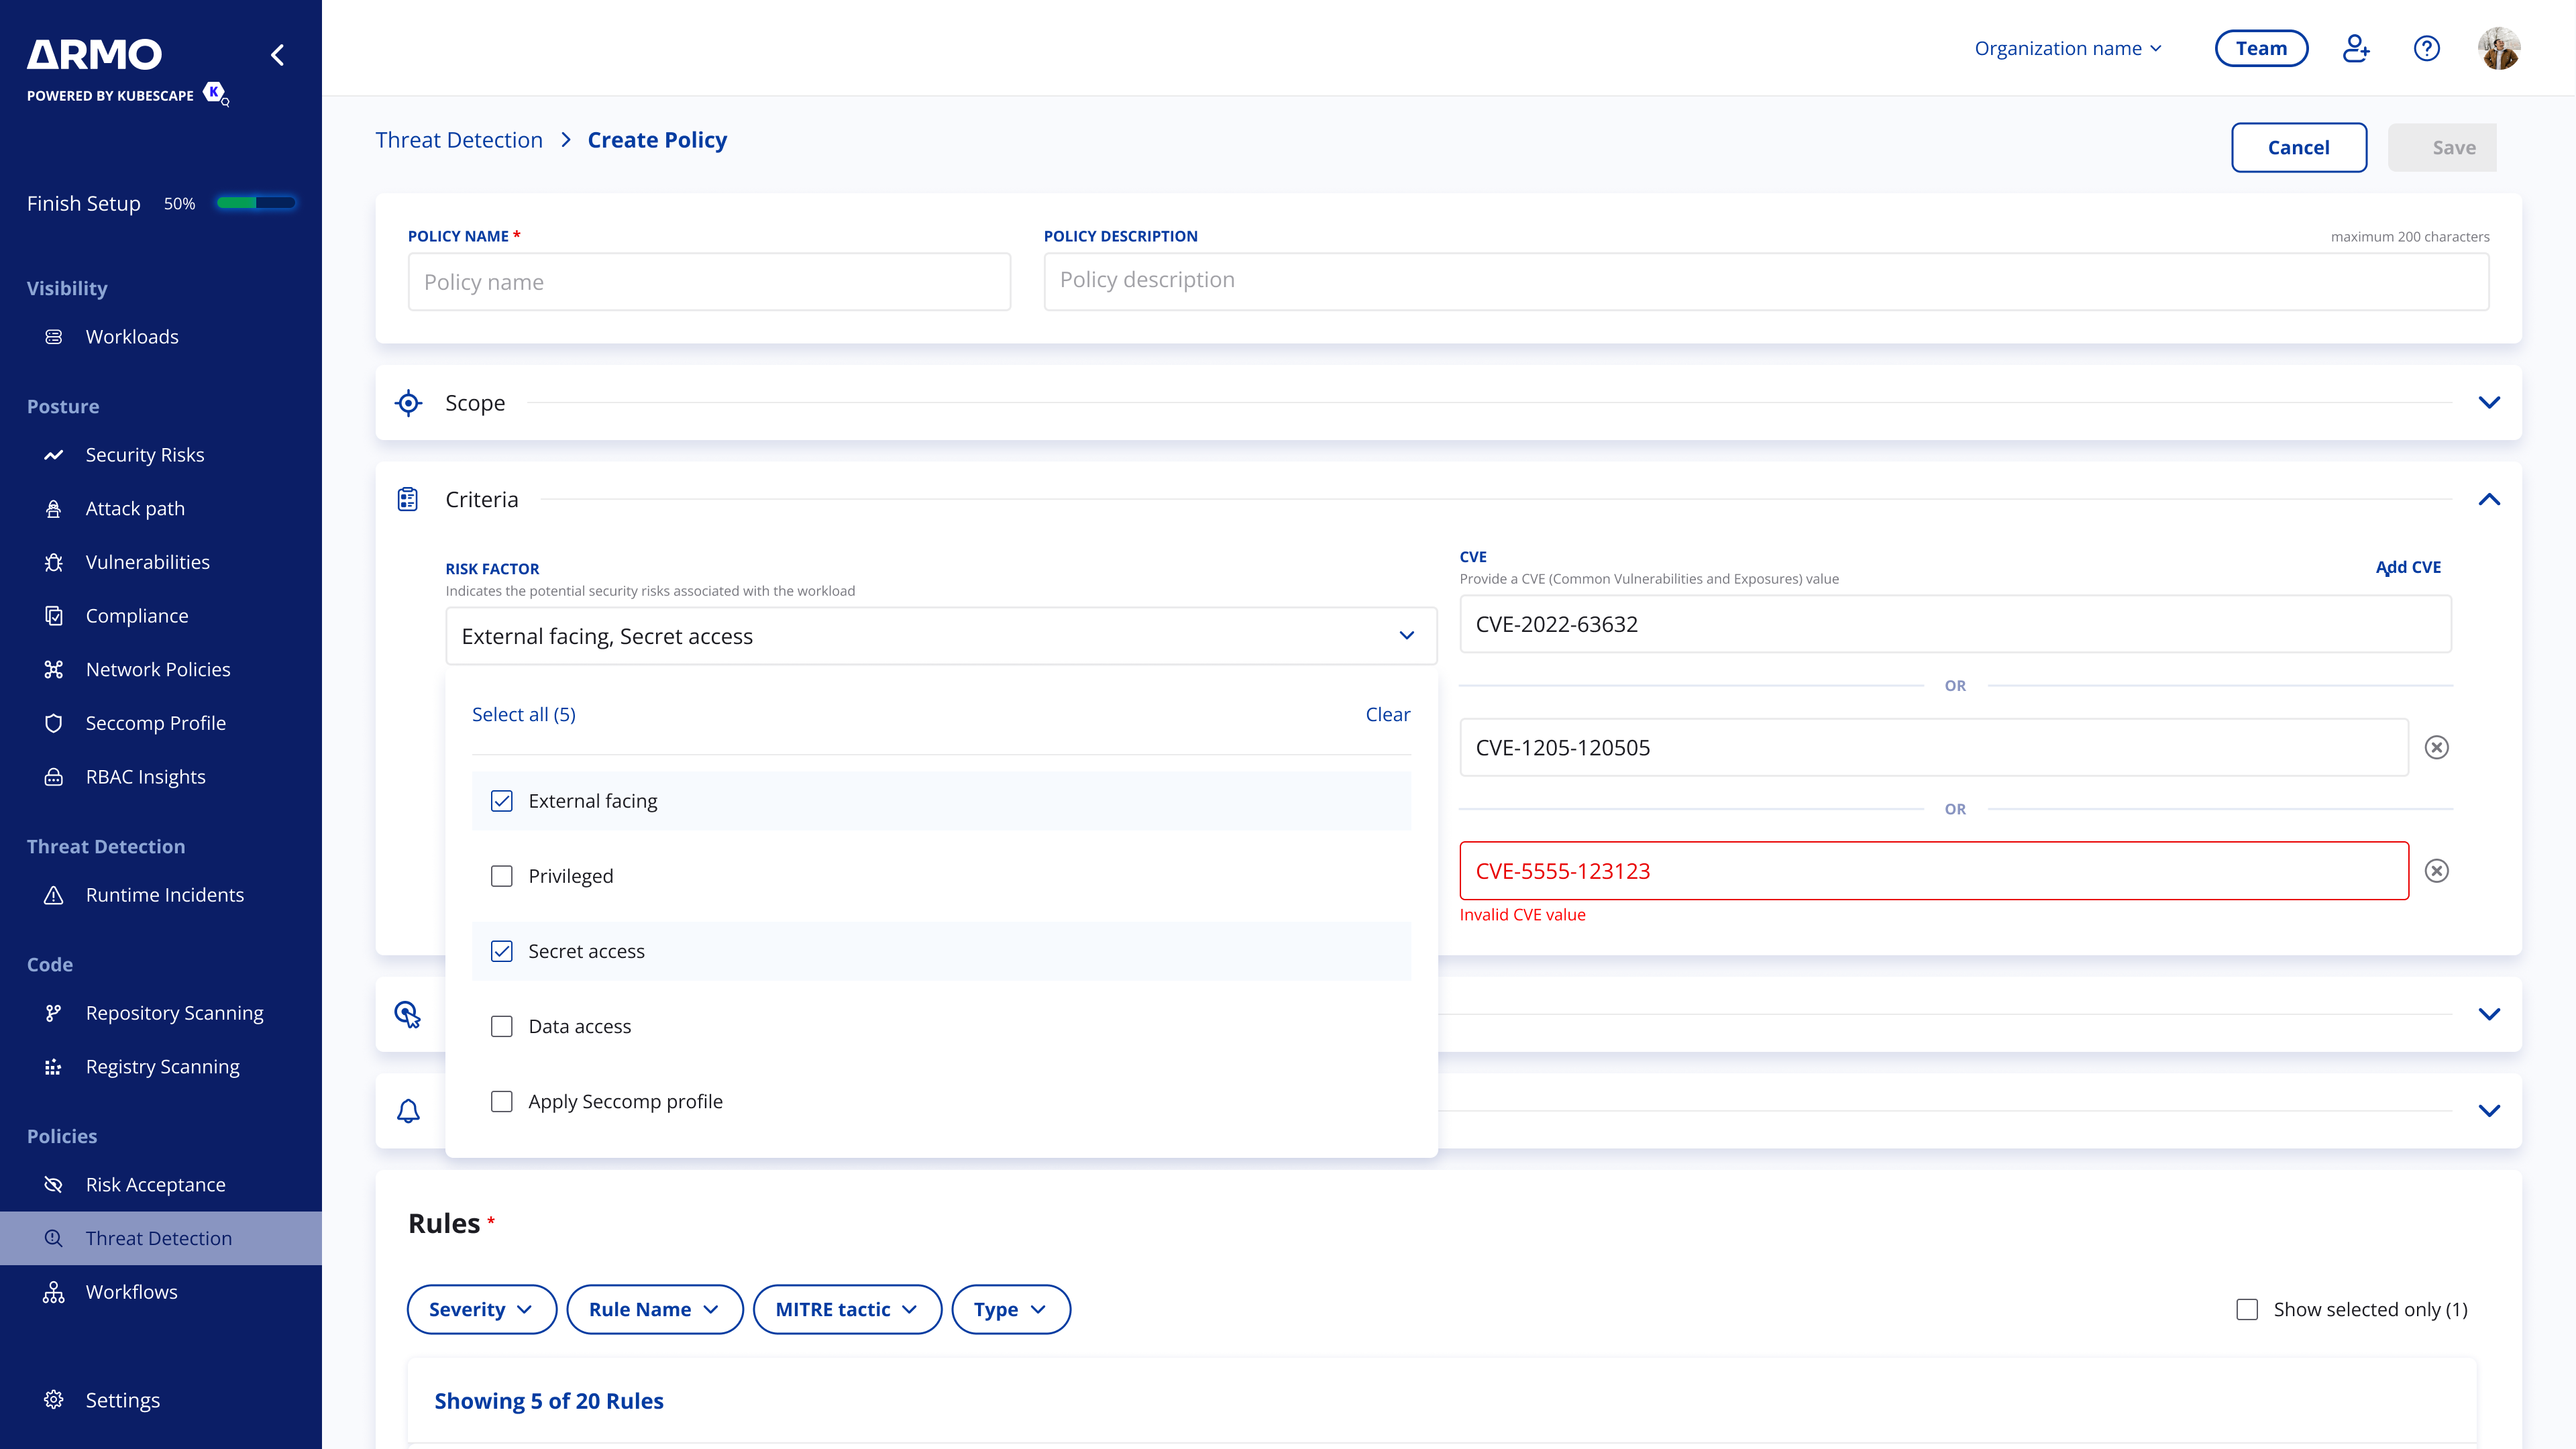
Step 3: Configure criteria
Use criteria to further refine when the ADR policy applies, on top of the policy scope.
While scope defines which assets are monitored, criteria allows to tailor the scope and narrow according to workload context, risk factors or CVEs:.
- Risk factors — workload attributes such as external exposure, privileged access, secret access, data access, or host access.
- CVEs — specific CVEs that may be associated with the workload.
For example, you can scope a policy to a production cluster and use criteria to apply it only to workloads that are externally exposed or potntially affected by a specific CVE.
If you do not configure criteria, the policy will trigger and alert based on the defined scope and selected detection rules.
Step 4: Configure actions and notifications
ADR Policy actions can be configured to send alerts, triger automatic response according to the following options:
- Incident classification trigger — select which incident classifications should trigger the configured actions.
- Response — choose whether to report the incident or apply a supported response action.
- Quarantine — optionally apply additional isolation controls to the affected workload.
- Notifications — send alerts or create tickets through configured integrations.
Response actions
Select one of the available response actions:
| Response | Description |
|---|---|
| Report | Reports the incident to the Runtime incidents dashboard for review and tracking, without changing the affected workload. |
| Kill | Forcefully ends the affected container process. |
| Stop | Gracefully stops the affected container. |
| Pause | Temporarily pauses the affected container process. |
Note: In cases where response action cannot be applied, the detection will still be reported to the Runtime incidents dashboard.
Quarantine
Quarantine options provide additional containment controls for affected workloads.
Available quarantine options may include:
- Apply Network Policy — isolates the workload using a network policy.
- Apply Seccomp Profile — restricts the workload’s system calls using a seccomp profile.
Notifications and tickets
Select one or more configured integrations to notify the relevant teams when detections occur.
Depending on the integration type, the policy can send alerts to notification channels or create tickets in integrated ticketing systems.
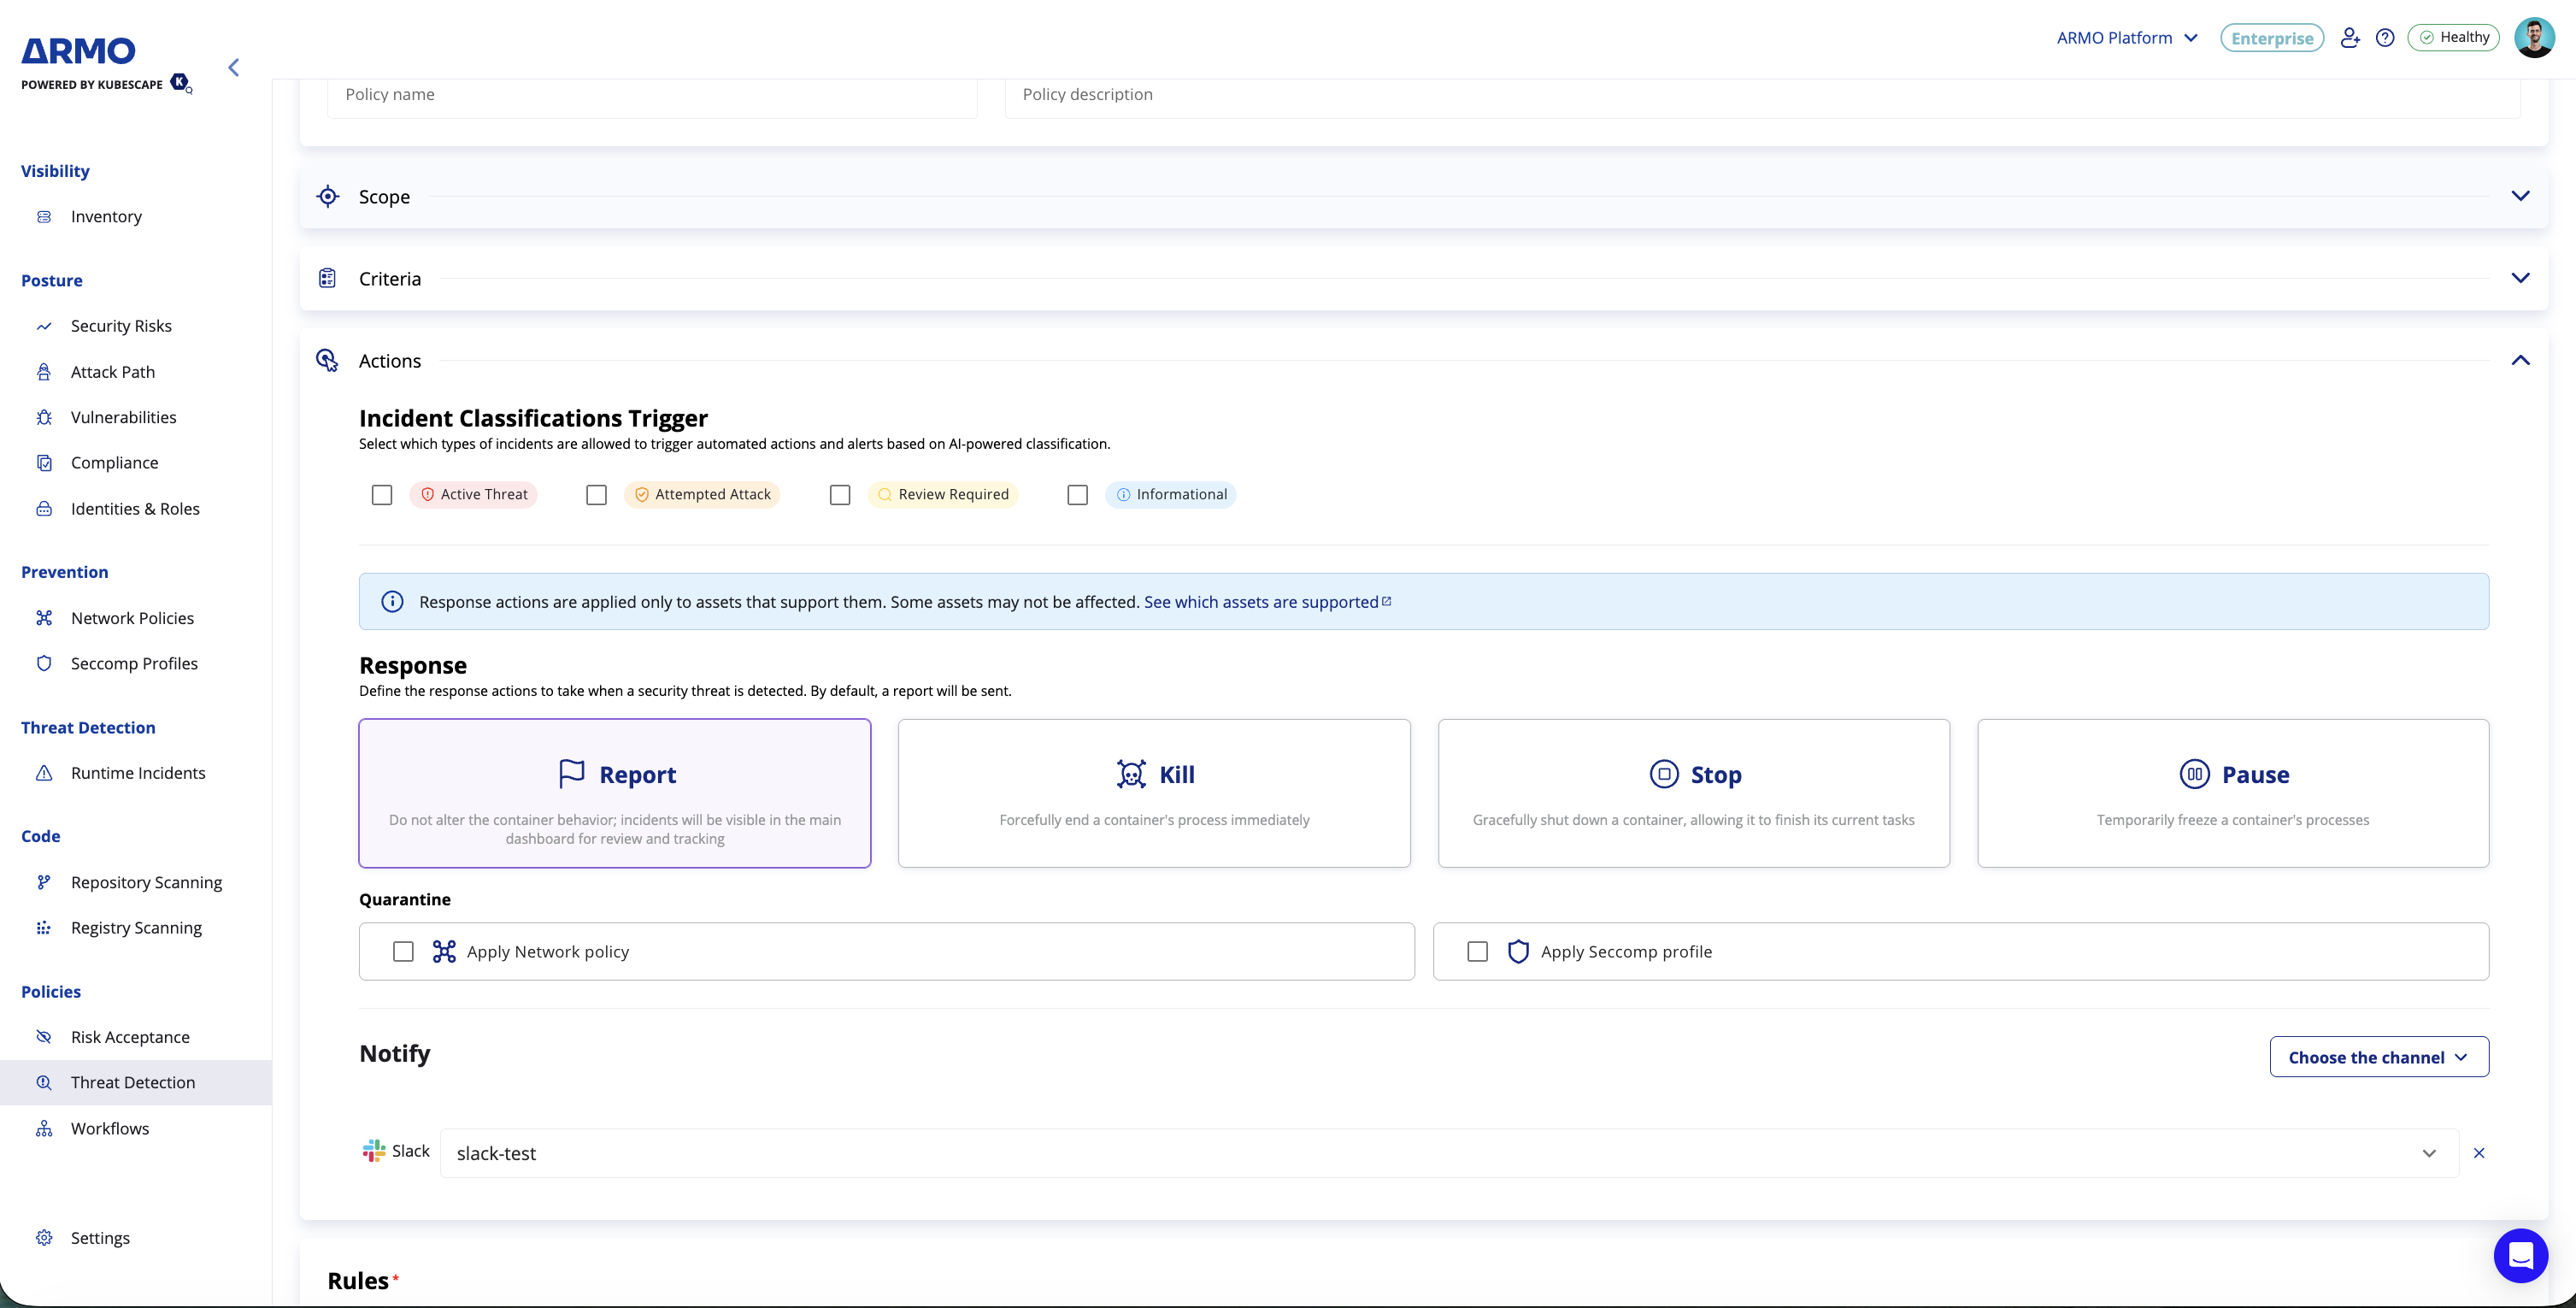
Note: Notification and ticketing integrations must be configured before they can be selected in a policy.
Step 5: Define detection rules
Select the rules you want to include in the ADR policy to define the runtime threat behaviors the policy will detect, alert or respond on. Use the rules table to review and select the preferred rules for the policy. You can use filters to narrow the list by attributes such as severity, rule name, MITRE tactic, rule type, or tags.
To select rules:
- Use filters to refine the list of rules that may be relevant to the policy.
- Review the available rules.
- Select rules by clicking the box on the left of the relevant rule.
- Use Show selected only to review the selected rules before saving.
For each rule you can review details such as severity, name, description, MITRE ATT&CK tactic, type, and tags.
Step 6: Save the policy
After configuring the policy scope, criteria, actions, notifications, and rules, click Save.
Once the policy is saved it will start reporting new detections moving forward. Incidents are reported to the Runtime incidents dashboard for review and tracking. External alerts, tickets, or supported automatic response actions will be triggered according to the configured actions and notifications.
Note: Newly created policies are enabled by default, you can manage ADR policies from Policies > Threat Detection. Disabling a policy stops it from applying to new detections while existing incidents that were already reported remain available in the Runtime incidents dashboard for review and tracking.
Updated 3 days ago