
Onboard Azure Tenant
Onboard Azure Tenant (Multi-Subscription)
This guide explains how to connect an Azure tenant or management group to ARMO using the Tenant (Multi-Subscription) integration.
After onboarding, ARMO can discover Azure resources across the connected tenant or management group and continuously monitor cloud compliance findings, misconfigurations, and risks across multiple Azure subscriptions.
Overview
Use the Azure Tenant (Multi-Subscription) onboarding flow when you want to connect multiple Azure subscriptions under a single tenant or management group.
During the onboarding process, you will:
- Start the Azure connection flow from ARMO.
- Select Tenant (Multi-Subscription) as the integration scope.
- Temporarily elevate access in Microsoft Entra ID.
- Copy the Azure Tenant ID (and, to scope to a specific management group, its Management Group ID).
- Register an Azure application.
- Add the required Microsoft Graph API permissions.
- Create a client secret.
- Create a custom Azure role.
- Assign the required roles to the Azure application.
- Complete the connection in ARMO.
Prerequisites
Before you begin, make sure you have the required permissions in both ARMO and Azure.
| Requirement | Description |
|---|---|
| ARMO permissions | You have an Admin or Manager role in ARMO. |
| Microsoft Entra ID permissions | You are a Global Administrator in the tenant. This is required to elevate access (Step 3) and to grant admin consent for the Microsoft Graph permissions (Step 6) |
| Azure resource permissions | You have Owner or User Access Administrator at the tenant root or target management group, to create the custom role (Step 8) and assign roles (Step 9). Elevating access in Step 3 grants this. |
| Integration scope | Decide whether to connect the entire tenant or a specific management group. |
To manage permissions across subscriptions and management groups, you must temporarily elevate access in Microsoft Entra ID during the onboarding process. You can disable this setting after onboarding is complete.
Integration scope
When onboarding Azure Tenant (Multi-Subscription), you can connect either your entire tenant or a specific management group. This choice controls the Management Group ID value in the wizard.
| Scope | What to do |
|---|---|
| Entire tenant | Leave Management Group ID empty. ARMO connects at the tenant root, covering every subscription in the tenant. |
| Specific management group | Enter the Management Group ID of the management group you want to scope to. |
High-level onboarding flow
ARMO Platform
  |
  v
Settings > Accounts > Azure > Connect
  |
  v
Select Tenant (Multi-Subscription)
  |
  v
Microsoft Entra ID / Azure Portal
  |-- Elevate access
  |-- Copy Tenant ID (Management Group ID only to scope to a specific management group)
  |-- Register Azure application
  |-- Add API permissions
  |-- Grant admin consent
  |-- Create client secret
  |-- Create custom role
  |-- Assign roles
  |
  v
Return to ARMO
  |
  v
Enter the required Azure details
  |
  v
Connect the tenant
Step-by-step onboarding
Step 1: Start Azure onboarding in ARMO
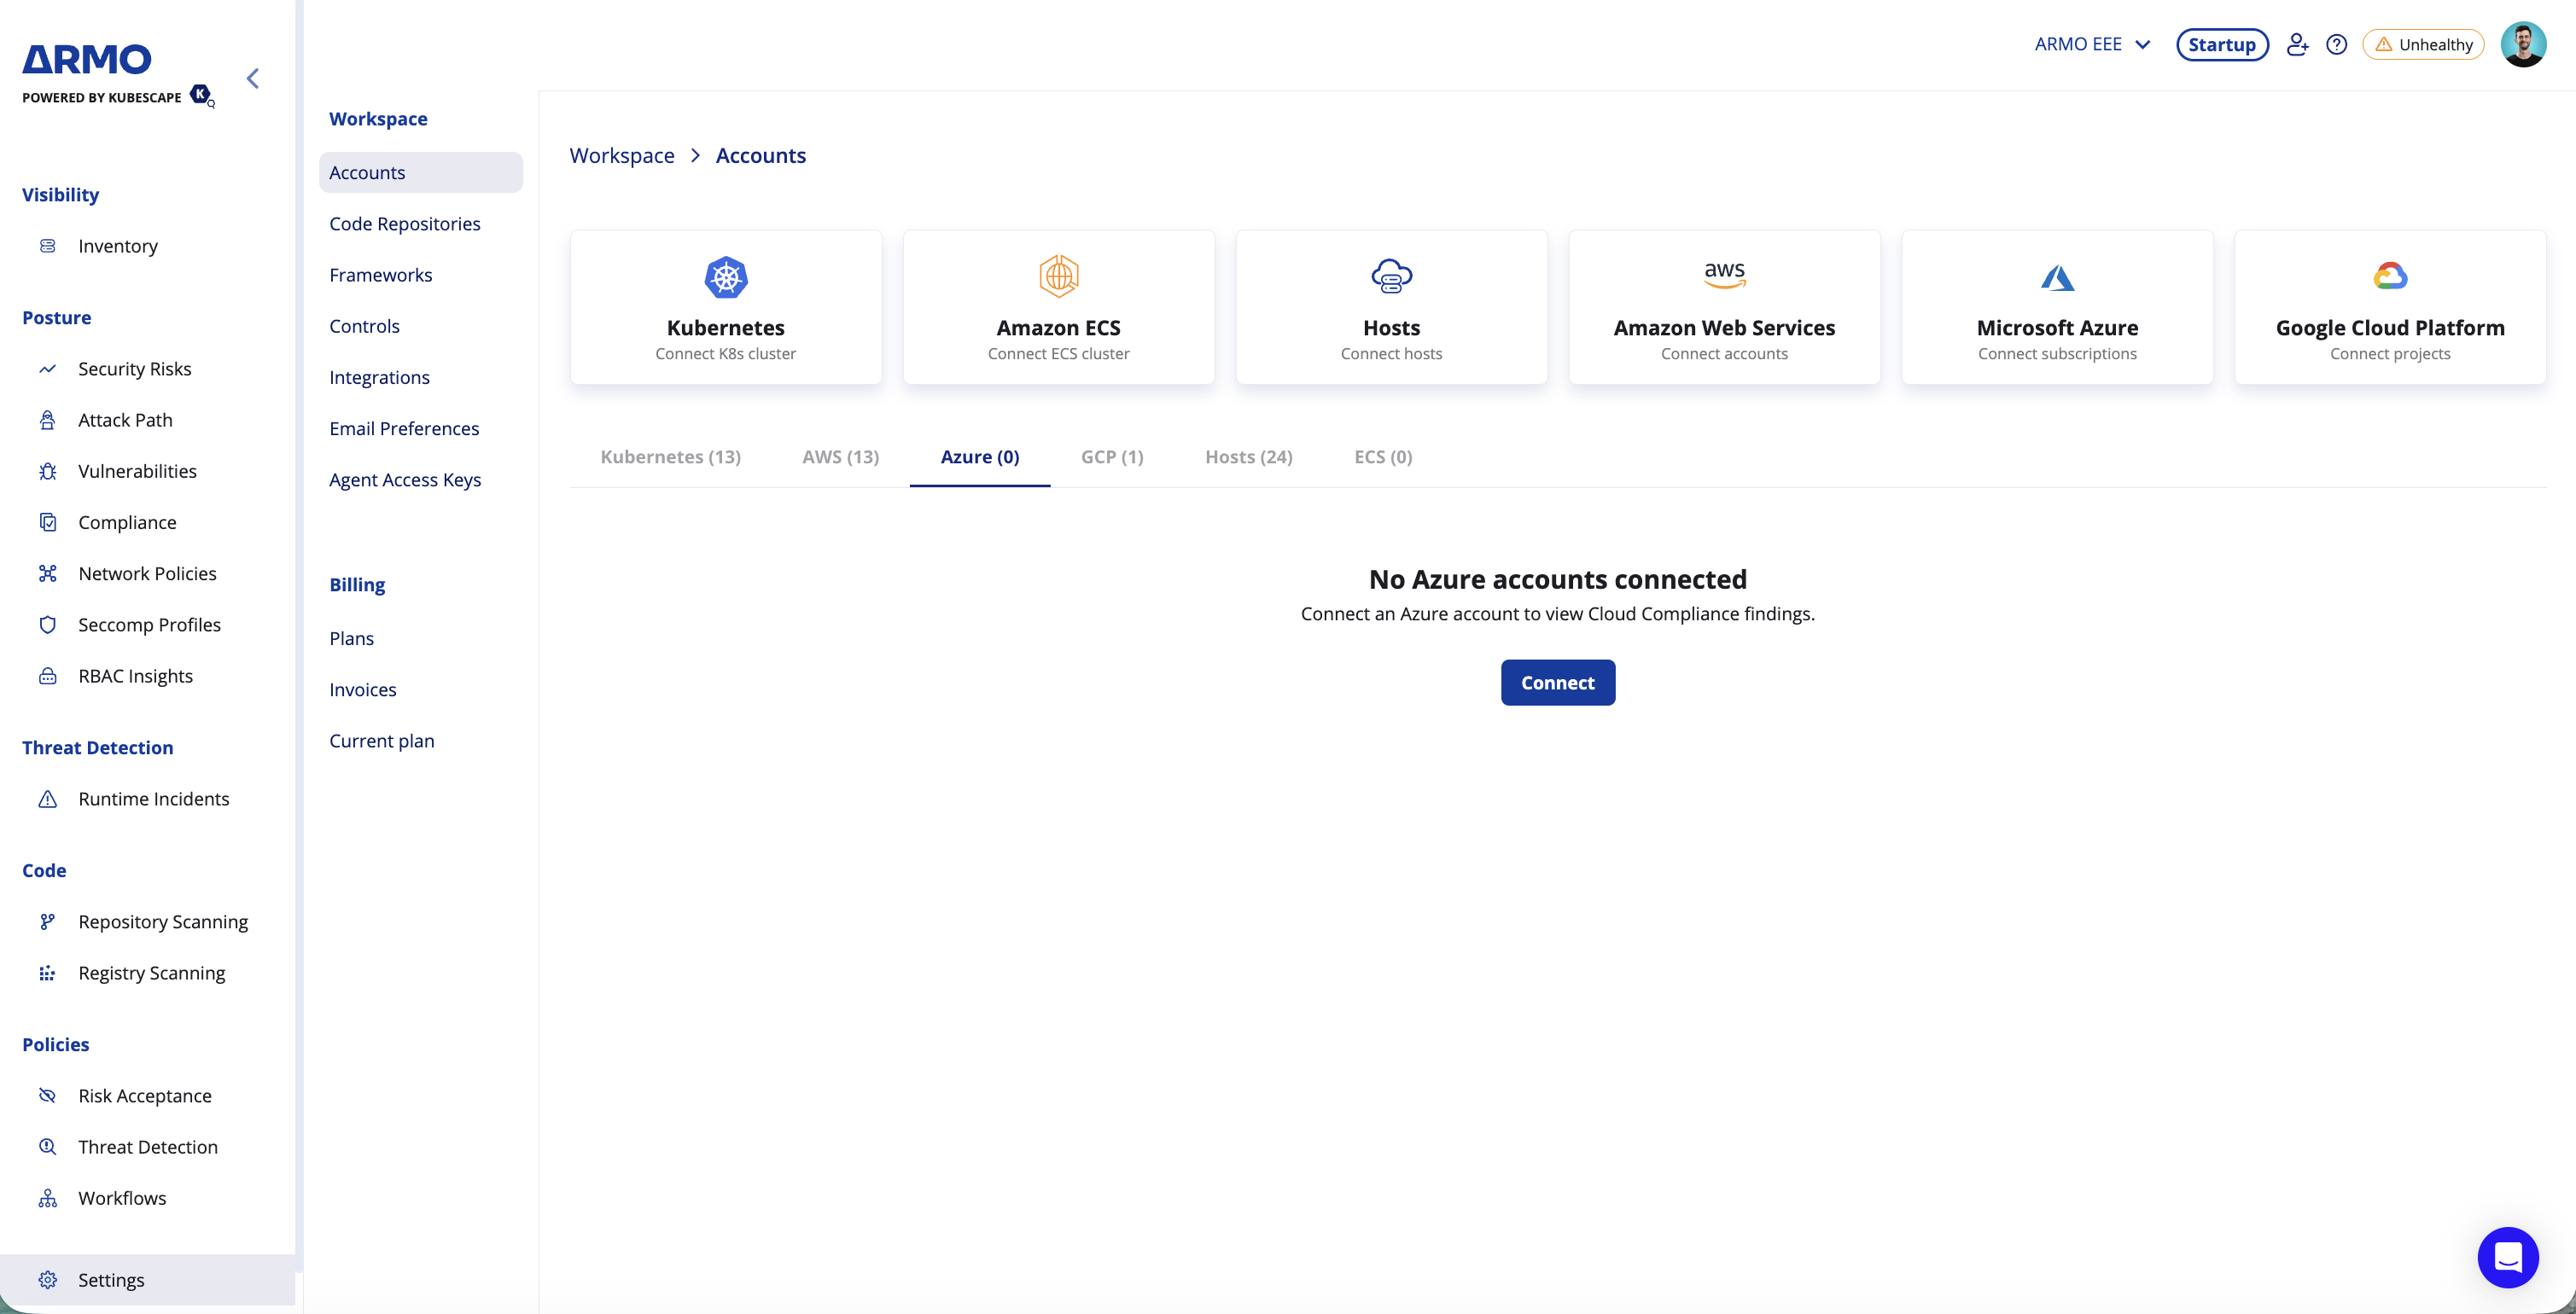
In ARMO, start the Azure account connection flow.
- Go to Settings --> Accounts.
- Select the Azure tab.
- Click Connect.
Step 2: Select Tenant (Multi-Subscription)
In the Connect Azure dialog, select the Azure integration scope.
- Under What will be the integration scope?, select Tenant (Multi-Subscription).
- Under Choose Security Feature, keep CSPM (Cloud Compliance) selected.
- Click Next.
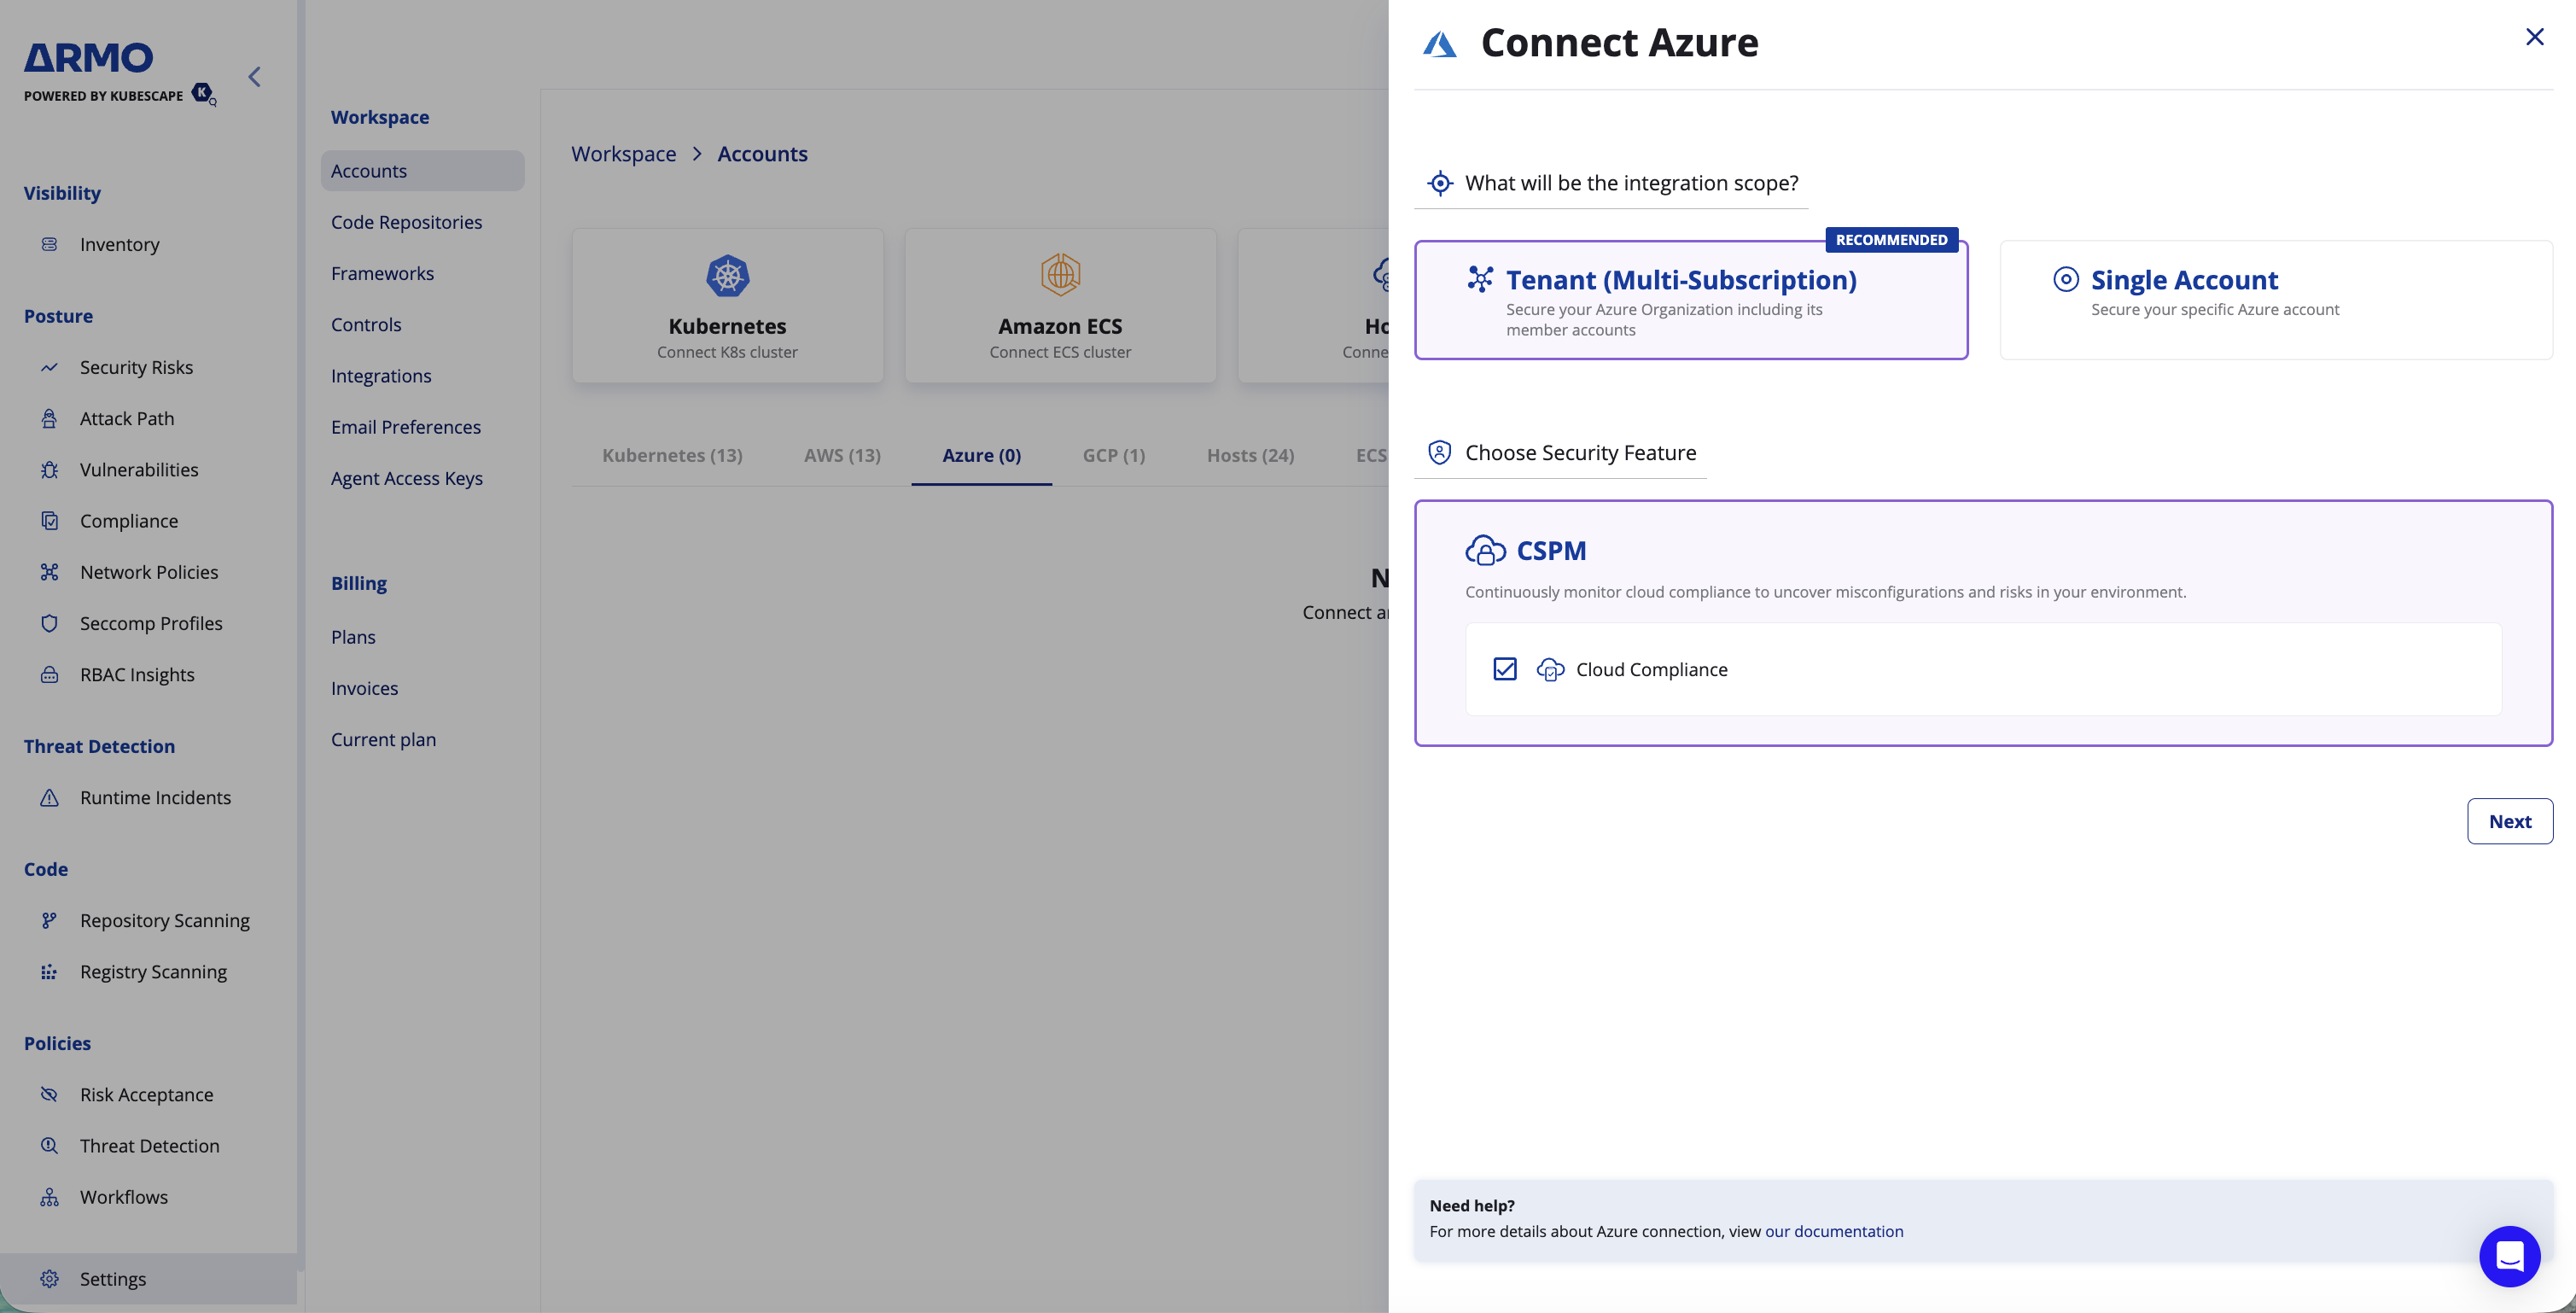
Select Tenant (Multi-Subscription) when you want ARMO to monitor multiple Azure subscriptions under a tenant or management group.
Step 3: Elevate access for tenant management
To manage permissions across all subscriptions, temporarily elevate your access in Microsoft Entra ID.
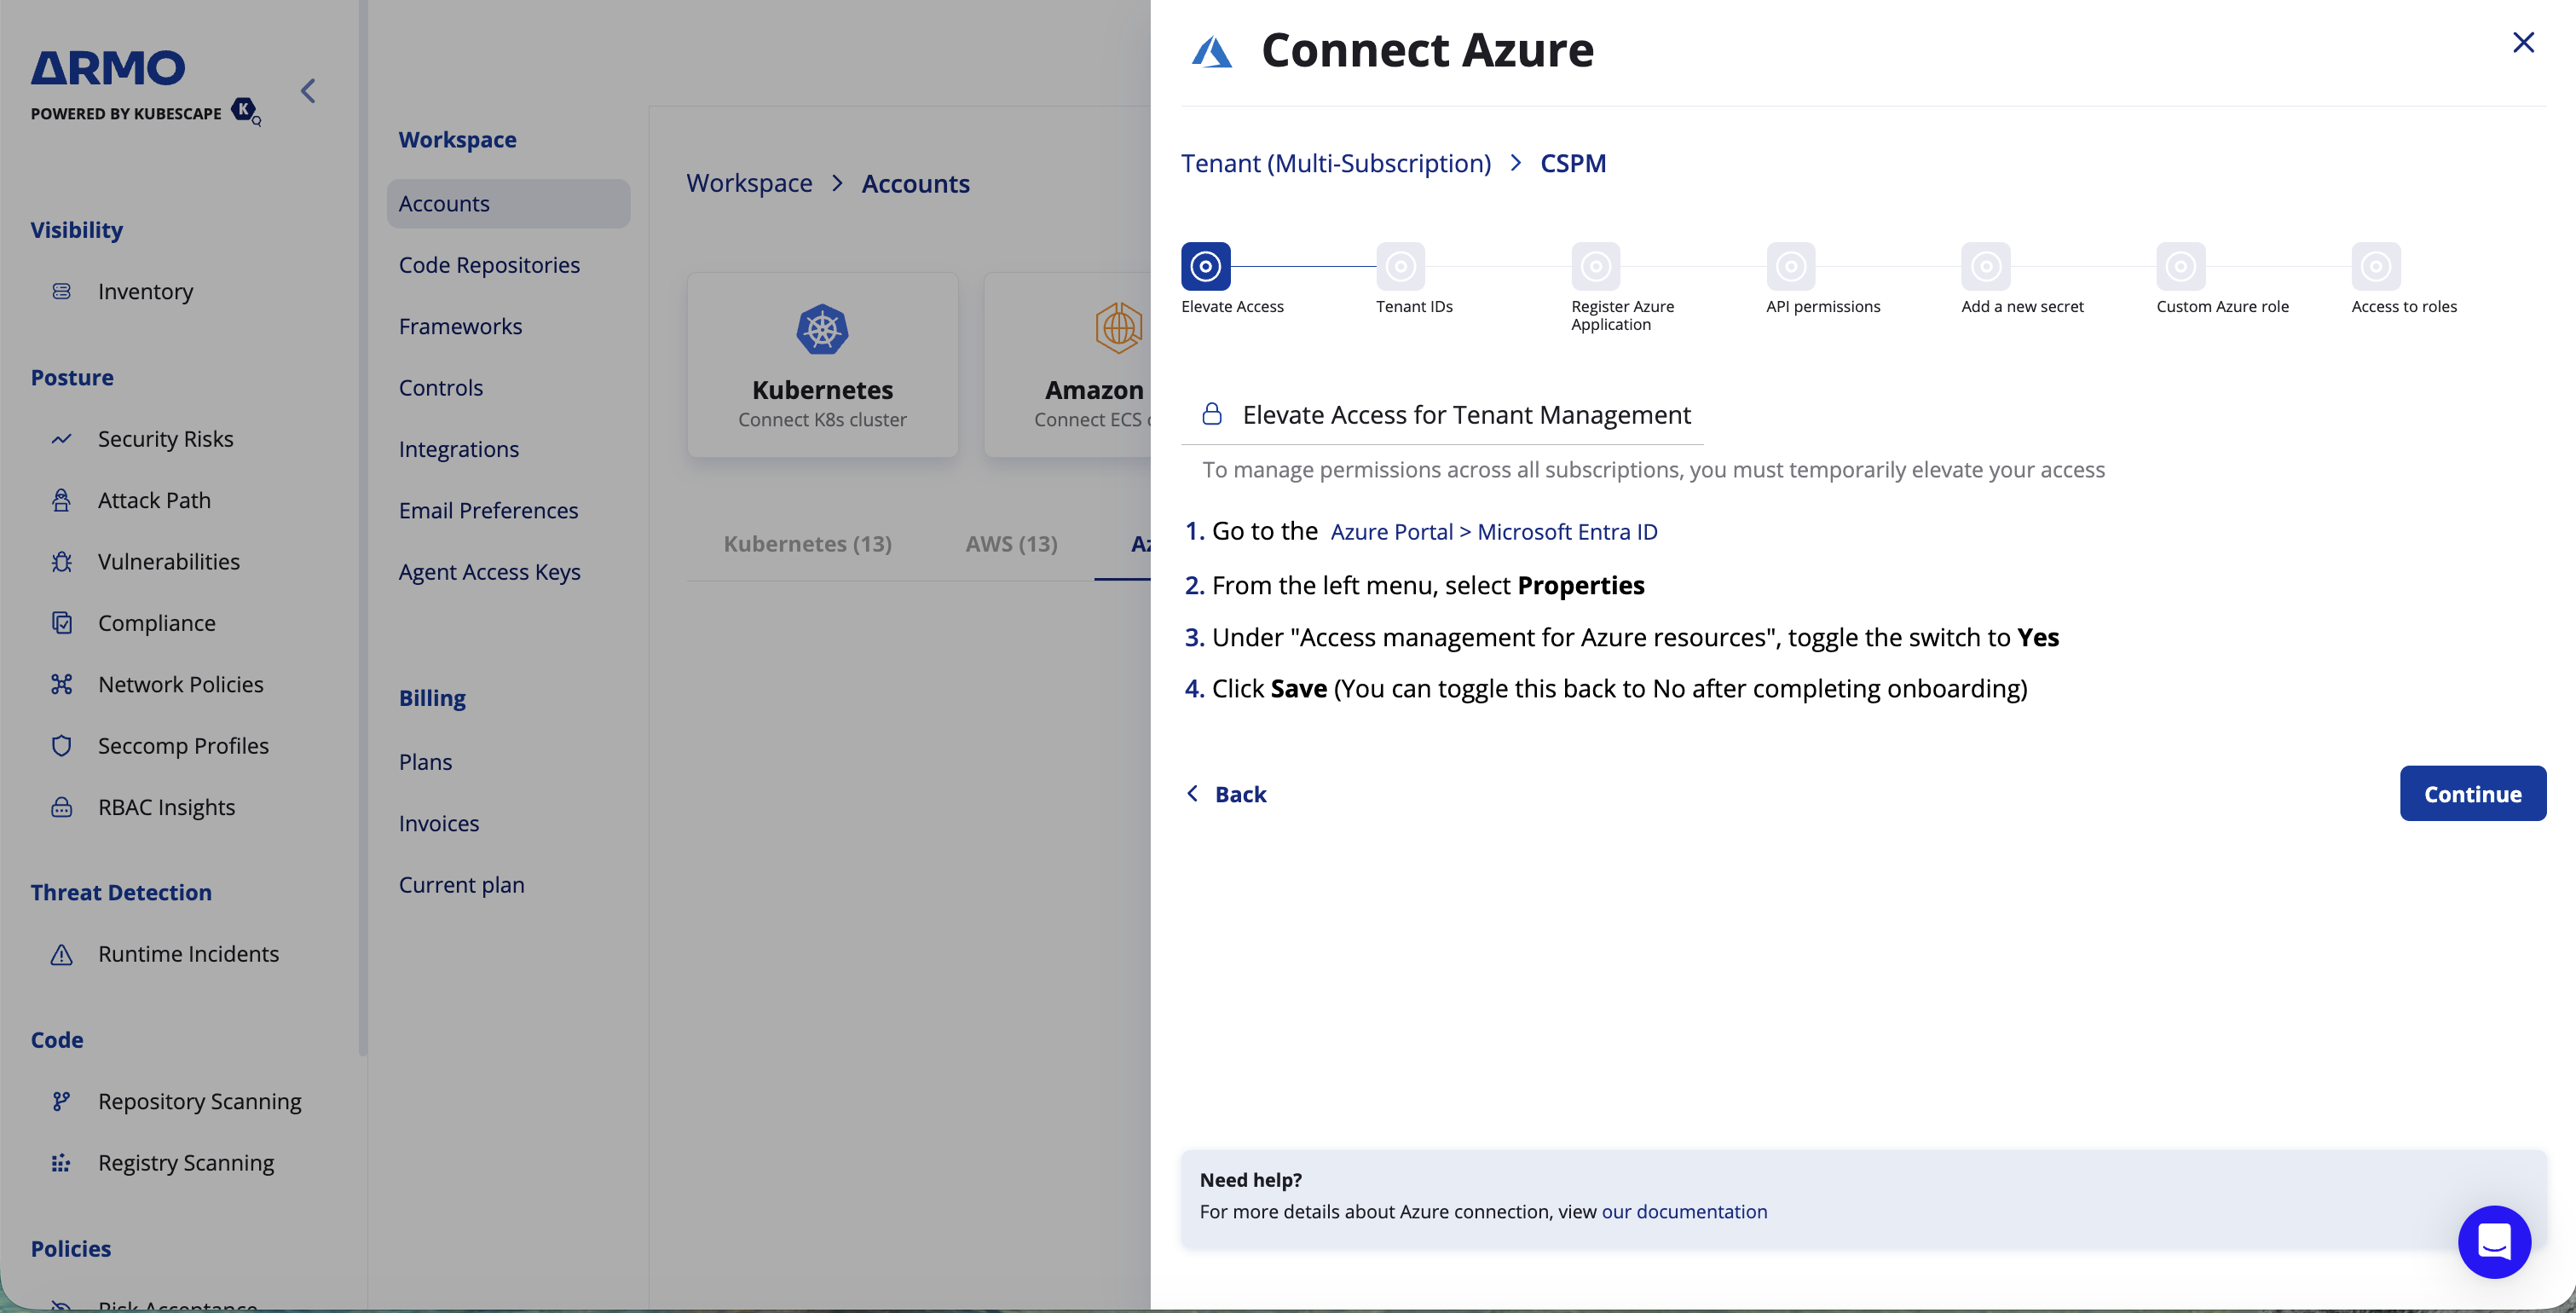
- In the Azure Portal, search for Microsoft Entra ID.
- From the left menu, select Properties.
- Under Access management for Azure resources, toggle the switch to Yes.
- Click Save.
- Return to the ARMO onboarding wizard and click Continue.
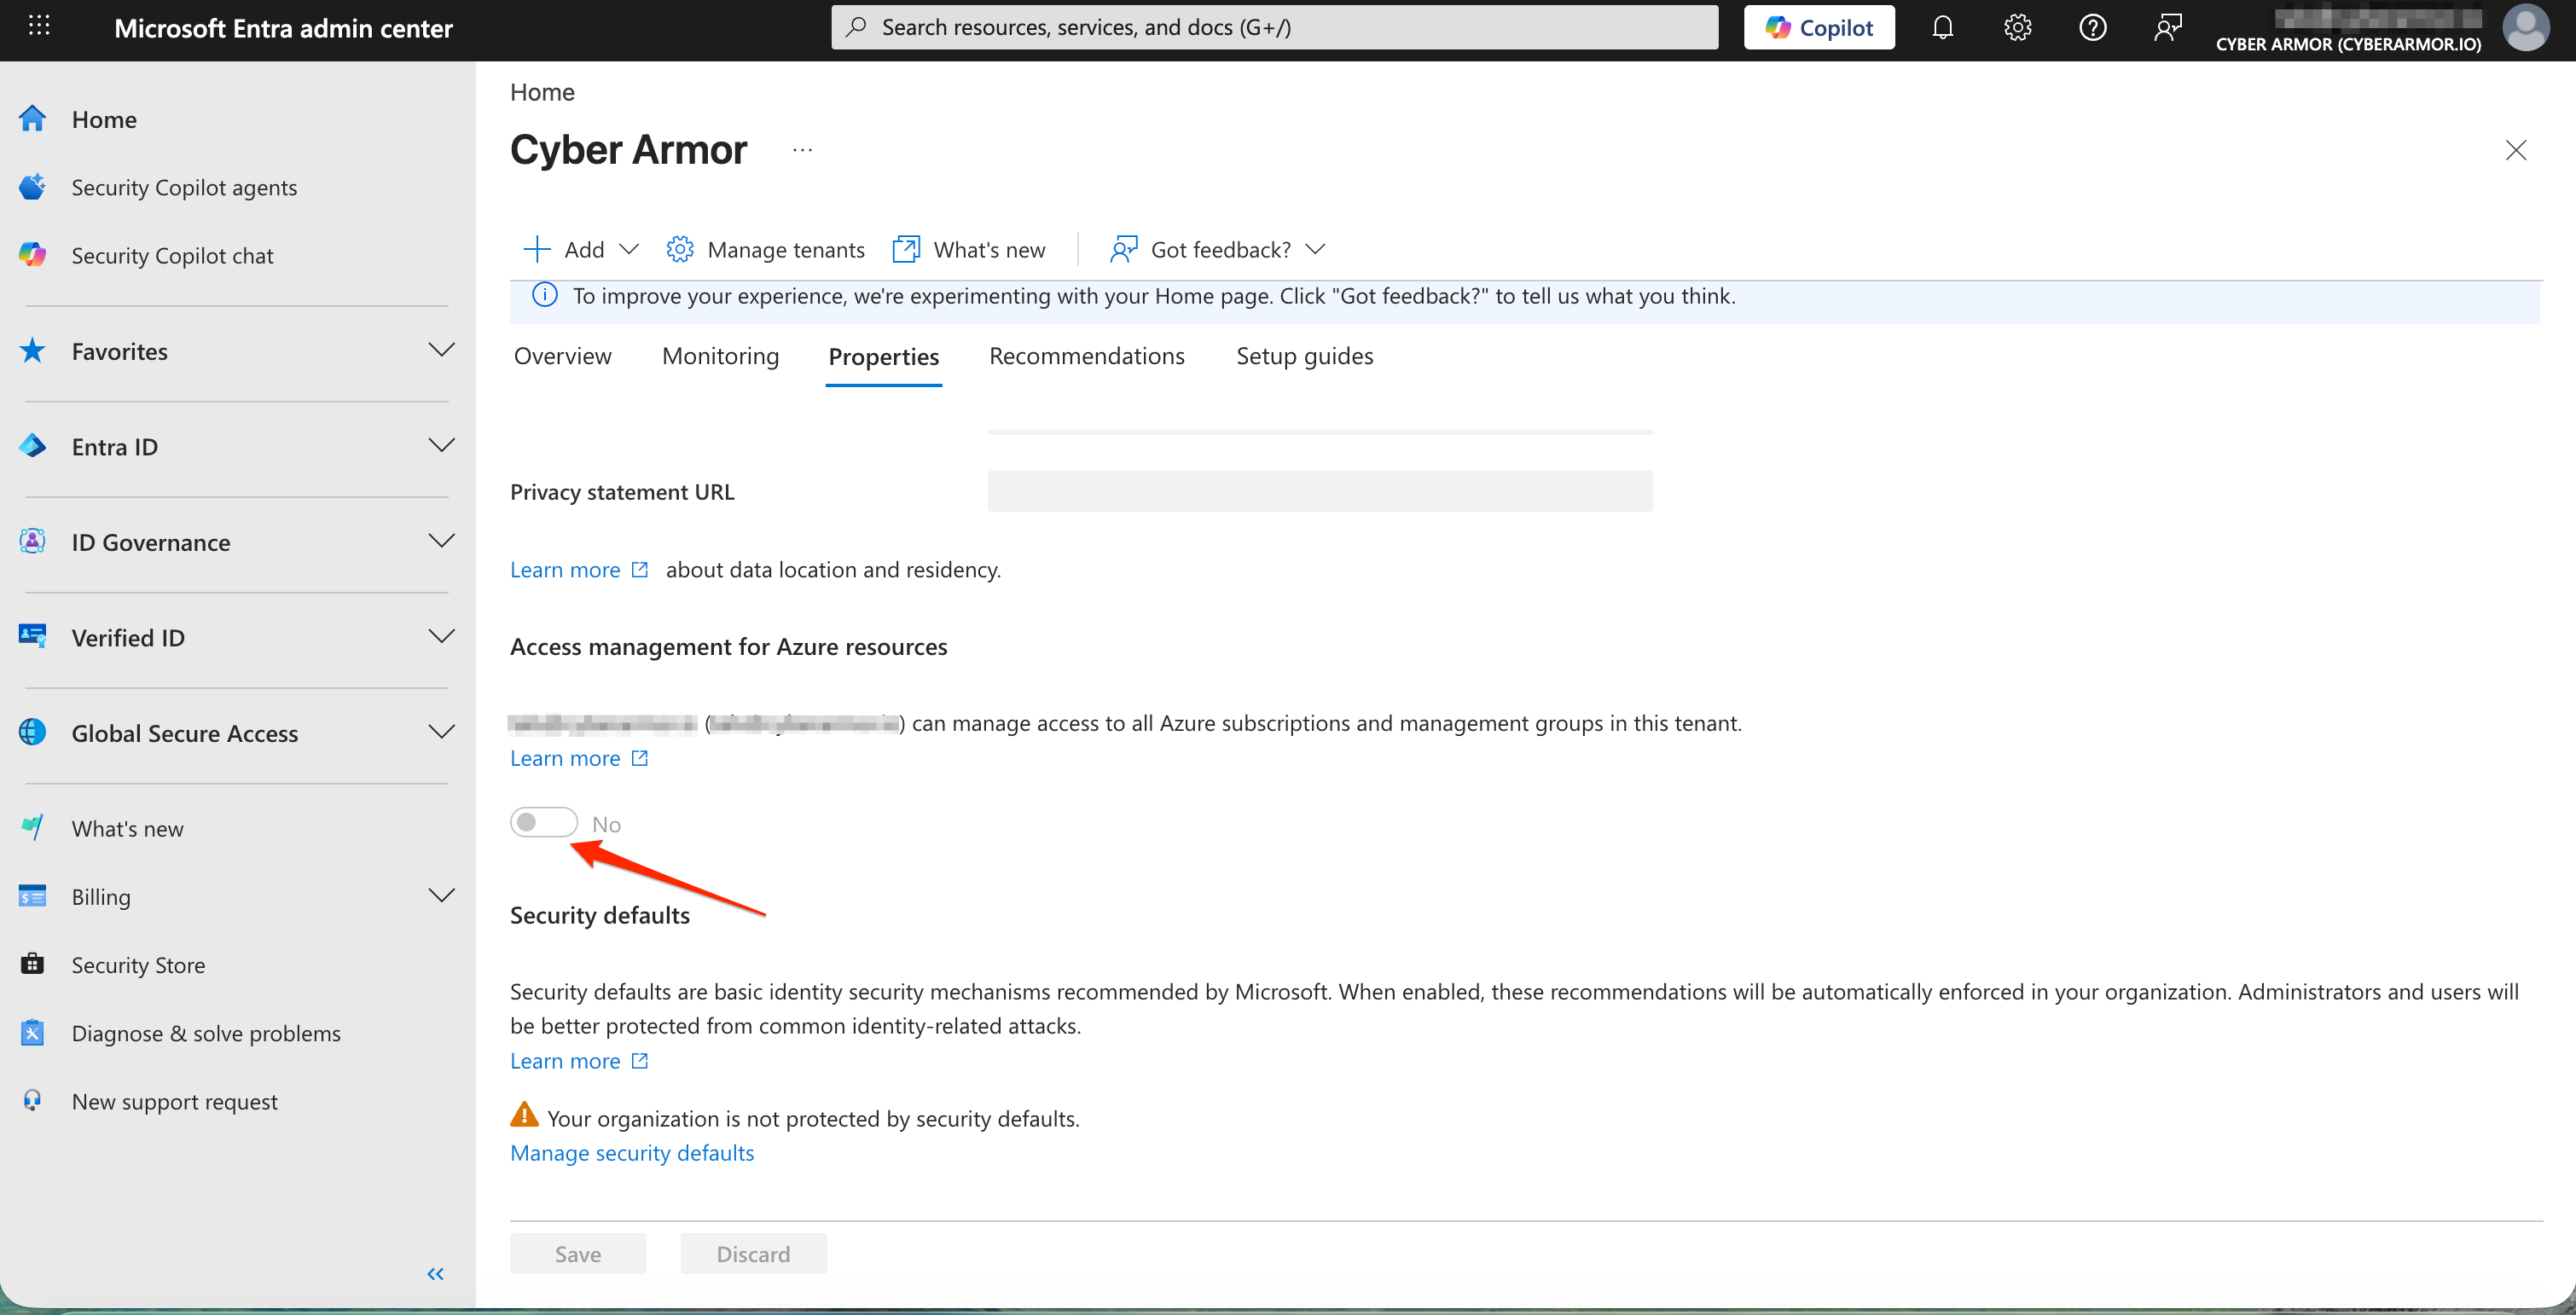
Elevated access is required to manage permissions across subscriptions and management groups during onboarding. You can toggle Access management for Azure resources back to No after the onboarding process is complete.
Step 4: Get the Tenant ID and Management Group ID
Next, collect the Azure identifiers required to define the tenant or management group scope ARMO should connect to.
- In the Azure Portal, search for Microsoft Entra ID.
- Copy the Tenant ID.
- Return to the ARMO onboarding wizard and paste the value into Tenant ID.
- Set the Management Group ID according to the scope you want:
- To connect the entire tenant, leave Management Group ID empty. ARMO connects at the tenant root and covers all subscriptions in the tenant.
- To connect a specific management group, search for Management Groups in the Azure Portal, copy its Management Group ID, and paste it into Management Group ID.
- In Name, enter a name for the Azure connection as it should appear in ARMO.
- Click Continue.
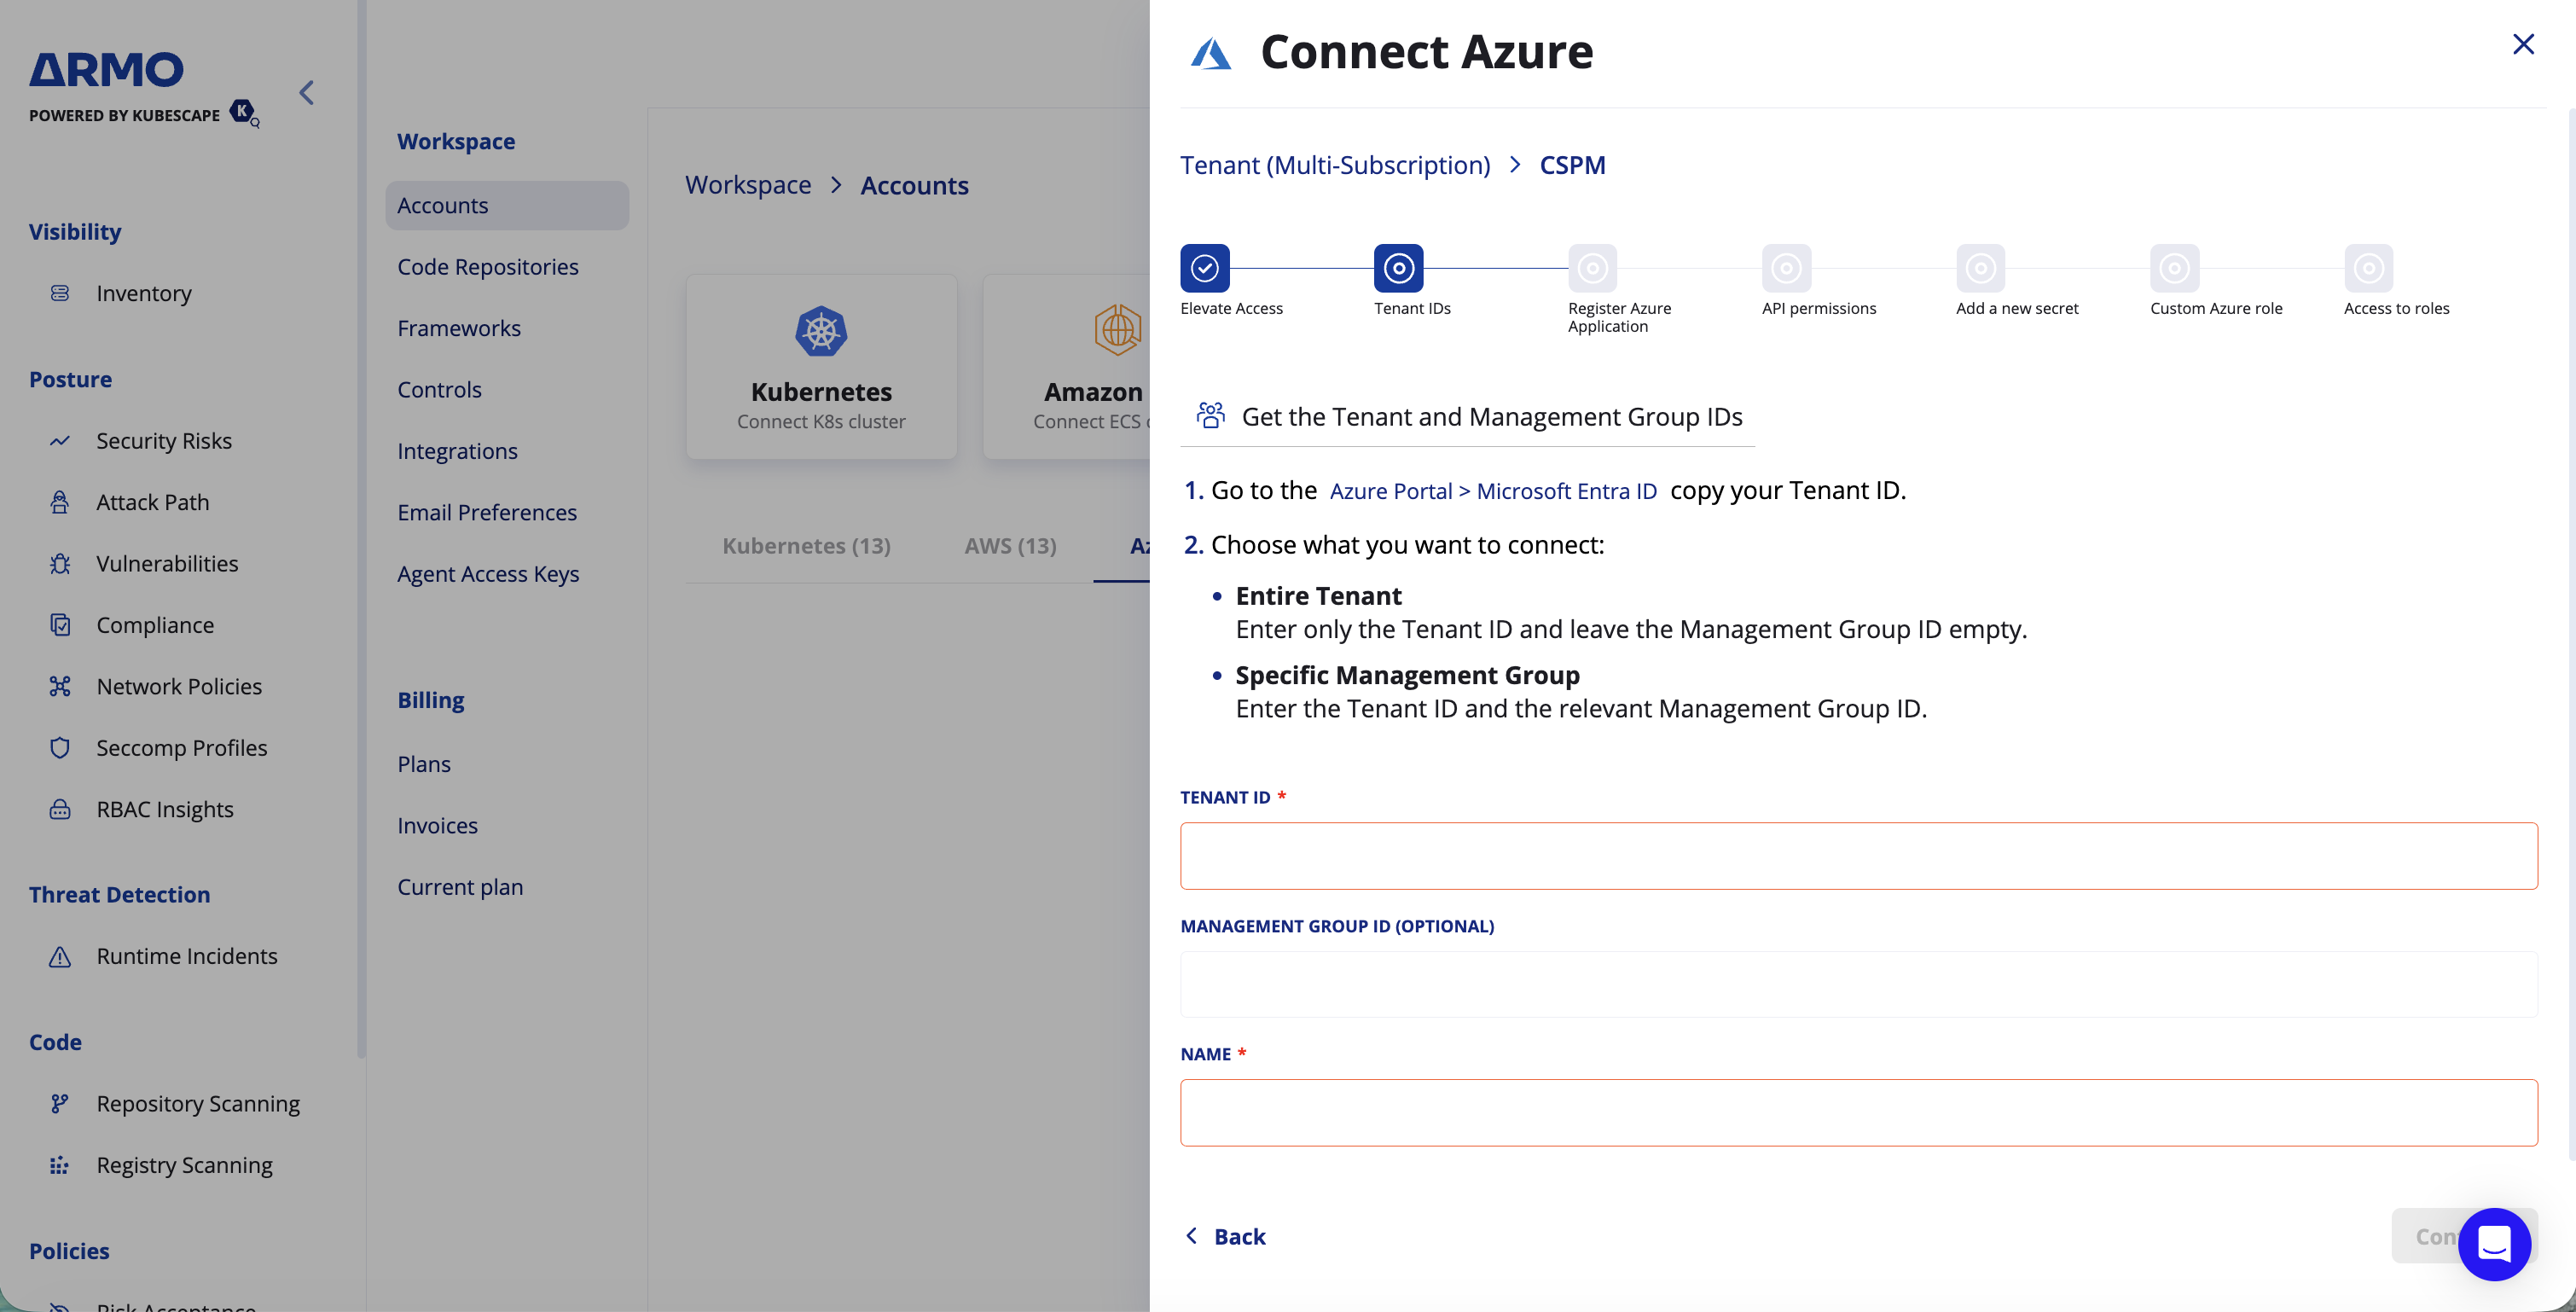
The Management Group ID field is optional. Leave it empty to connect the entire tenant, or provide a management group ID to scope the connection to that management group and the subscriptions beneath it.
The Name field is used to identify this Azure connection in ARMO. Use a clear name that helps your team recognize the connected tenant or management group.
Step 5: Register an Azure application
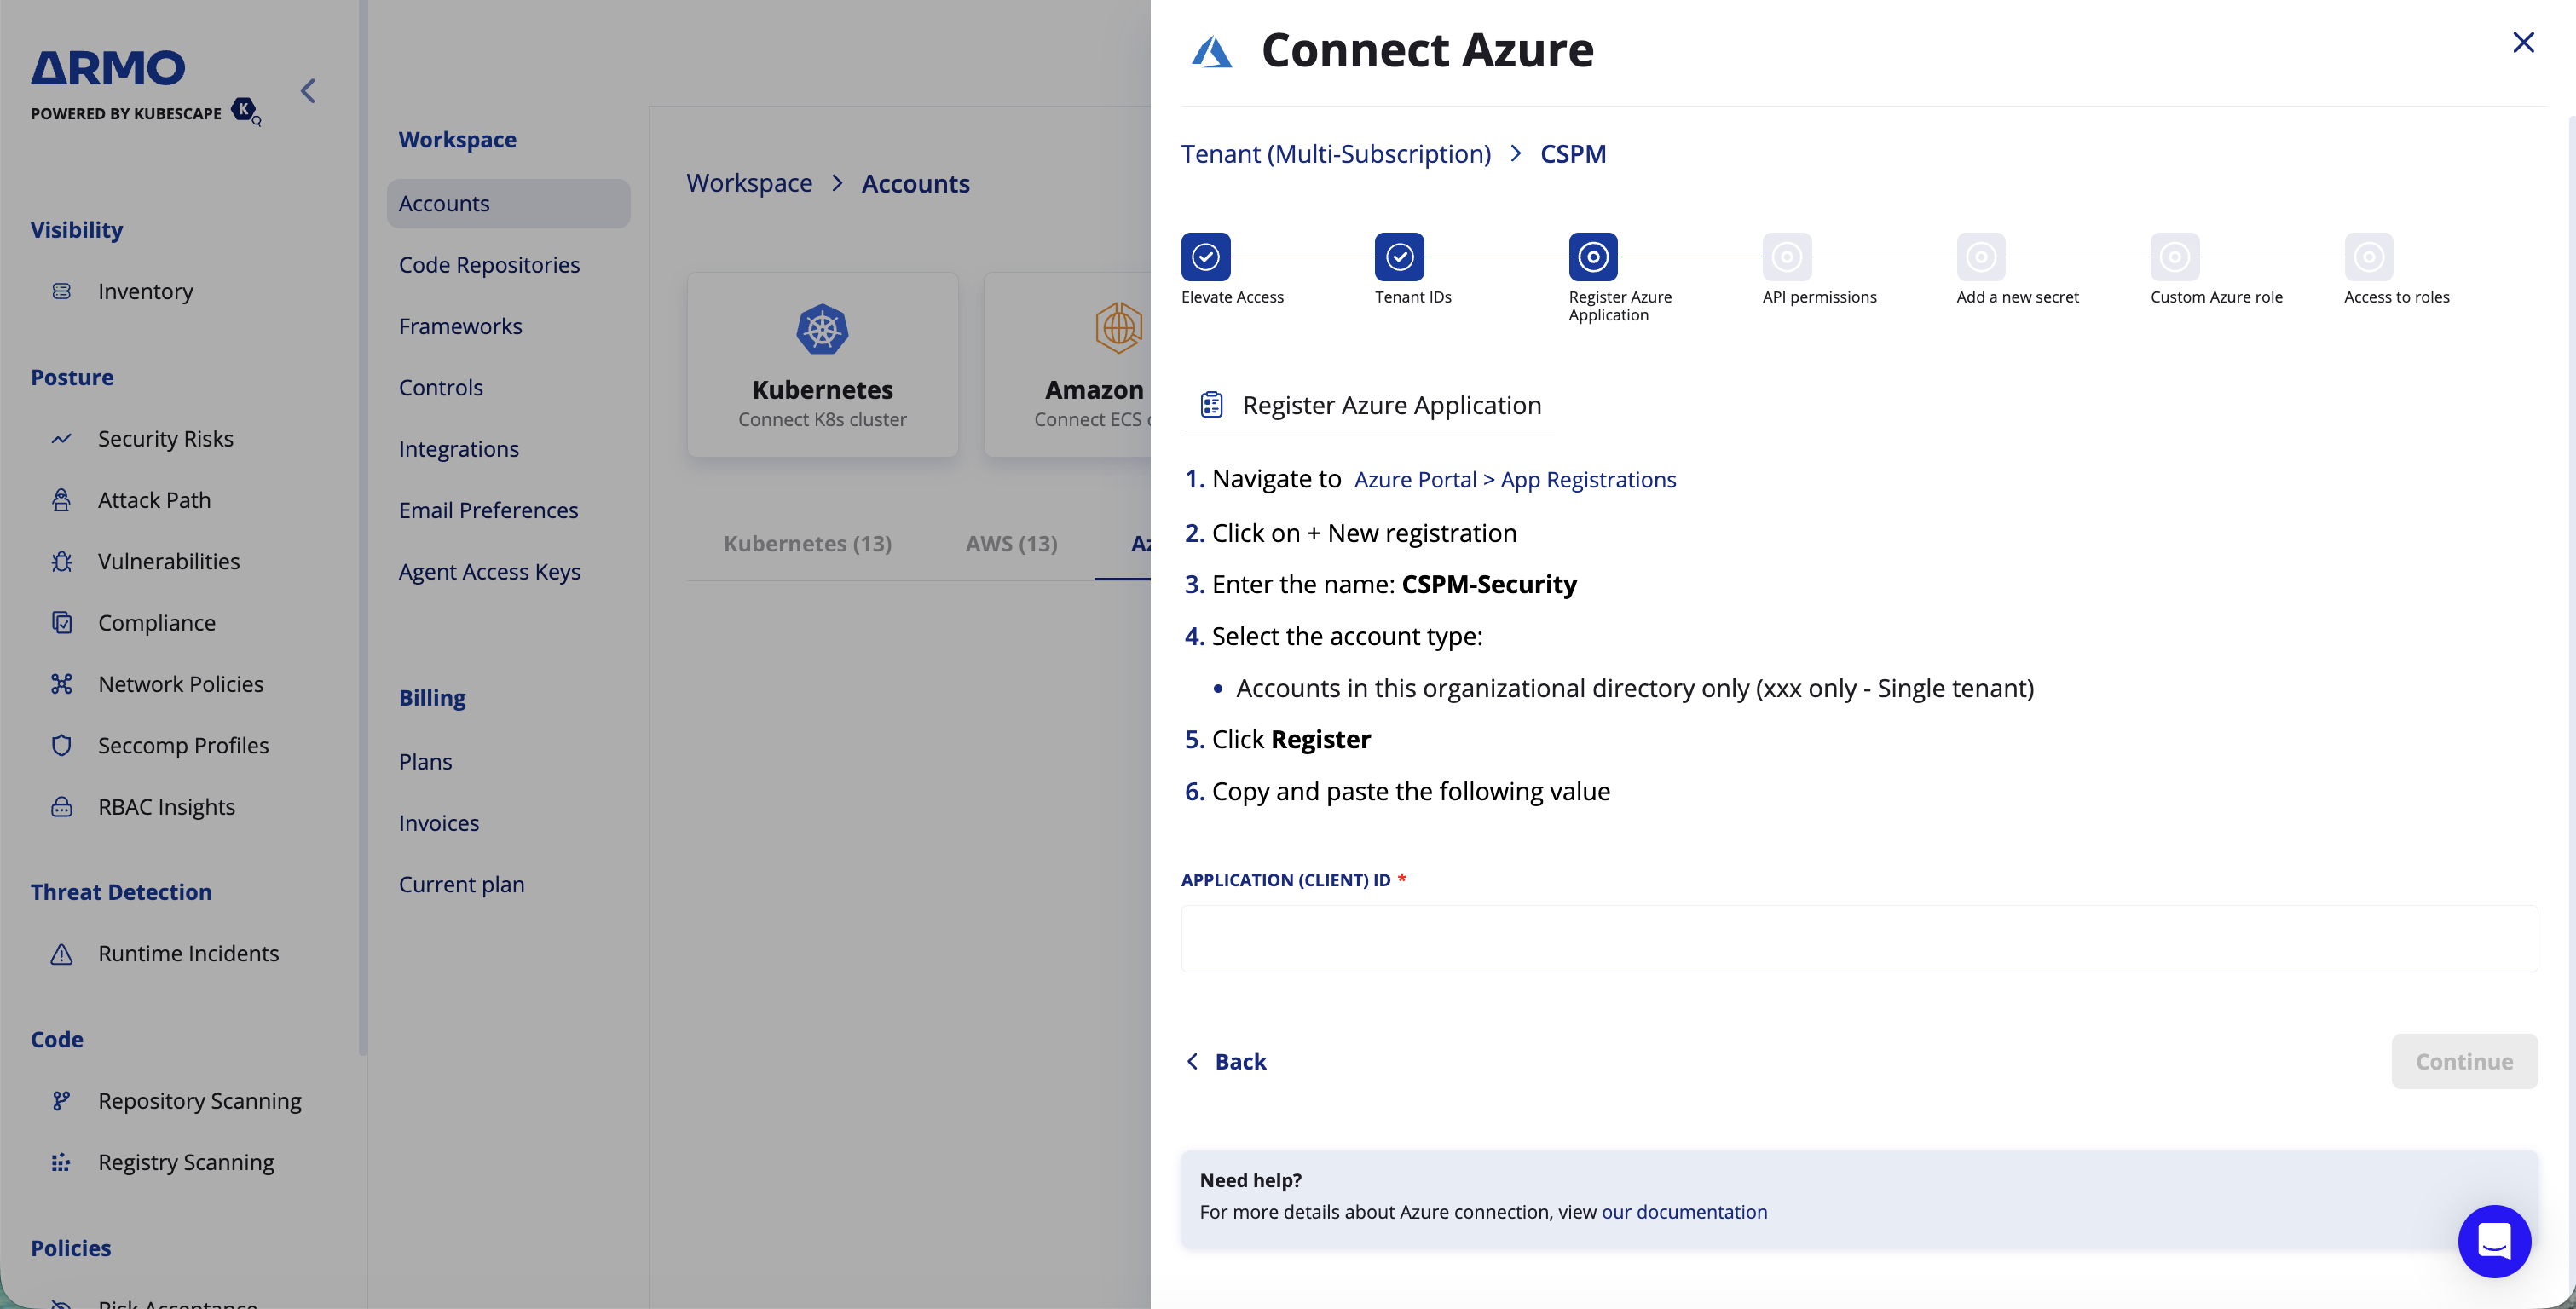
Next, create an Azure application that ARMO will use to access the connected tenant or management group.
-
In the Azure Portal, go to Microsoft Entra ID.
-
From the left menu, select App registrations.
-
Click + New registration.
-
In Name, enter a name for the application, for example:
CSPM-Security.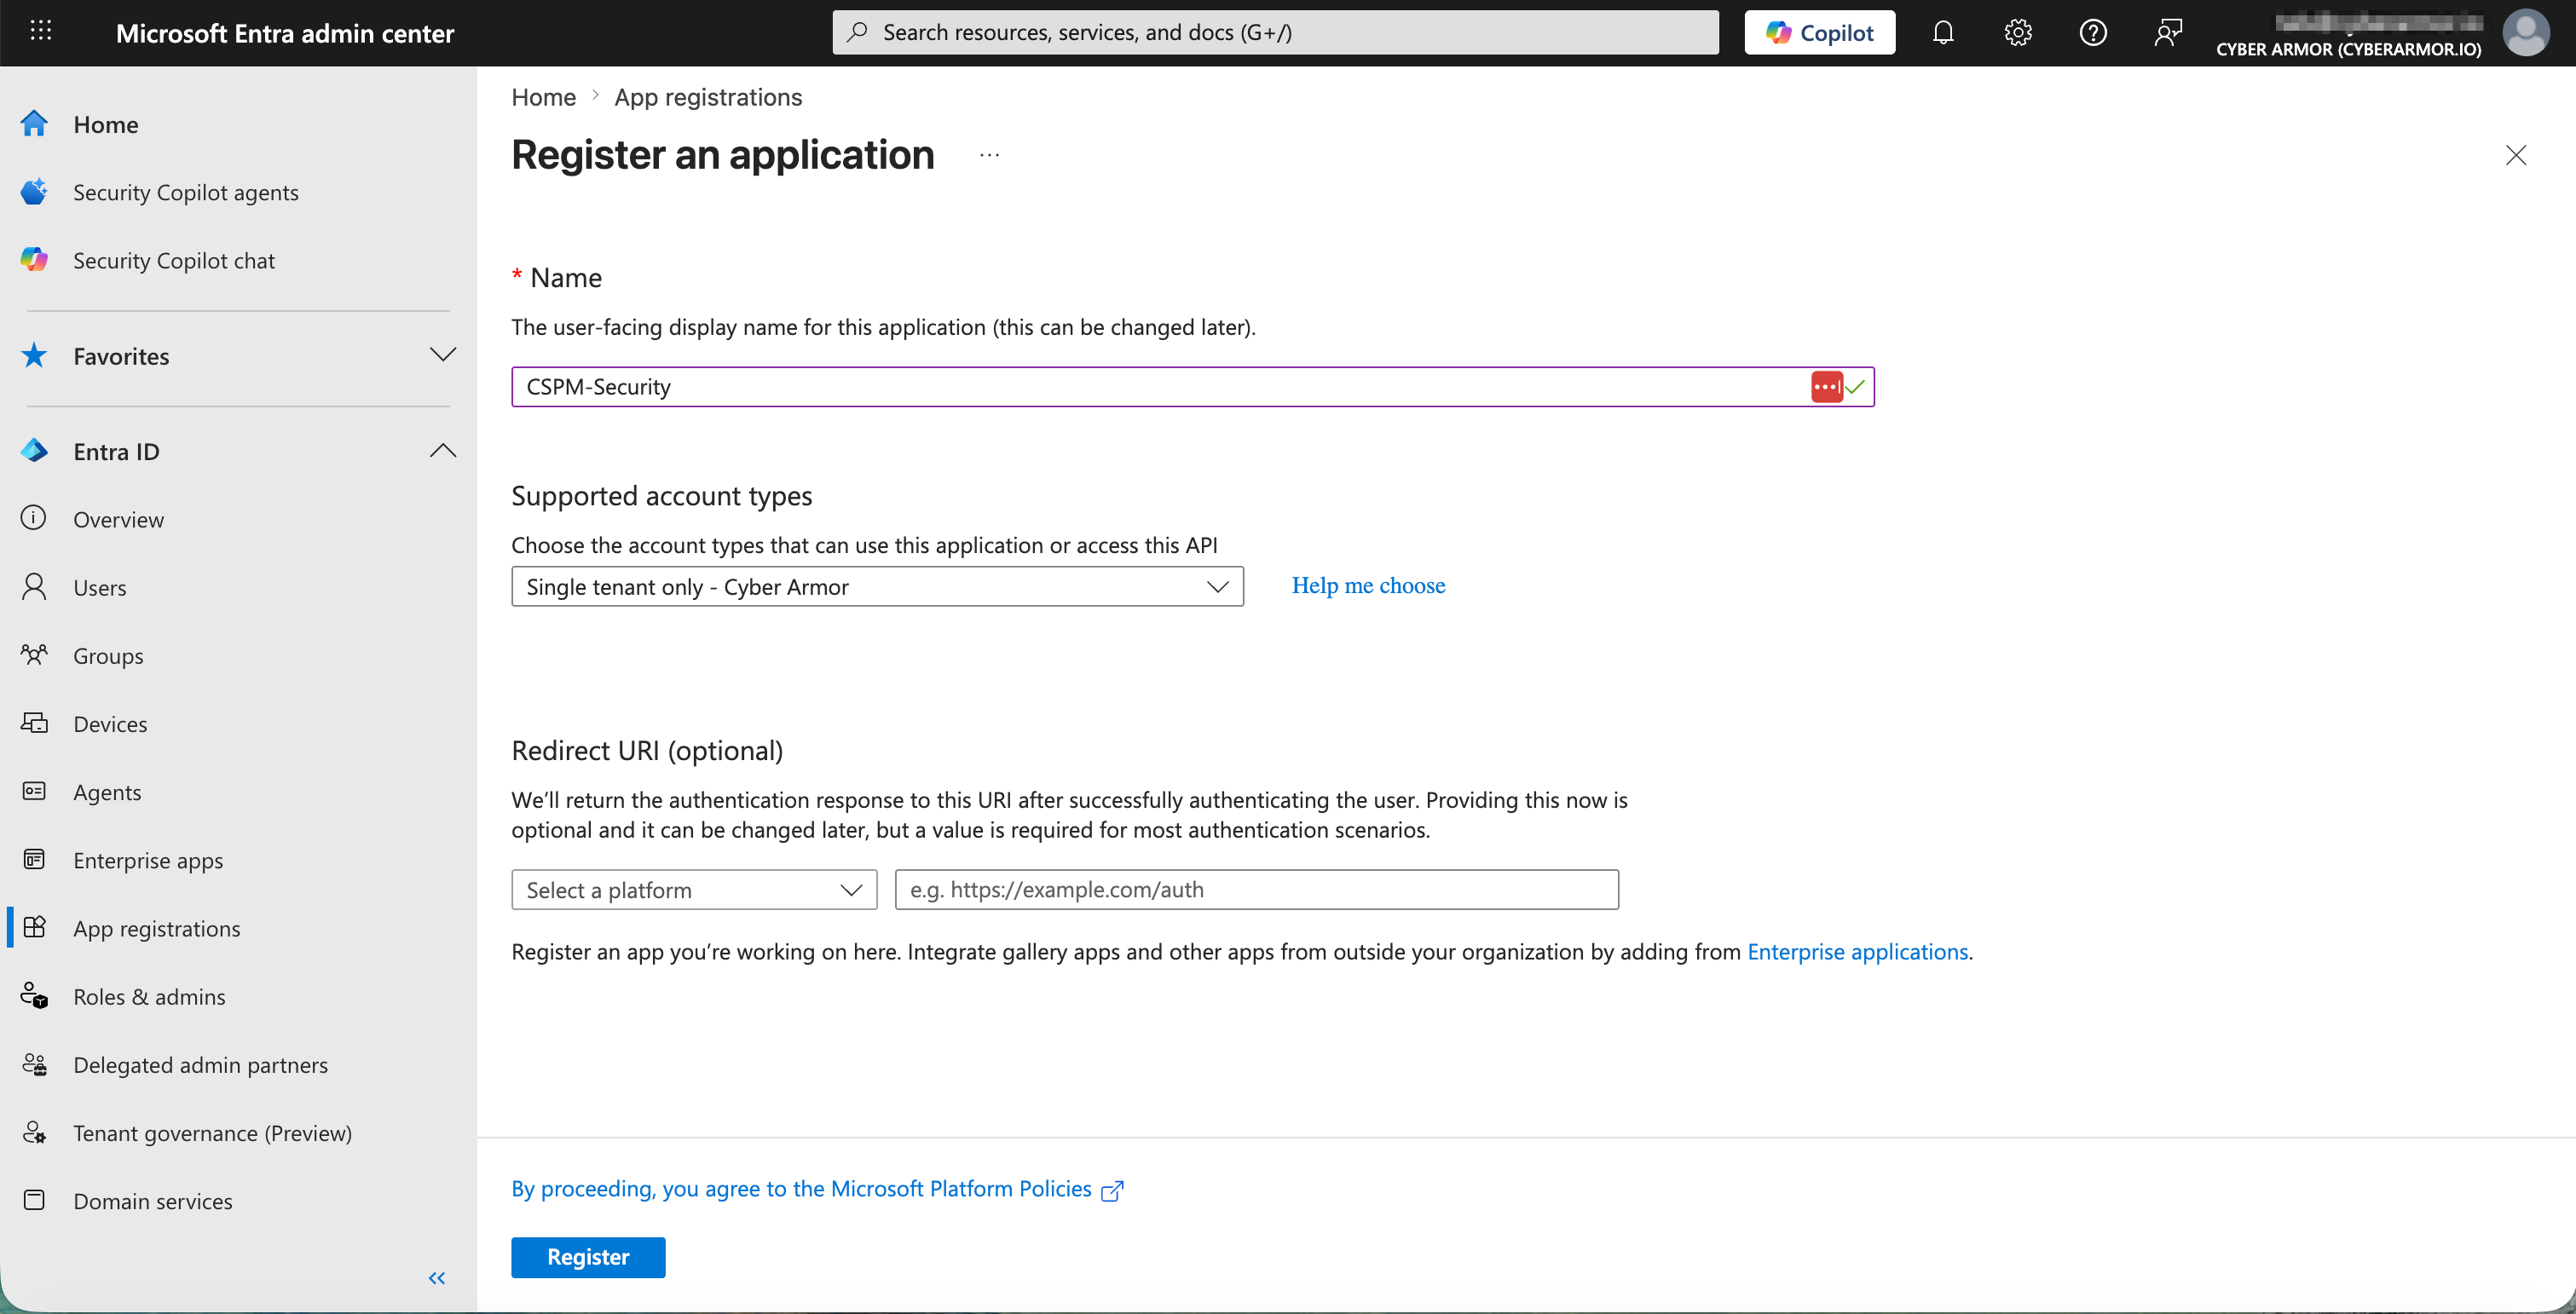
The application name can be customized. Use a clear name, such as
CSPM-Security, so it is easy to identify later when assigning roles. -
Under Supported account types, select Accounts in this organizational directory only.
-
Click Register.
-
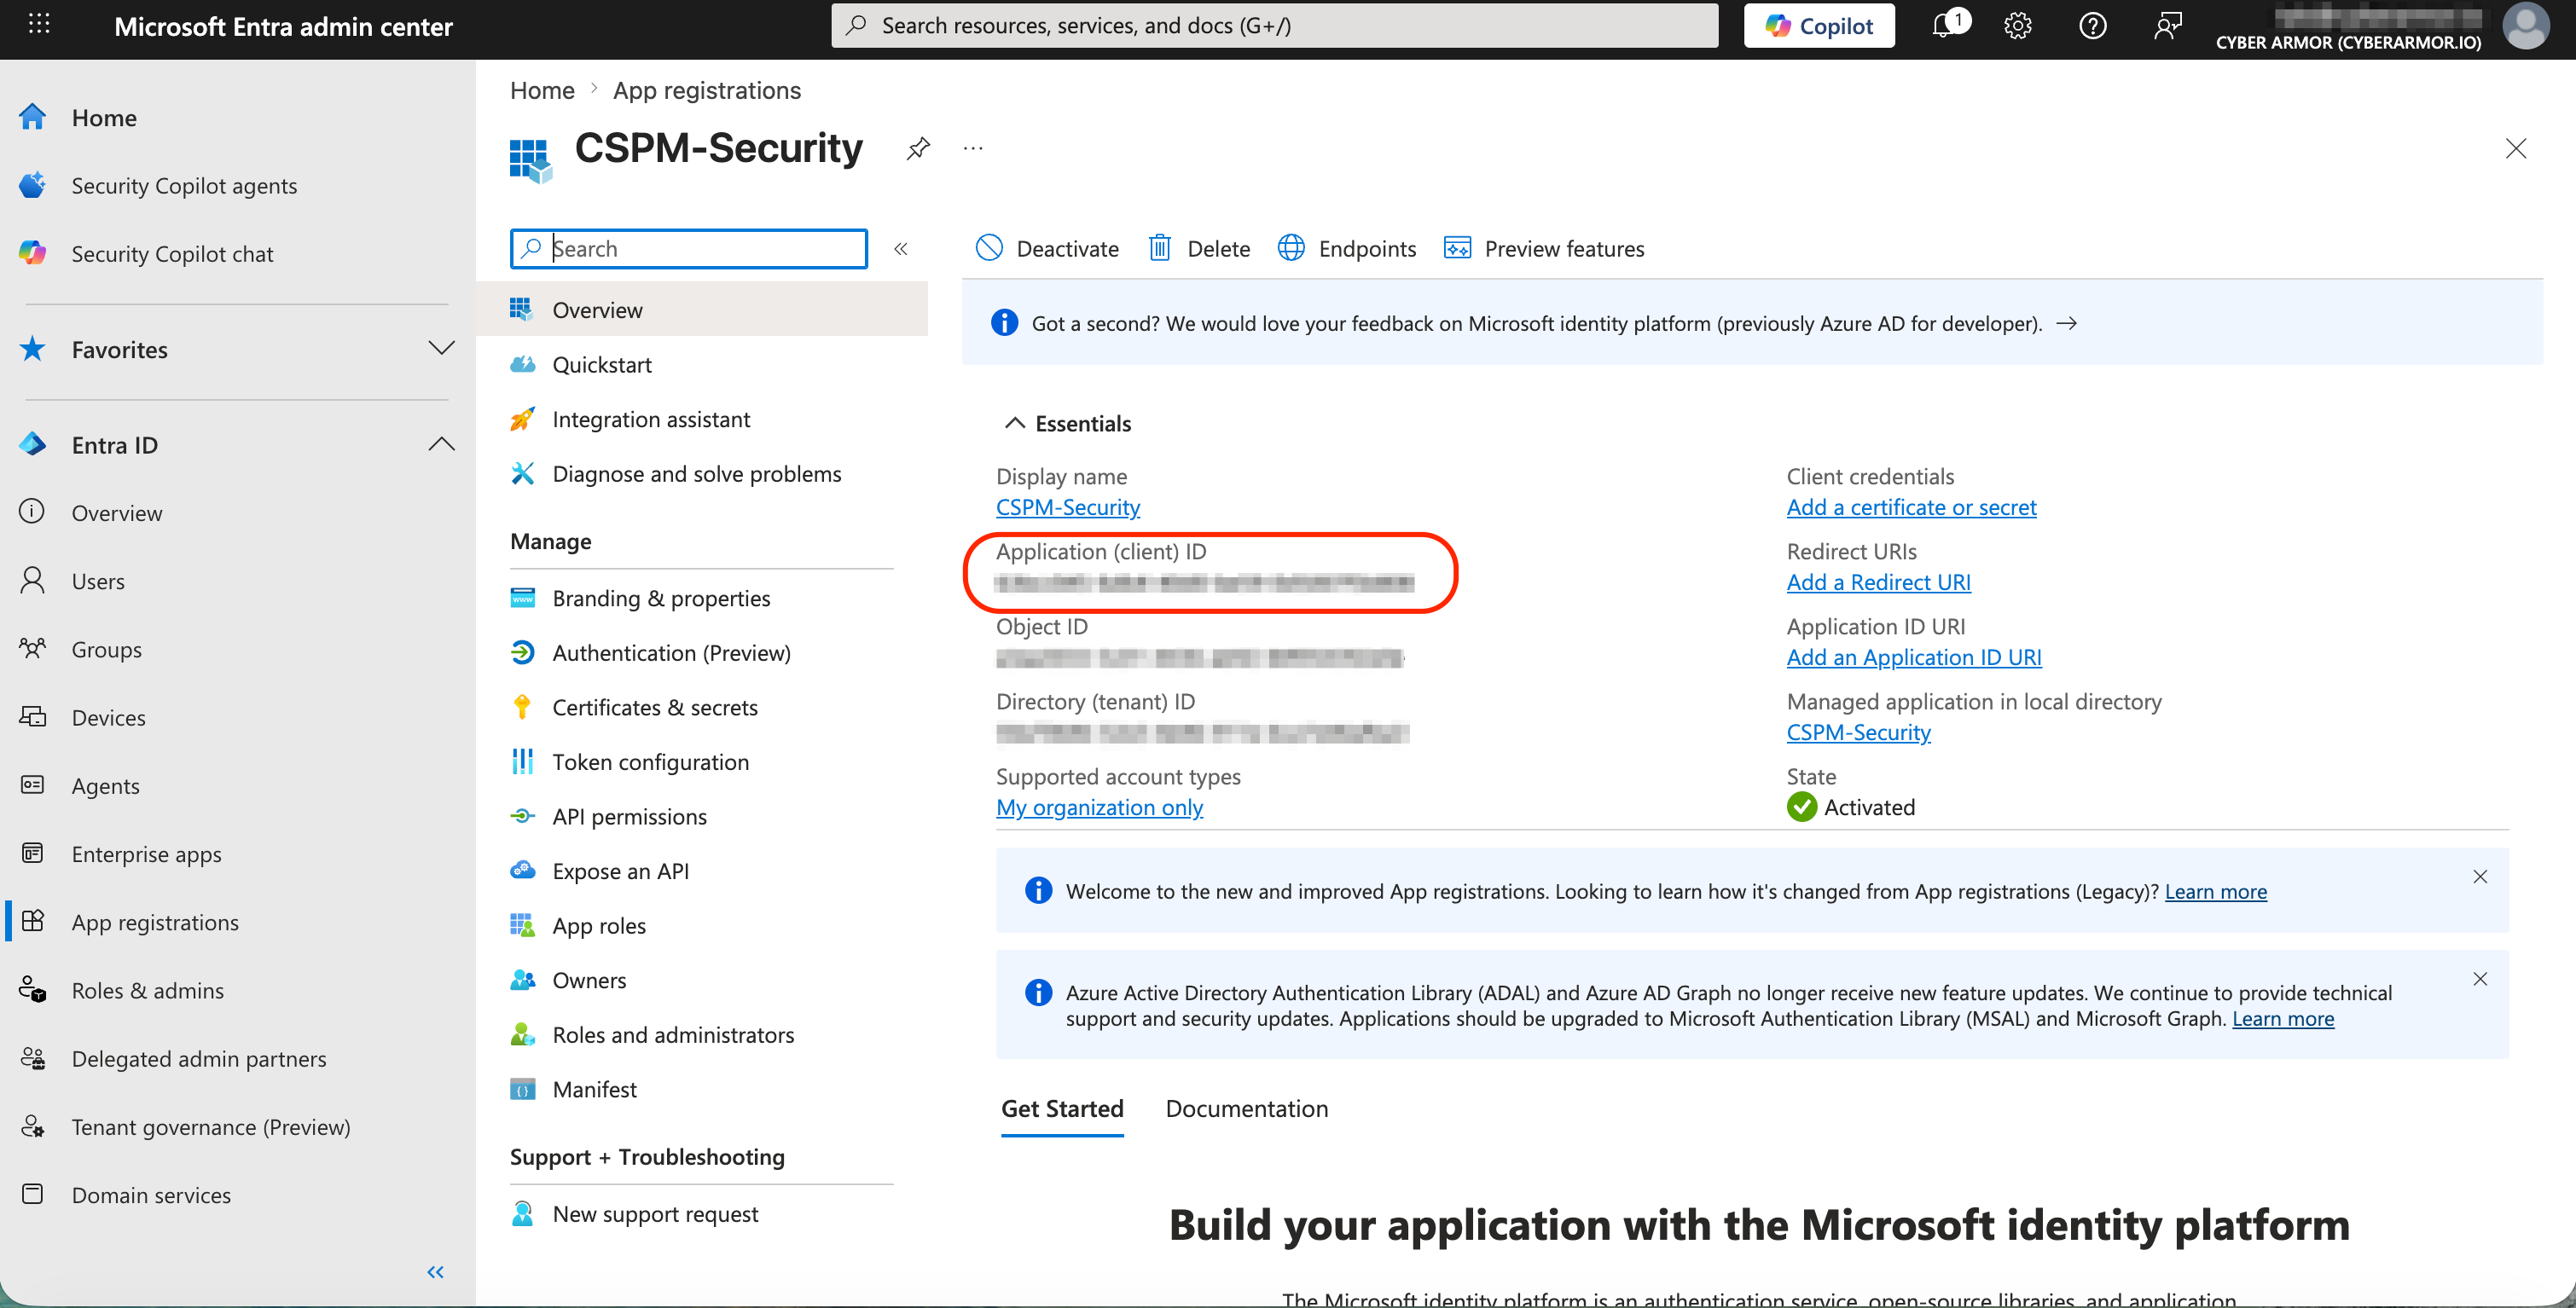
After the application is created, copy the Application (client) ID.
-
Return to the ARMO onboarding wizard and paste the value into Application (Client) ID.
-
Click Continue.
Step 6: Add Microsoft Graph API permissions
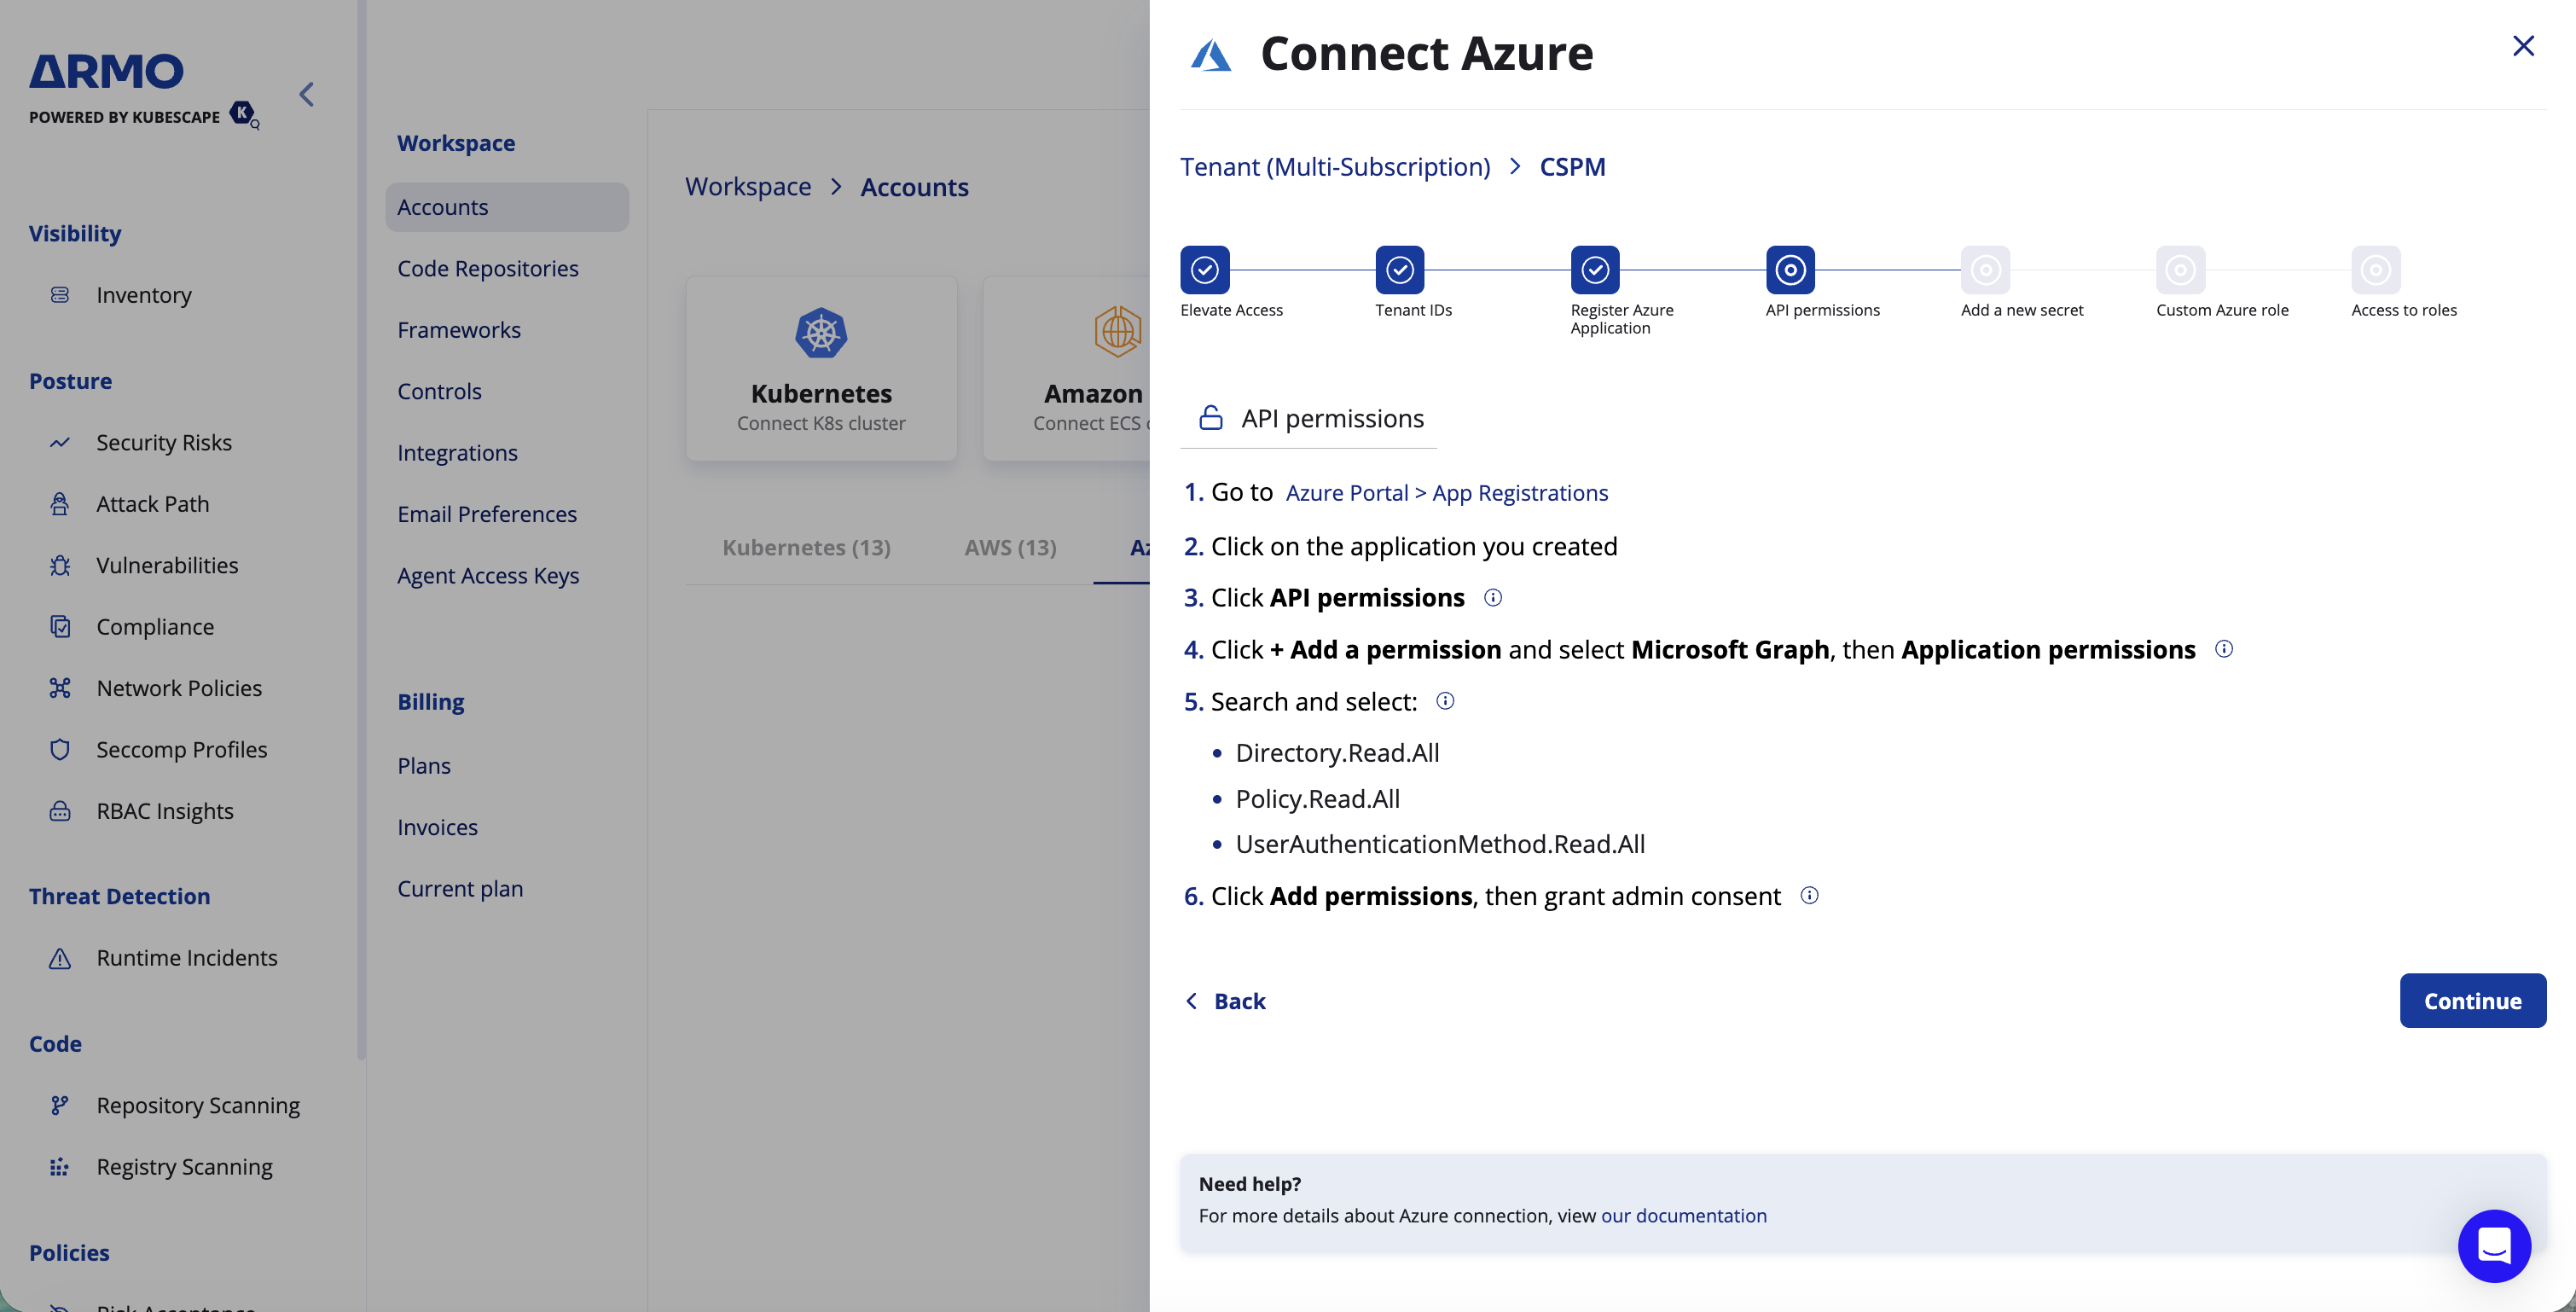
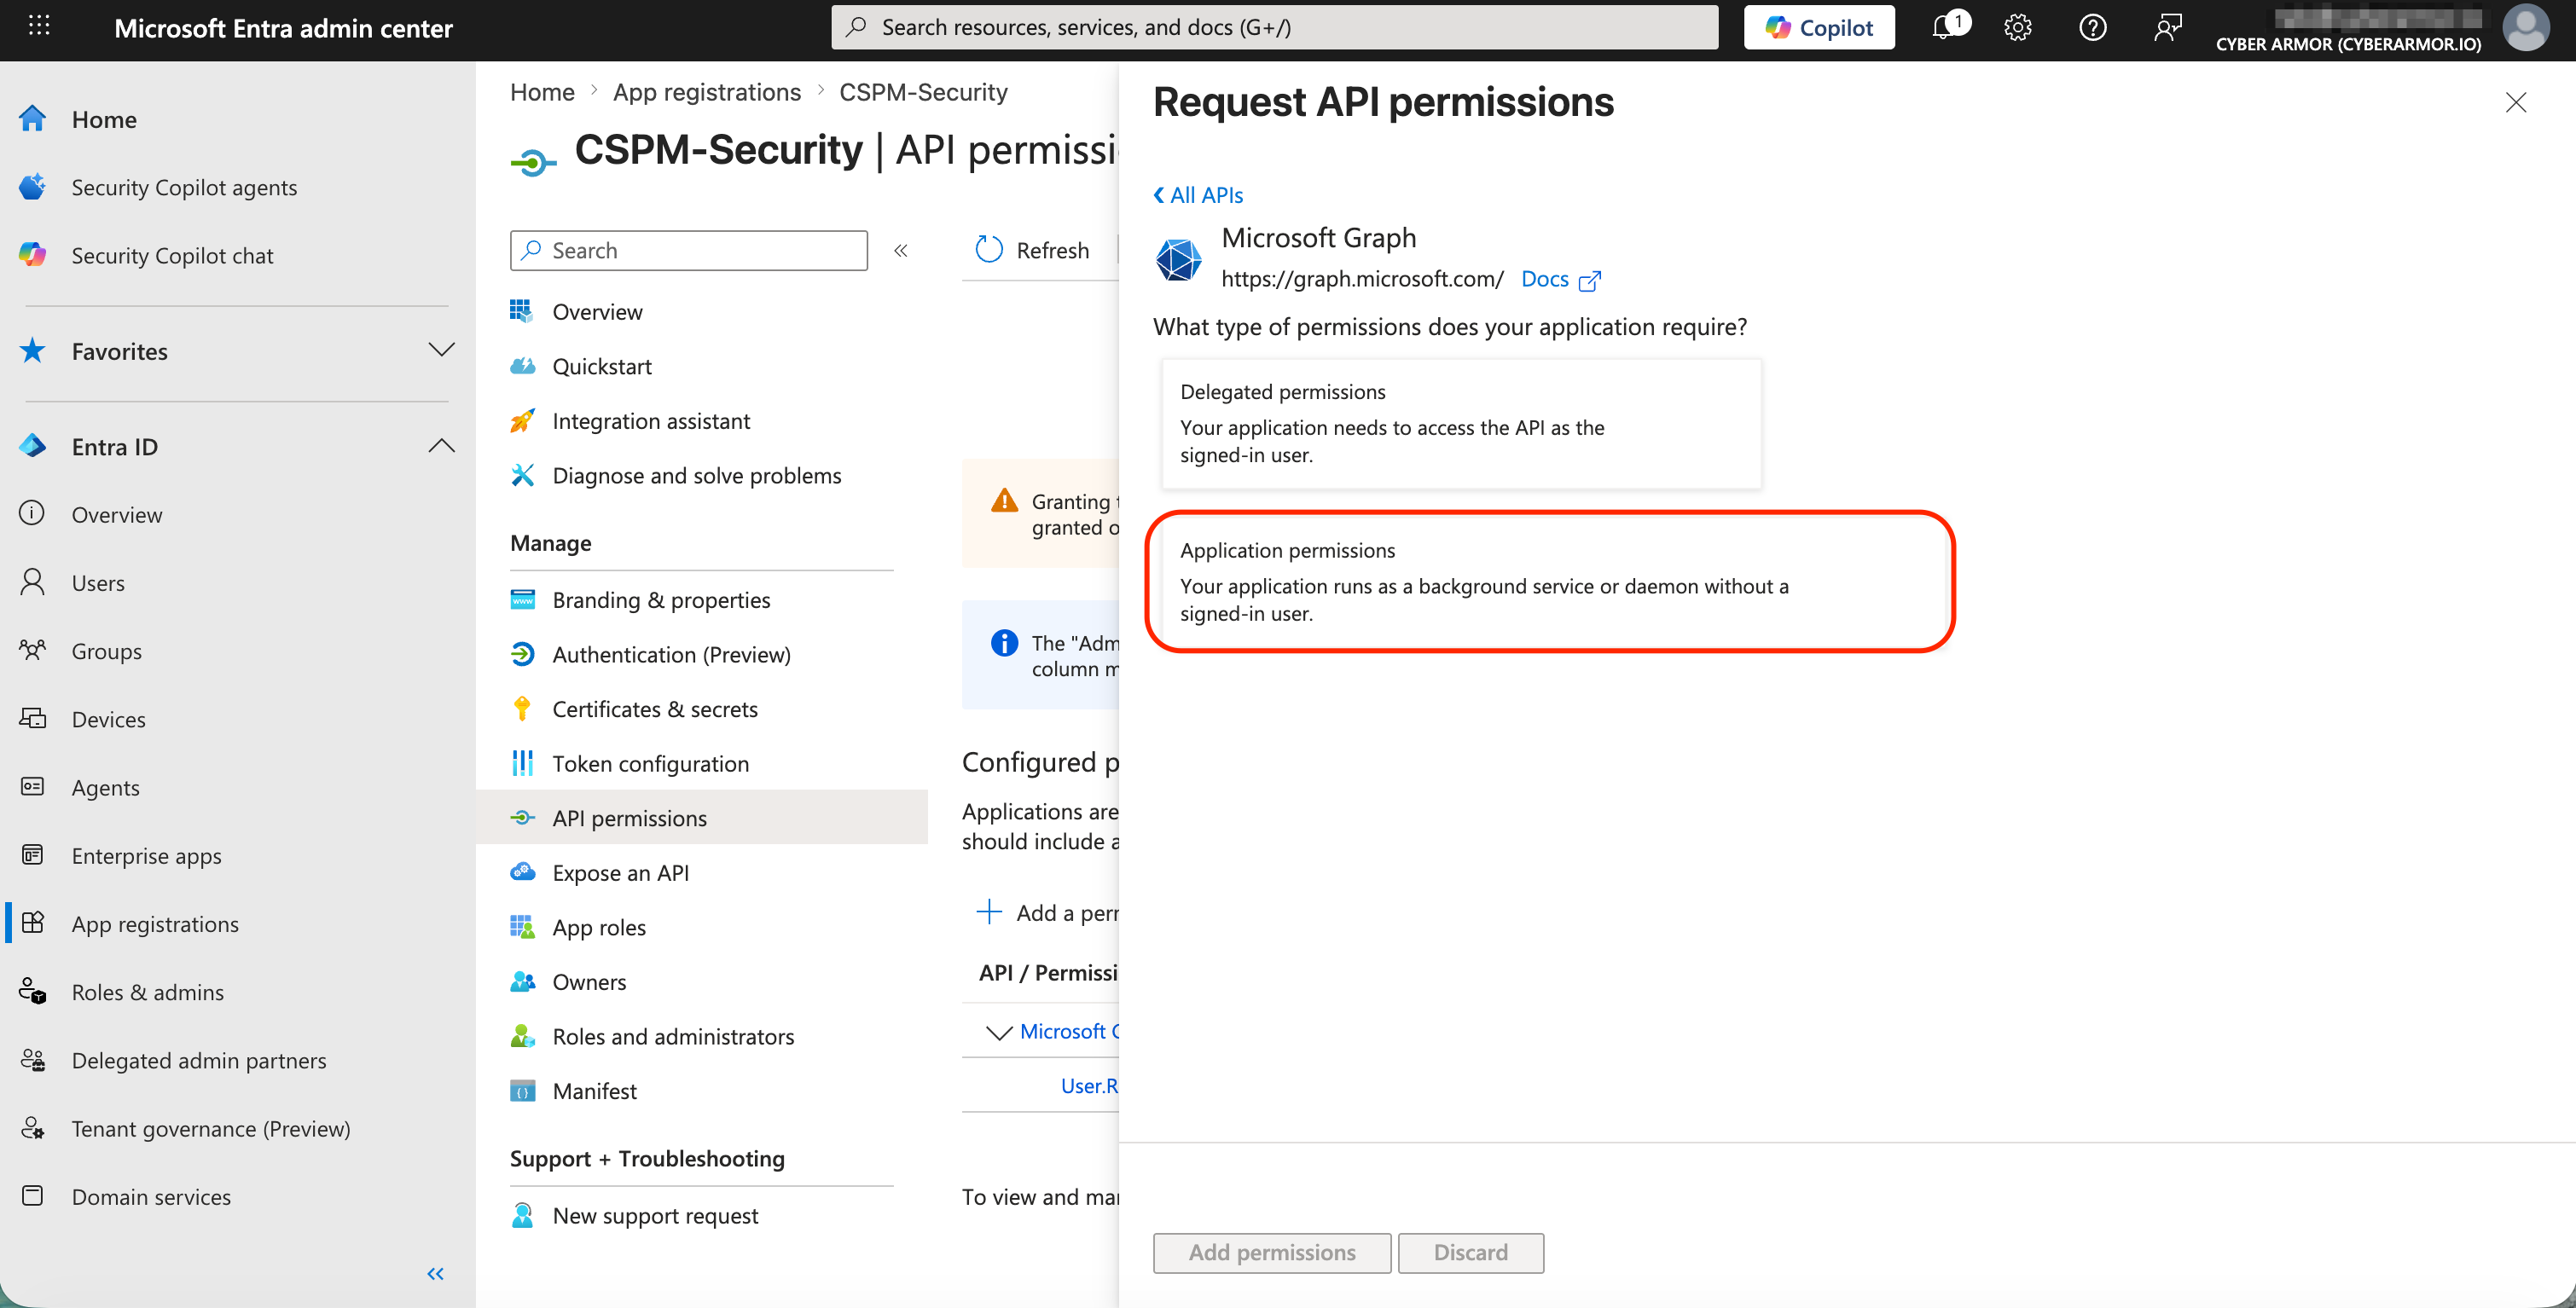
Next, add the required Microsoft Graph application permissions to the Azure application.
-
In the Azure Portal, go to Microsoft Entra ID.
-
From the left menu, select App registrations.
-
Select the application you created.
-
From the application menu, select API permissions.
-
Click + Add a permission.
-
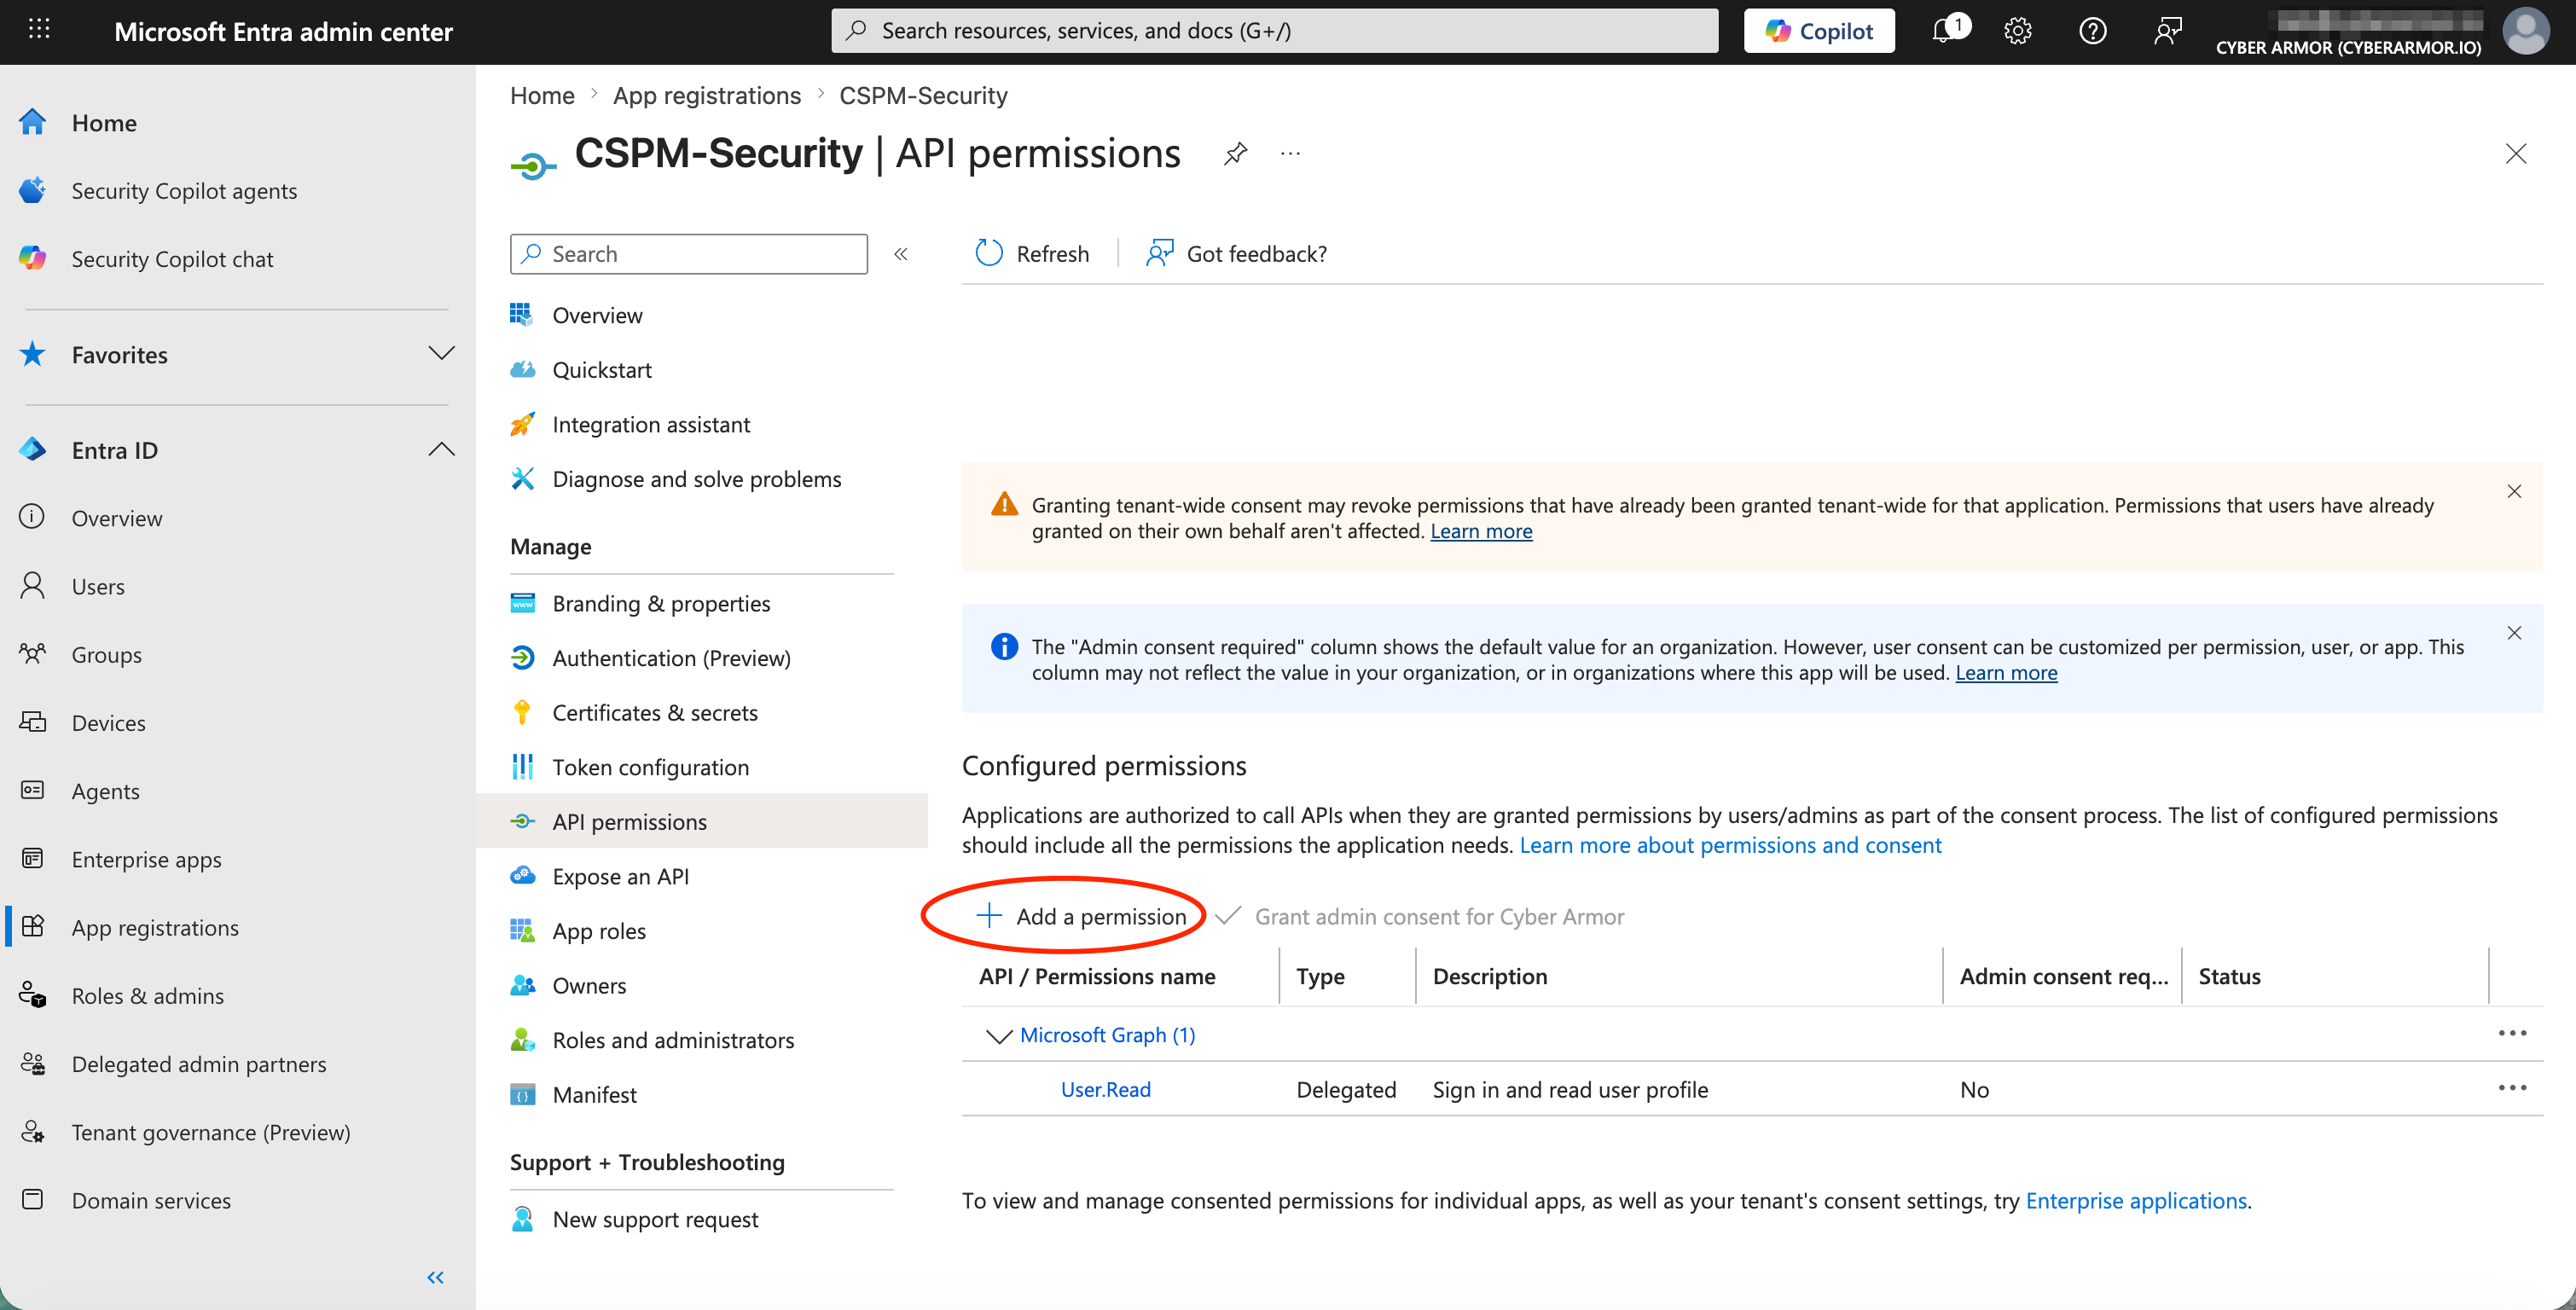
Select Microsoft Graph.
-
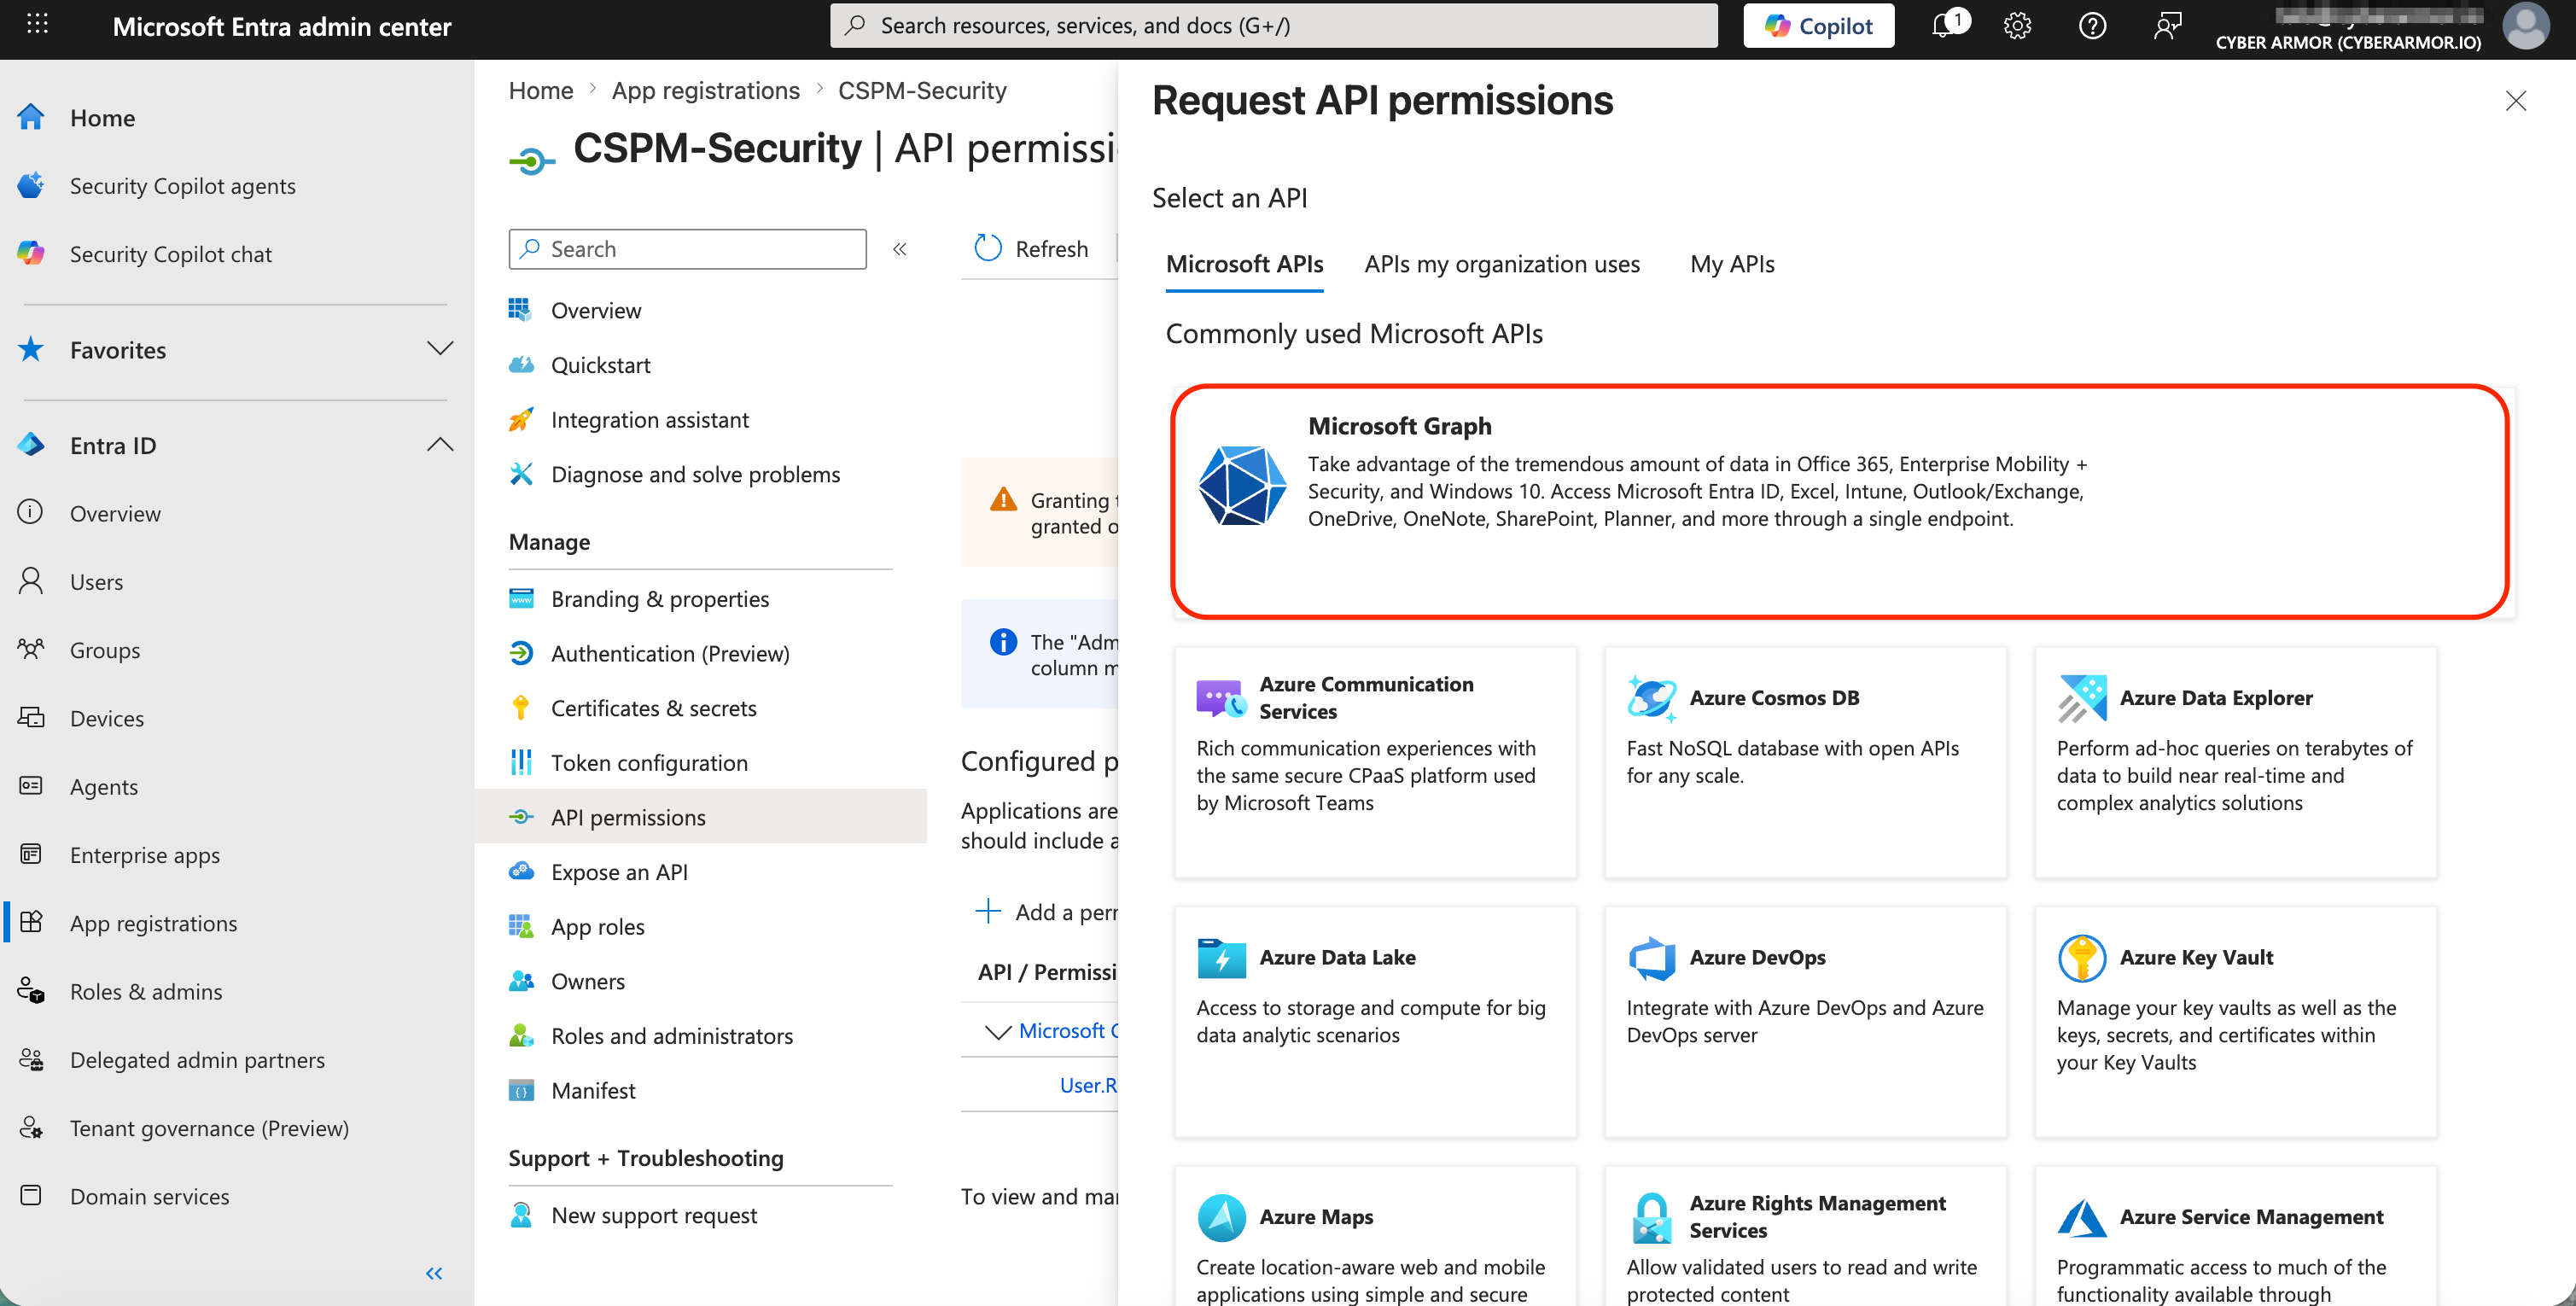
Select Application permissions.
Make sure to select Application permissions, not Delegated permissions. The ARMO integration uses these permissions without a signed-in user.
-
Search for and select the following permissions:
Directory.Read.AllPolicy.Read.AllUserAuthenticationMethod.Read.All
-
Click Add permissions.
-
Click Grant admin consent for [Directory Name].
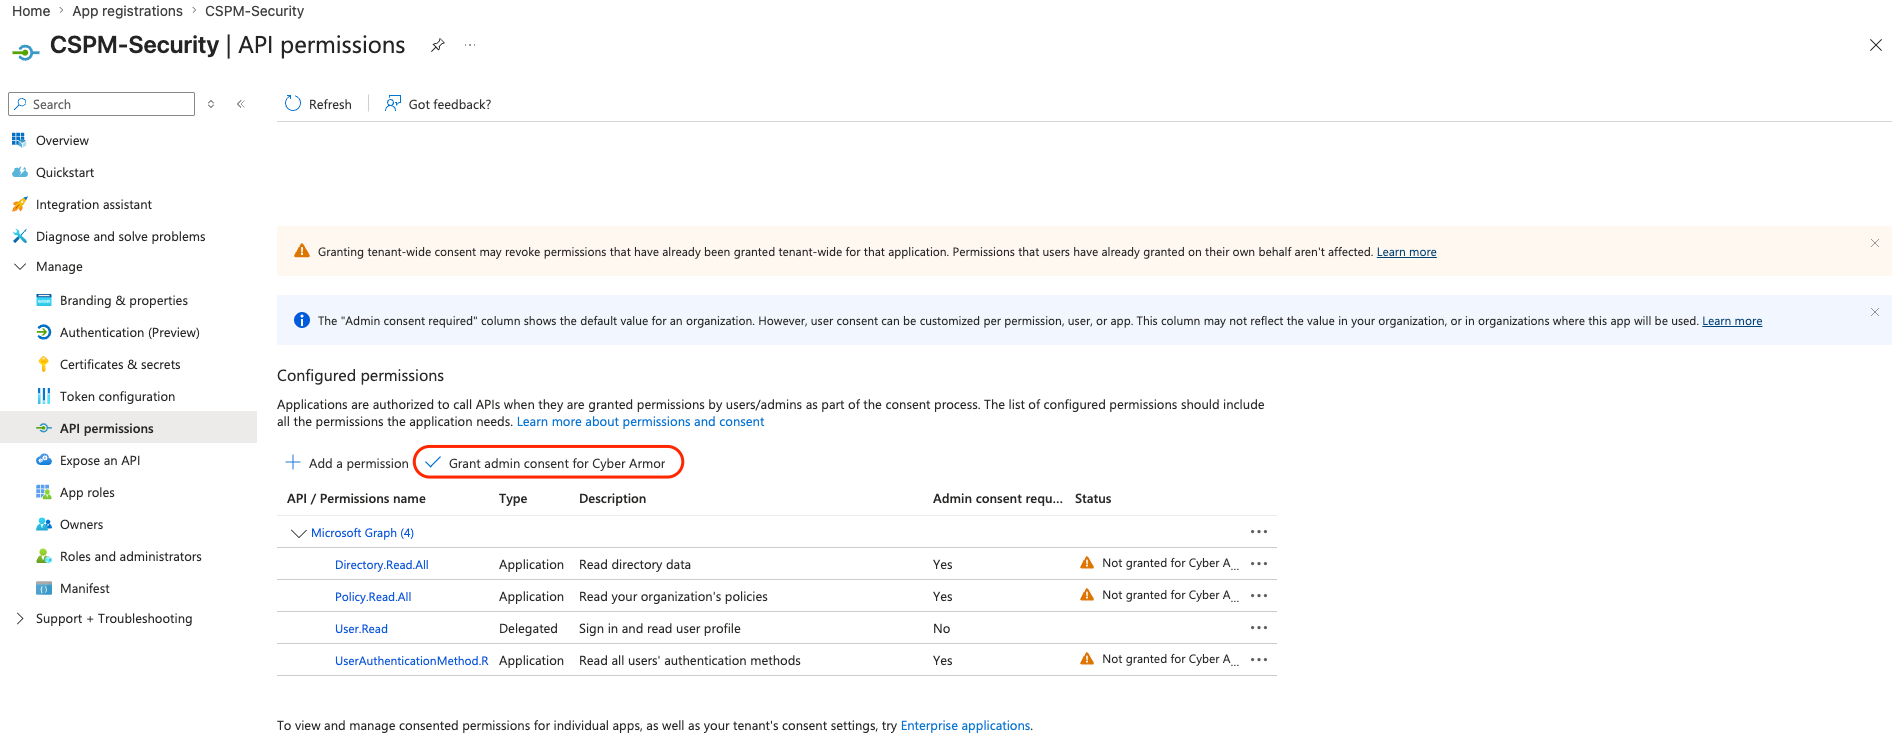
Admin consent is required before ARMO can use the selected Microsoft Graph permissions.
-
Confirm that the permissions show as granted.
-
Return to the ARMO onboarding wizard and click Continue.
Step 7: Create a client secret
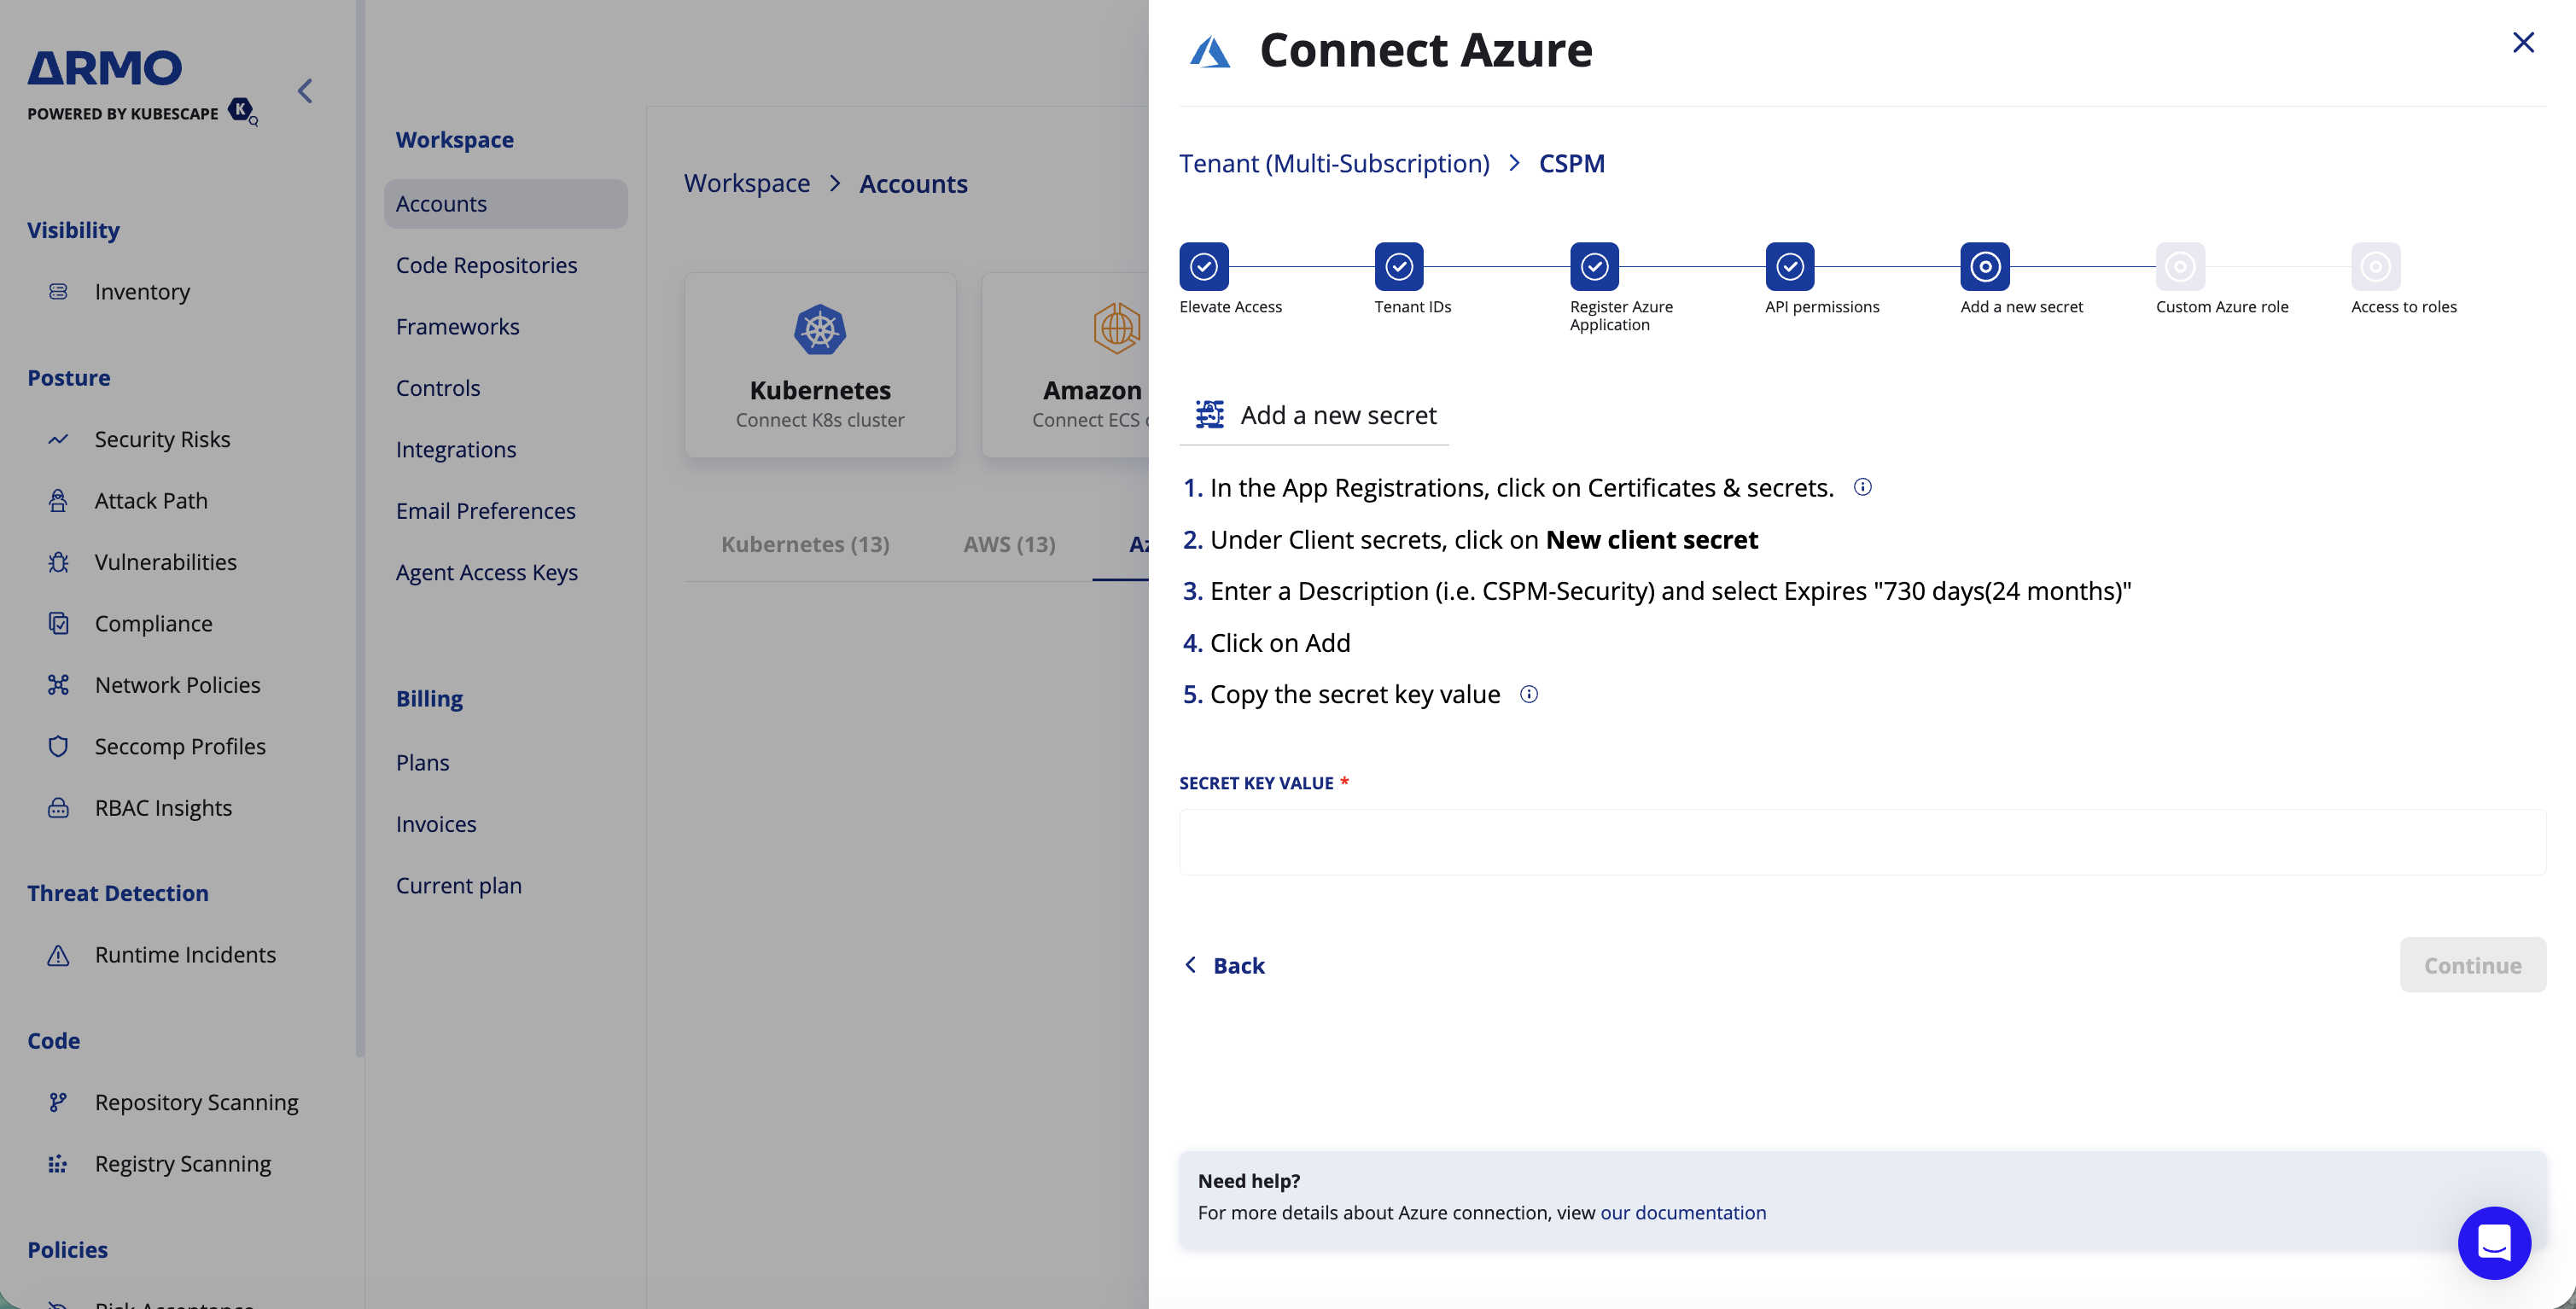
Next, create a client secret for the Azure application and copy the secret value into ARMO.
-
In the Azure Portal, go to Microsoft Entra ID.
-
From the left menu, select App registrations.
-
Select the application you created.
-
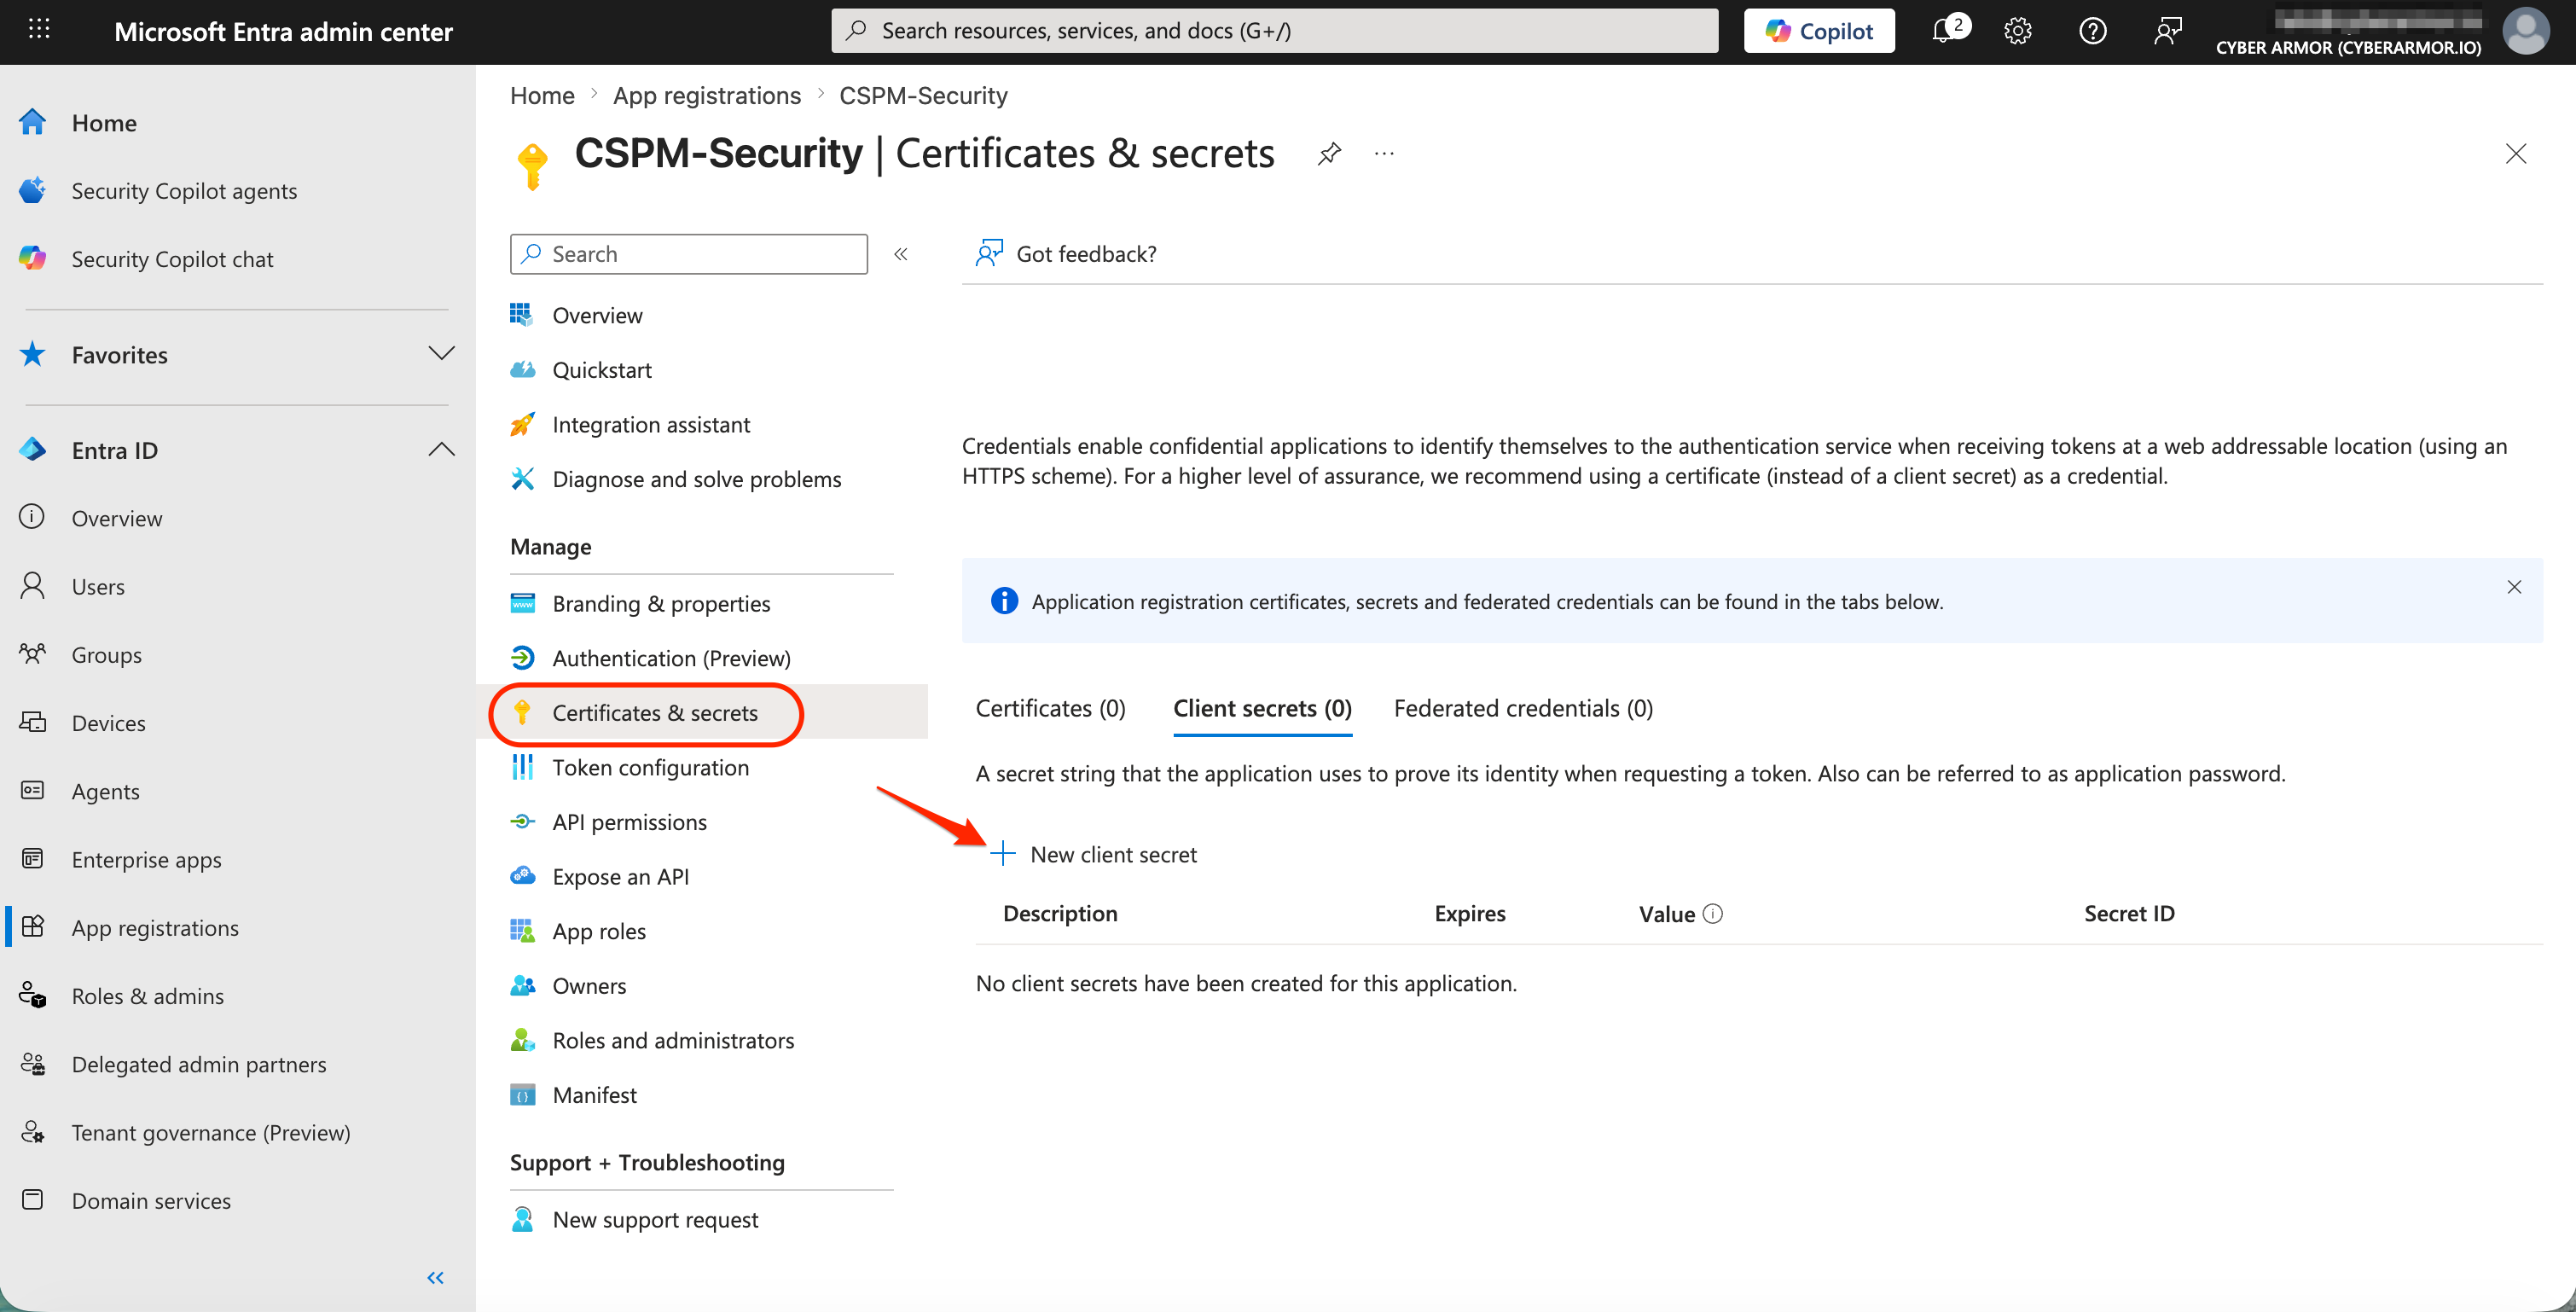
From the application menu, select Certificates & secrets.
-
Under Client secrets, click + New client secret.
-
In Description, enter a description for the secret, for example:
CSPM-Security. -
In Expires, select 730 days (24 months), or the longest period your organization's policy allows.
-
Click Add.
-
Copy the client secret Value.
-
Return to the ARMO onboarding wizard and paste the value into Client Secret.
-
Click Continue.
Step 8: Create a custom Azure role
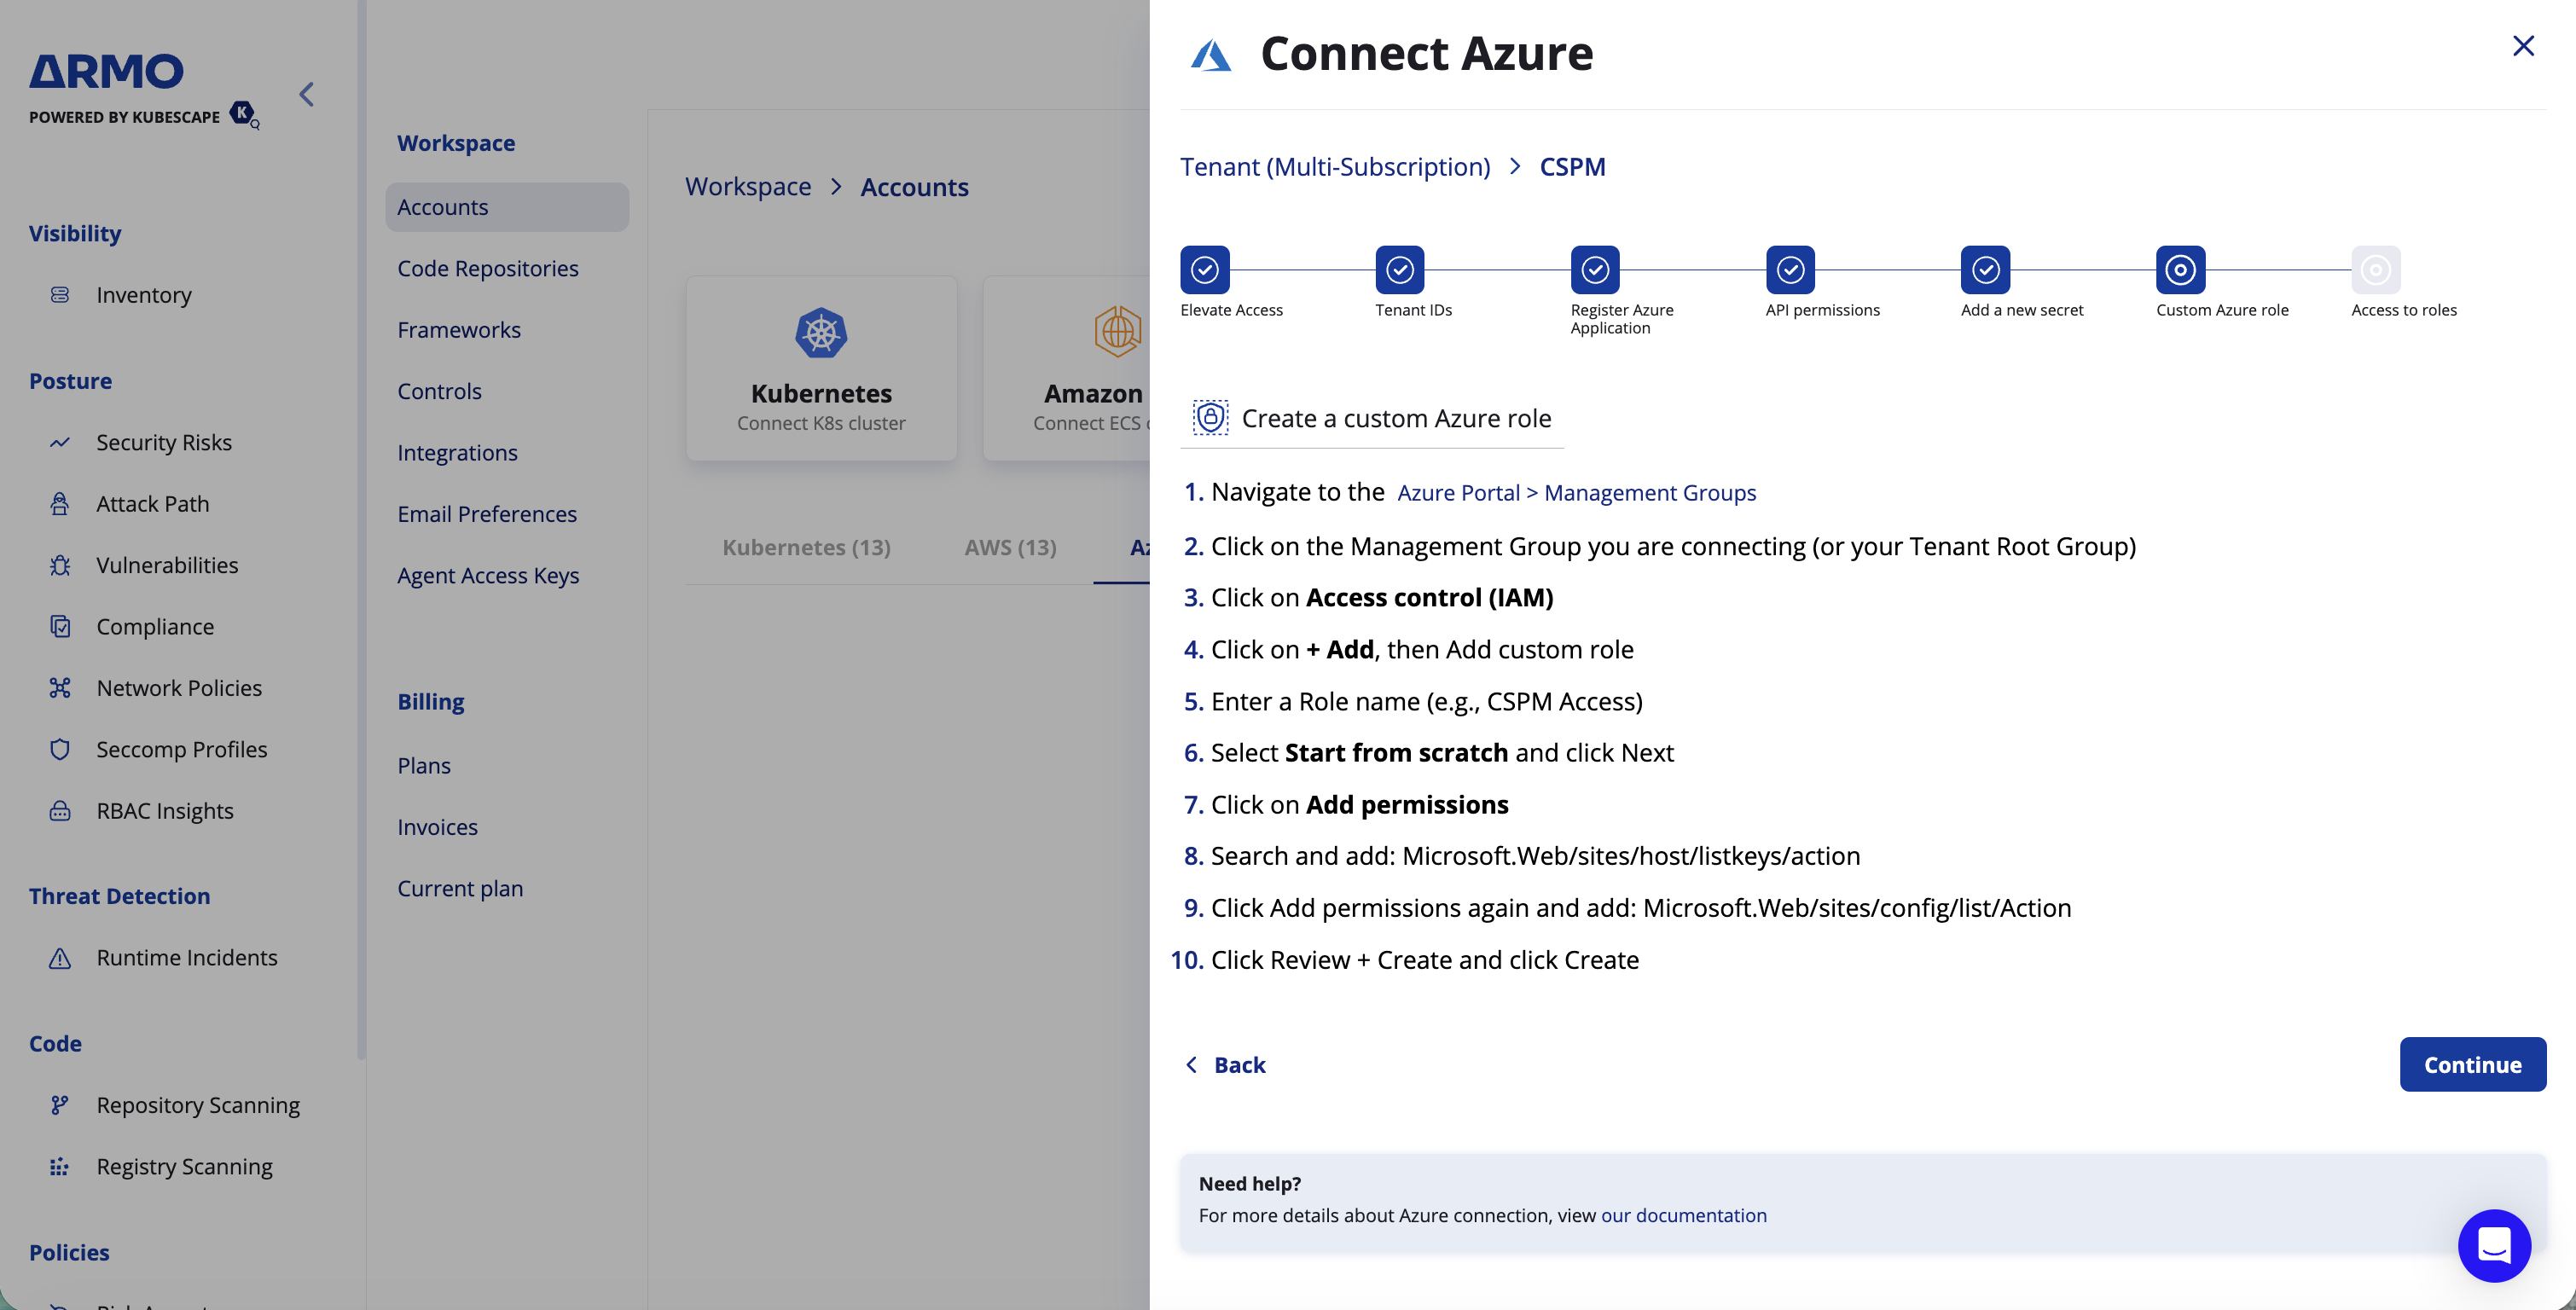
Next, create a custom Azure role with the additional permissions required by ARMO.
-
In the Azure Portal, search for Management Groups.
-
Select the scope you chose in Step 4:
- If you're connecting the entire tenant, select Tenant Root Group.
- If you're connecting a specific management group, select that management group.
-
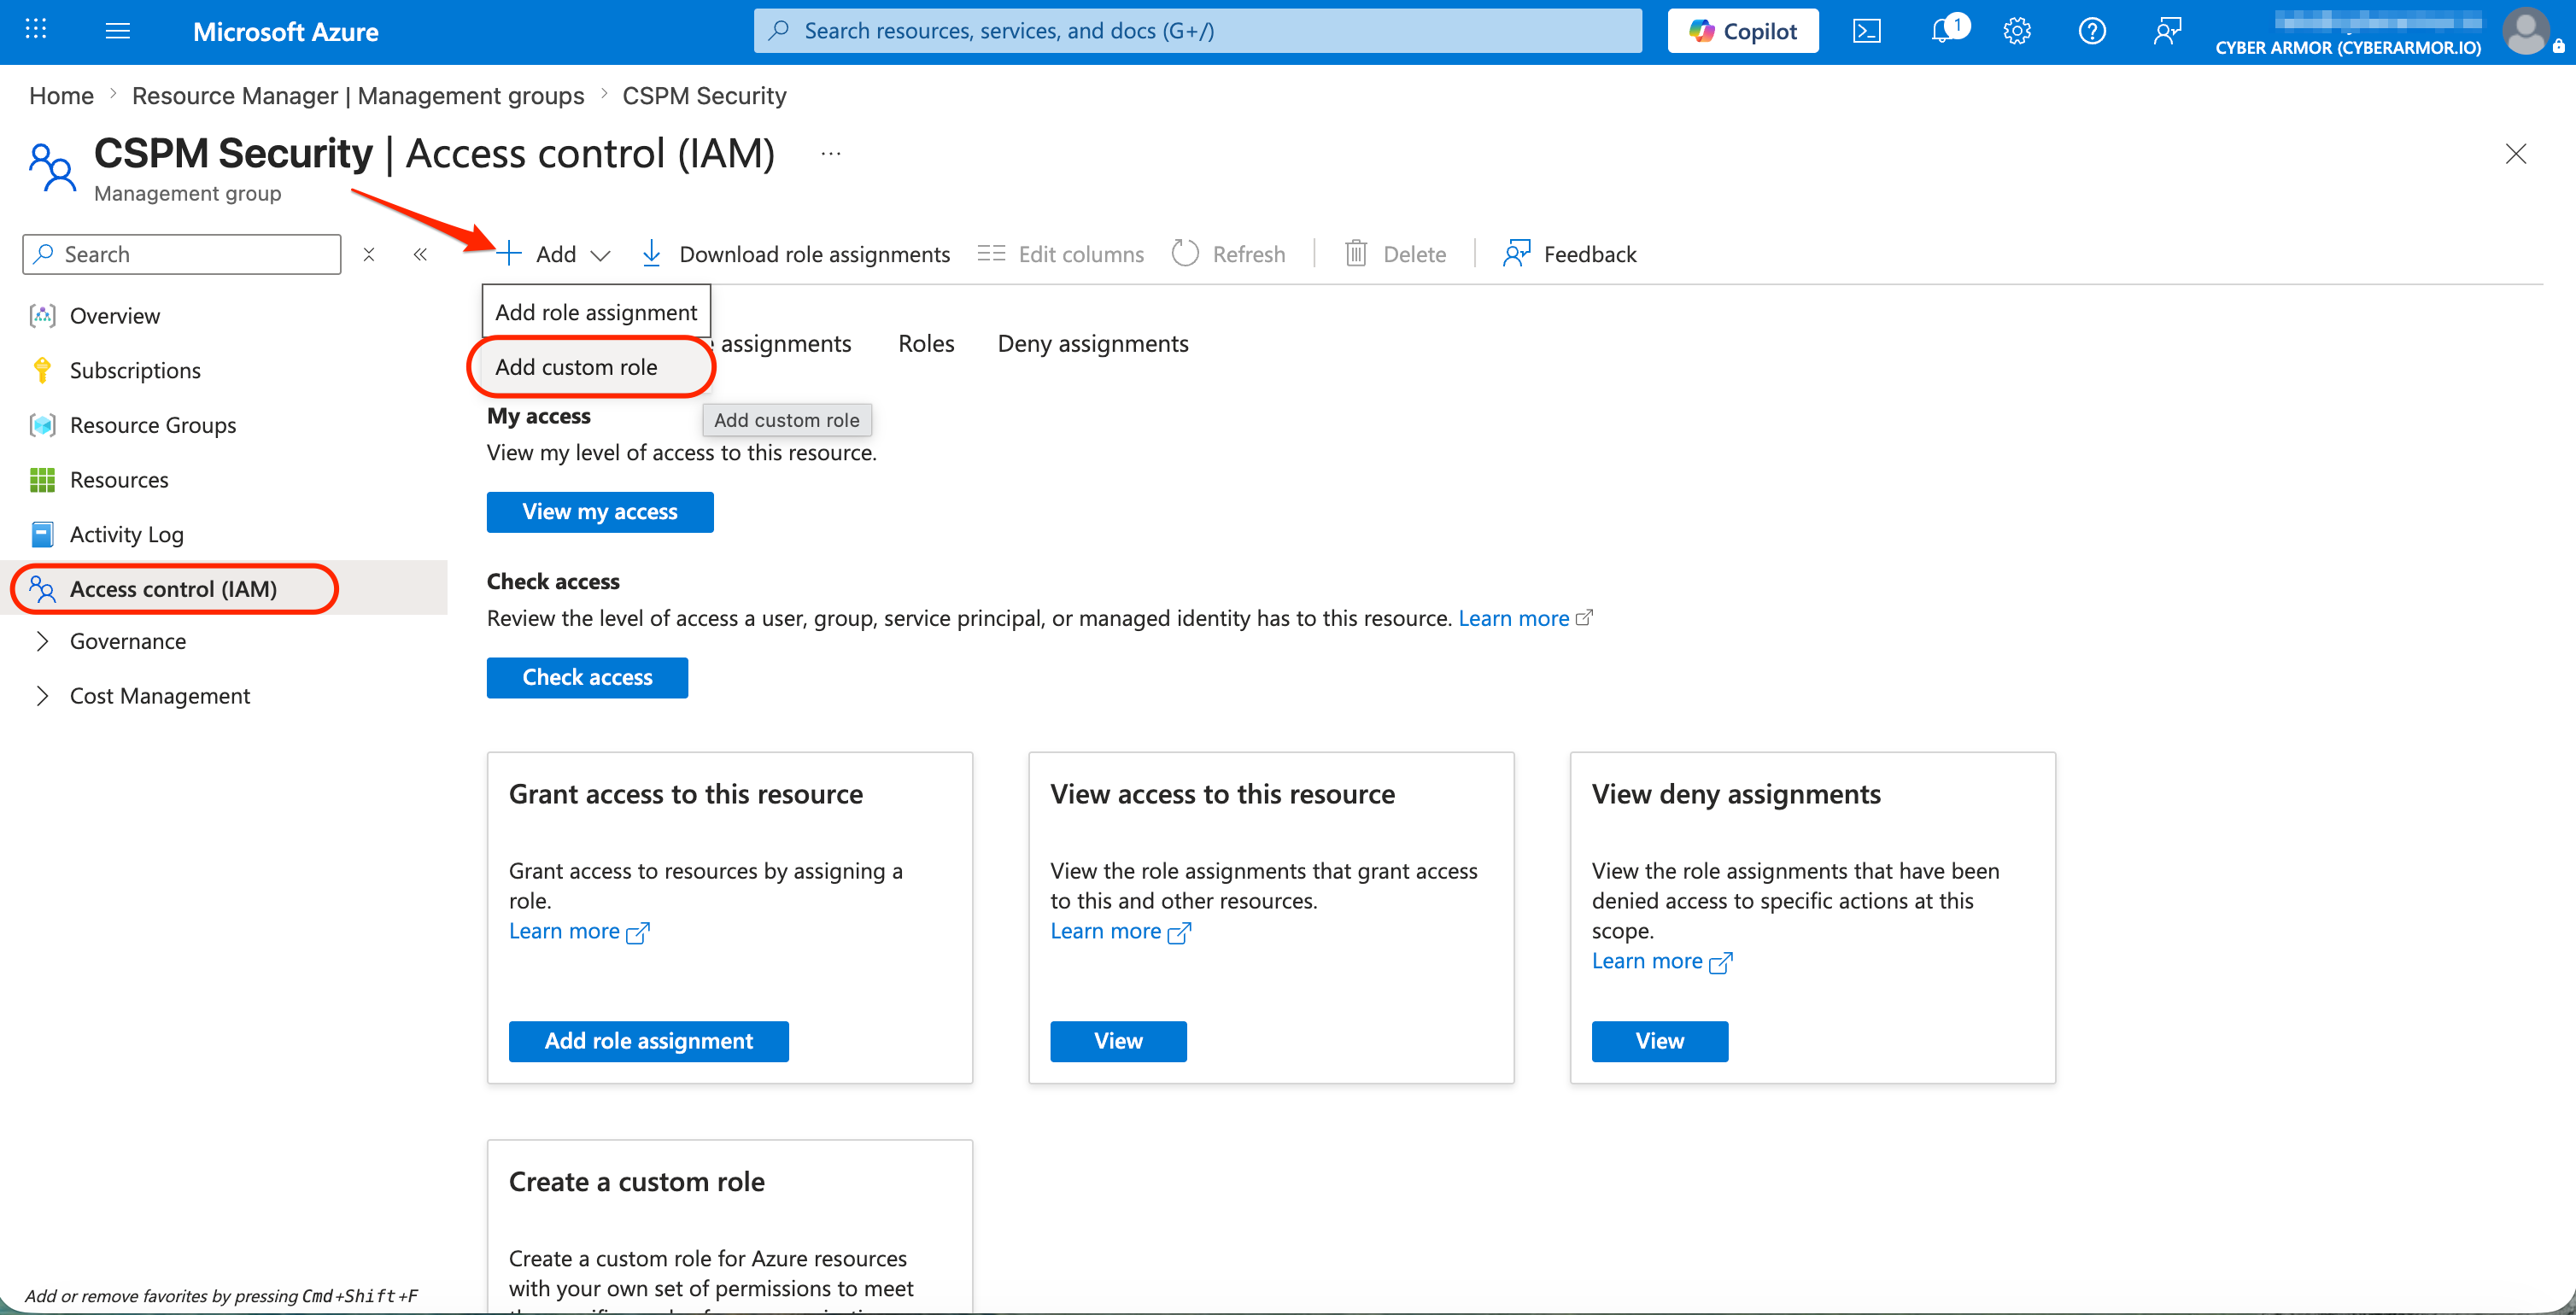
From the left menu, select Access control (IAM).
-
Click + Add.
-
Select Add custom role.
-
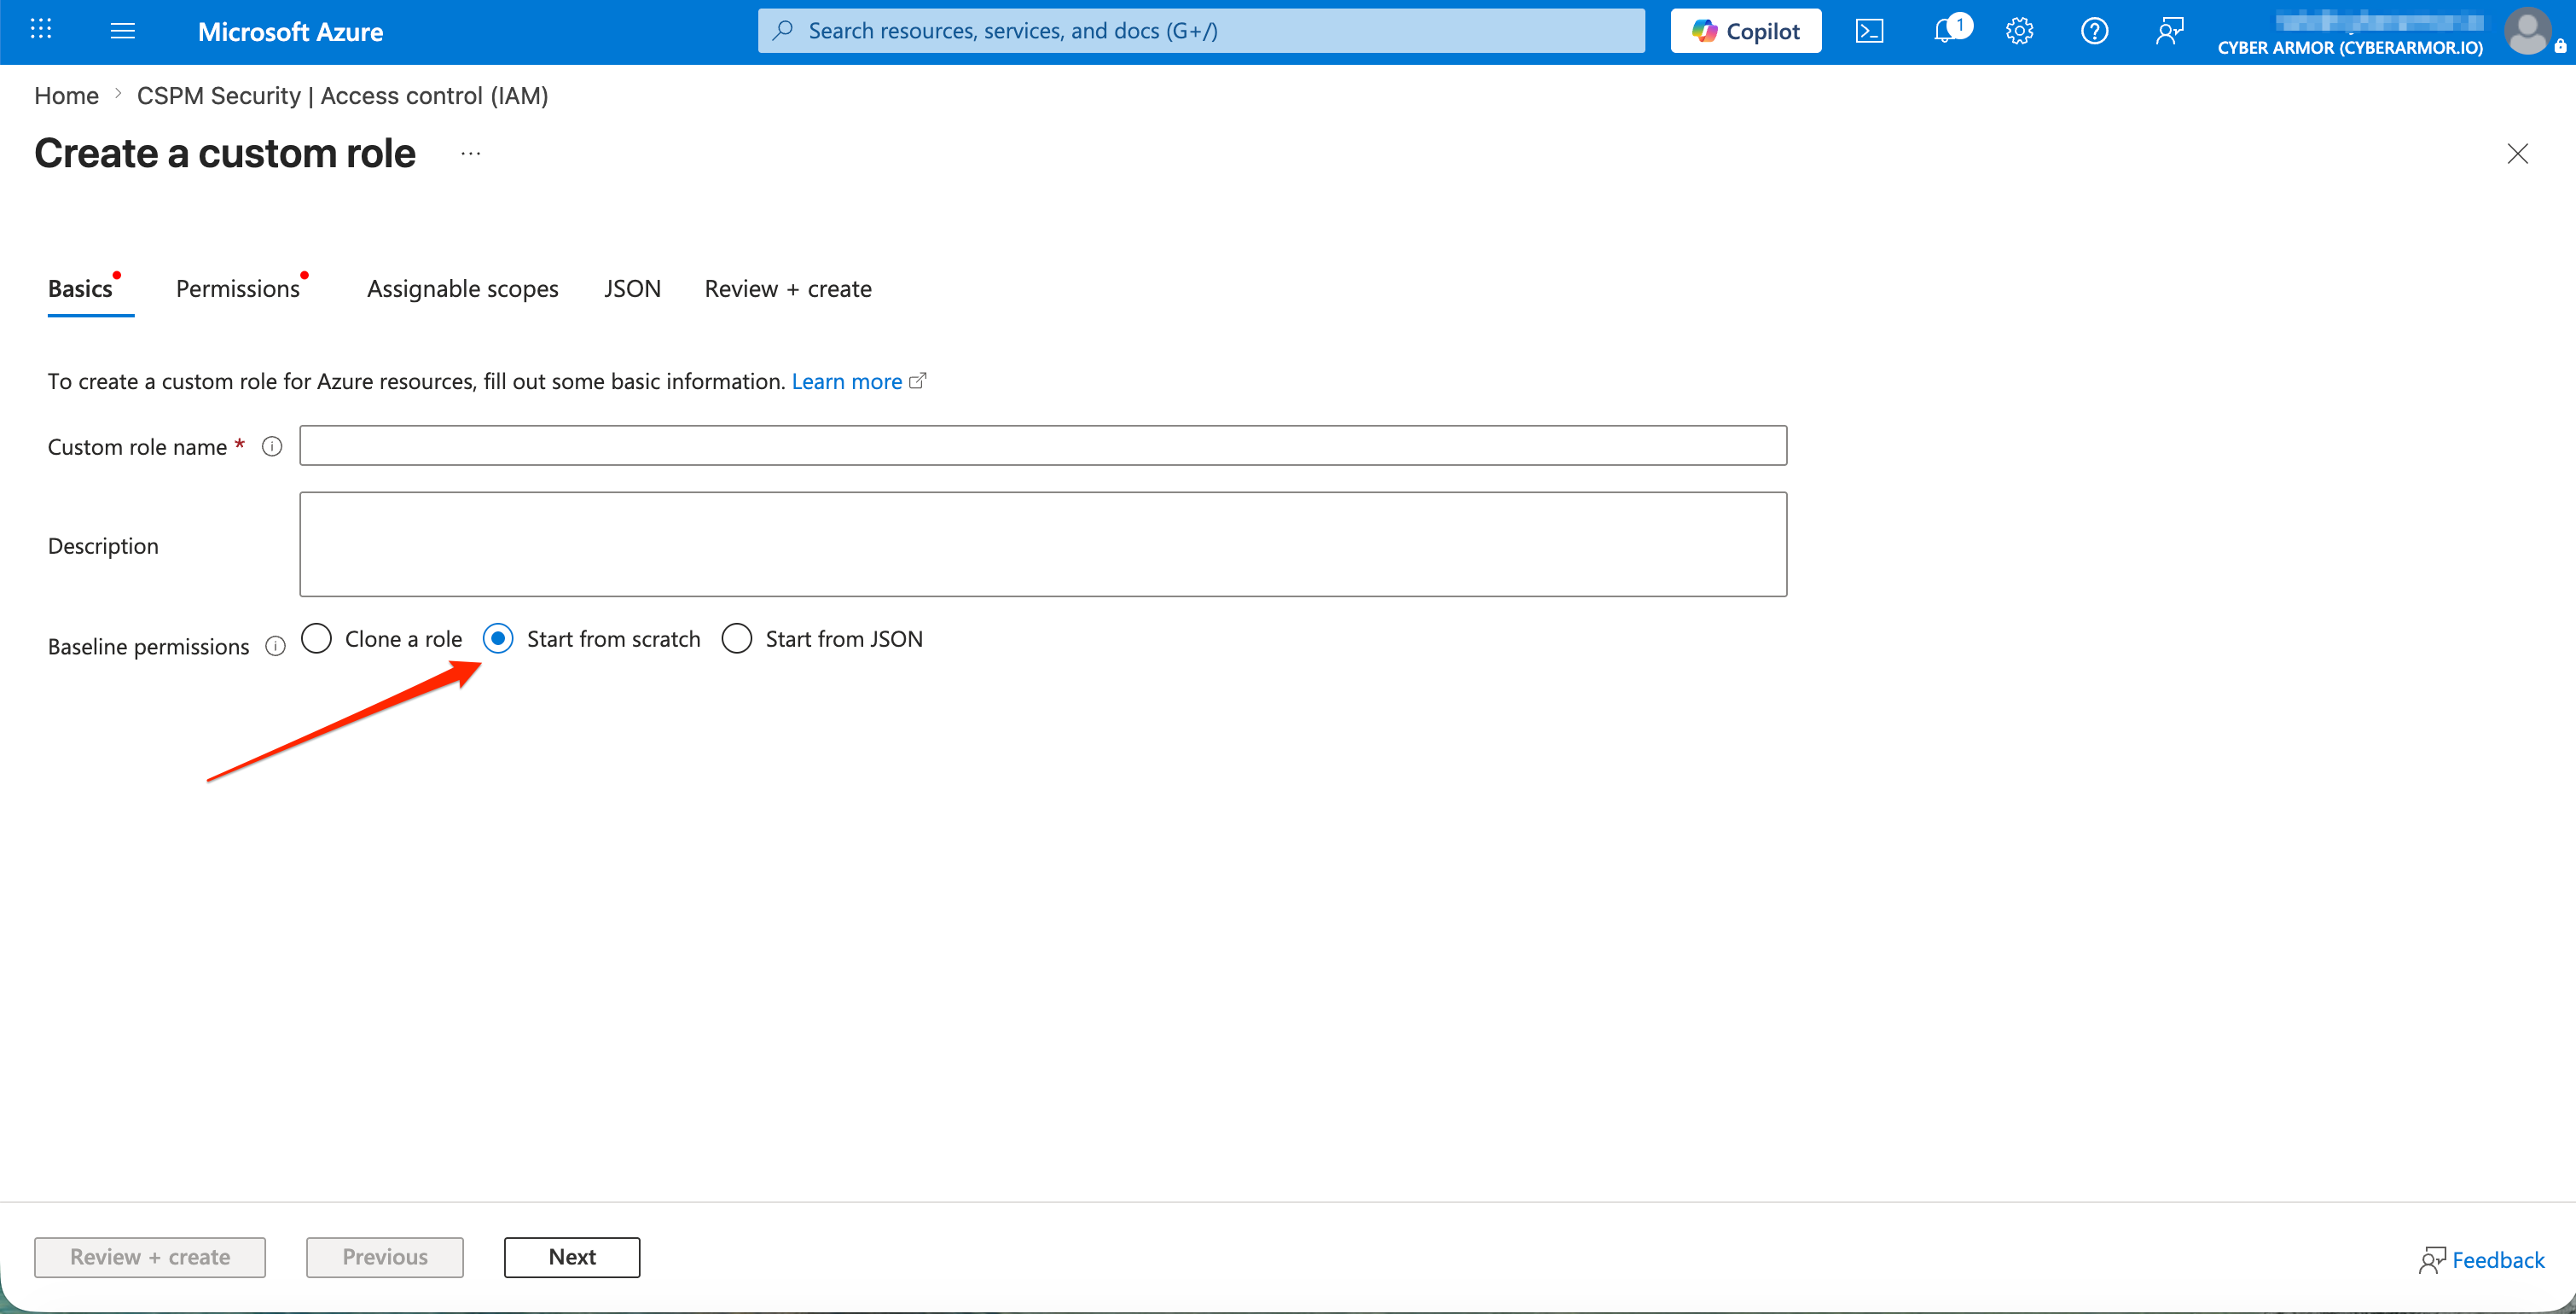
In Role name, enter a name for the custom role, for example:
CSPM Access. -
Select Start from scratch
-
Click Next.
-
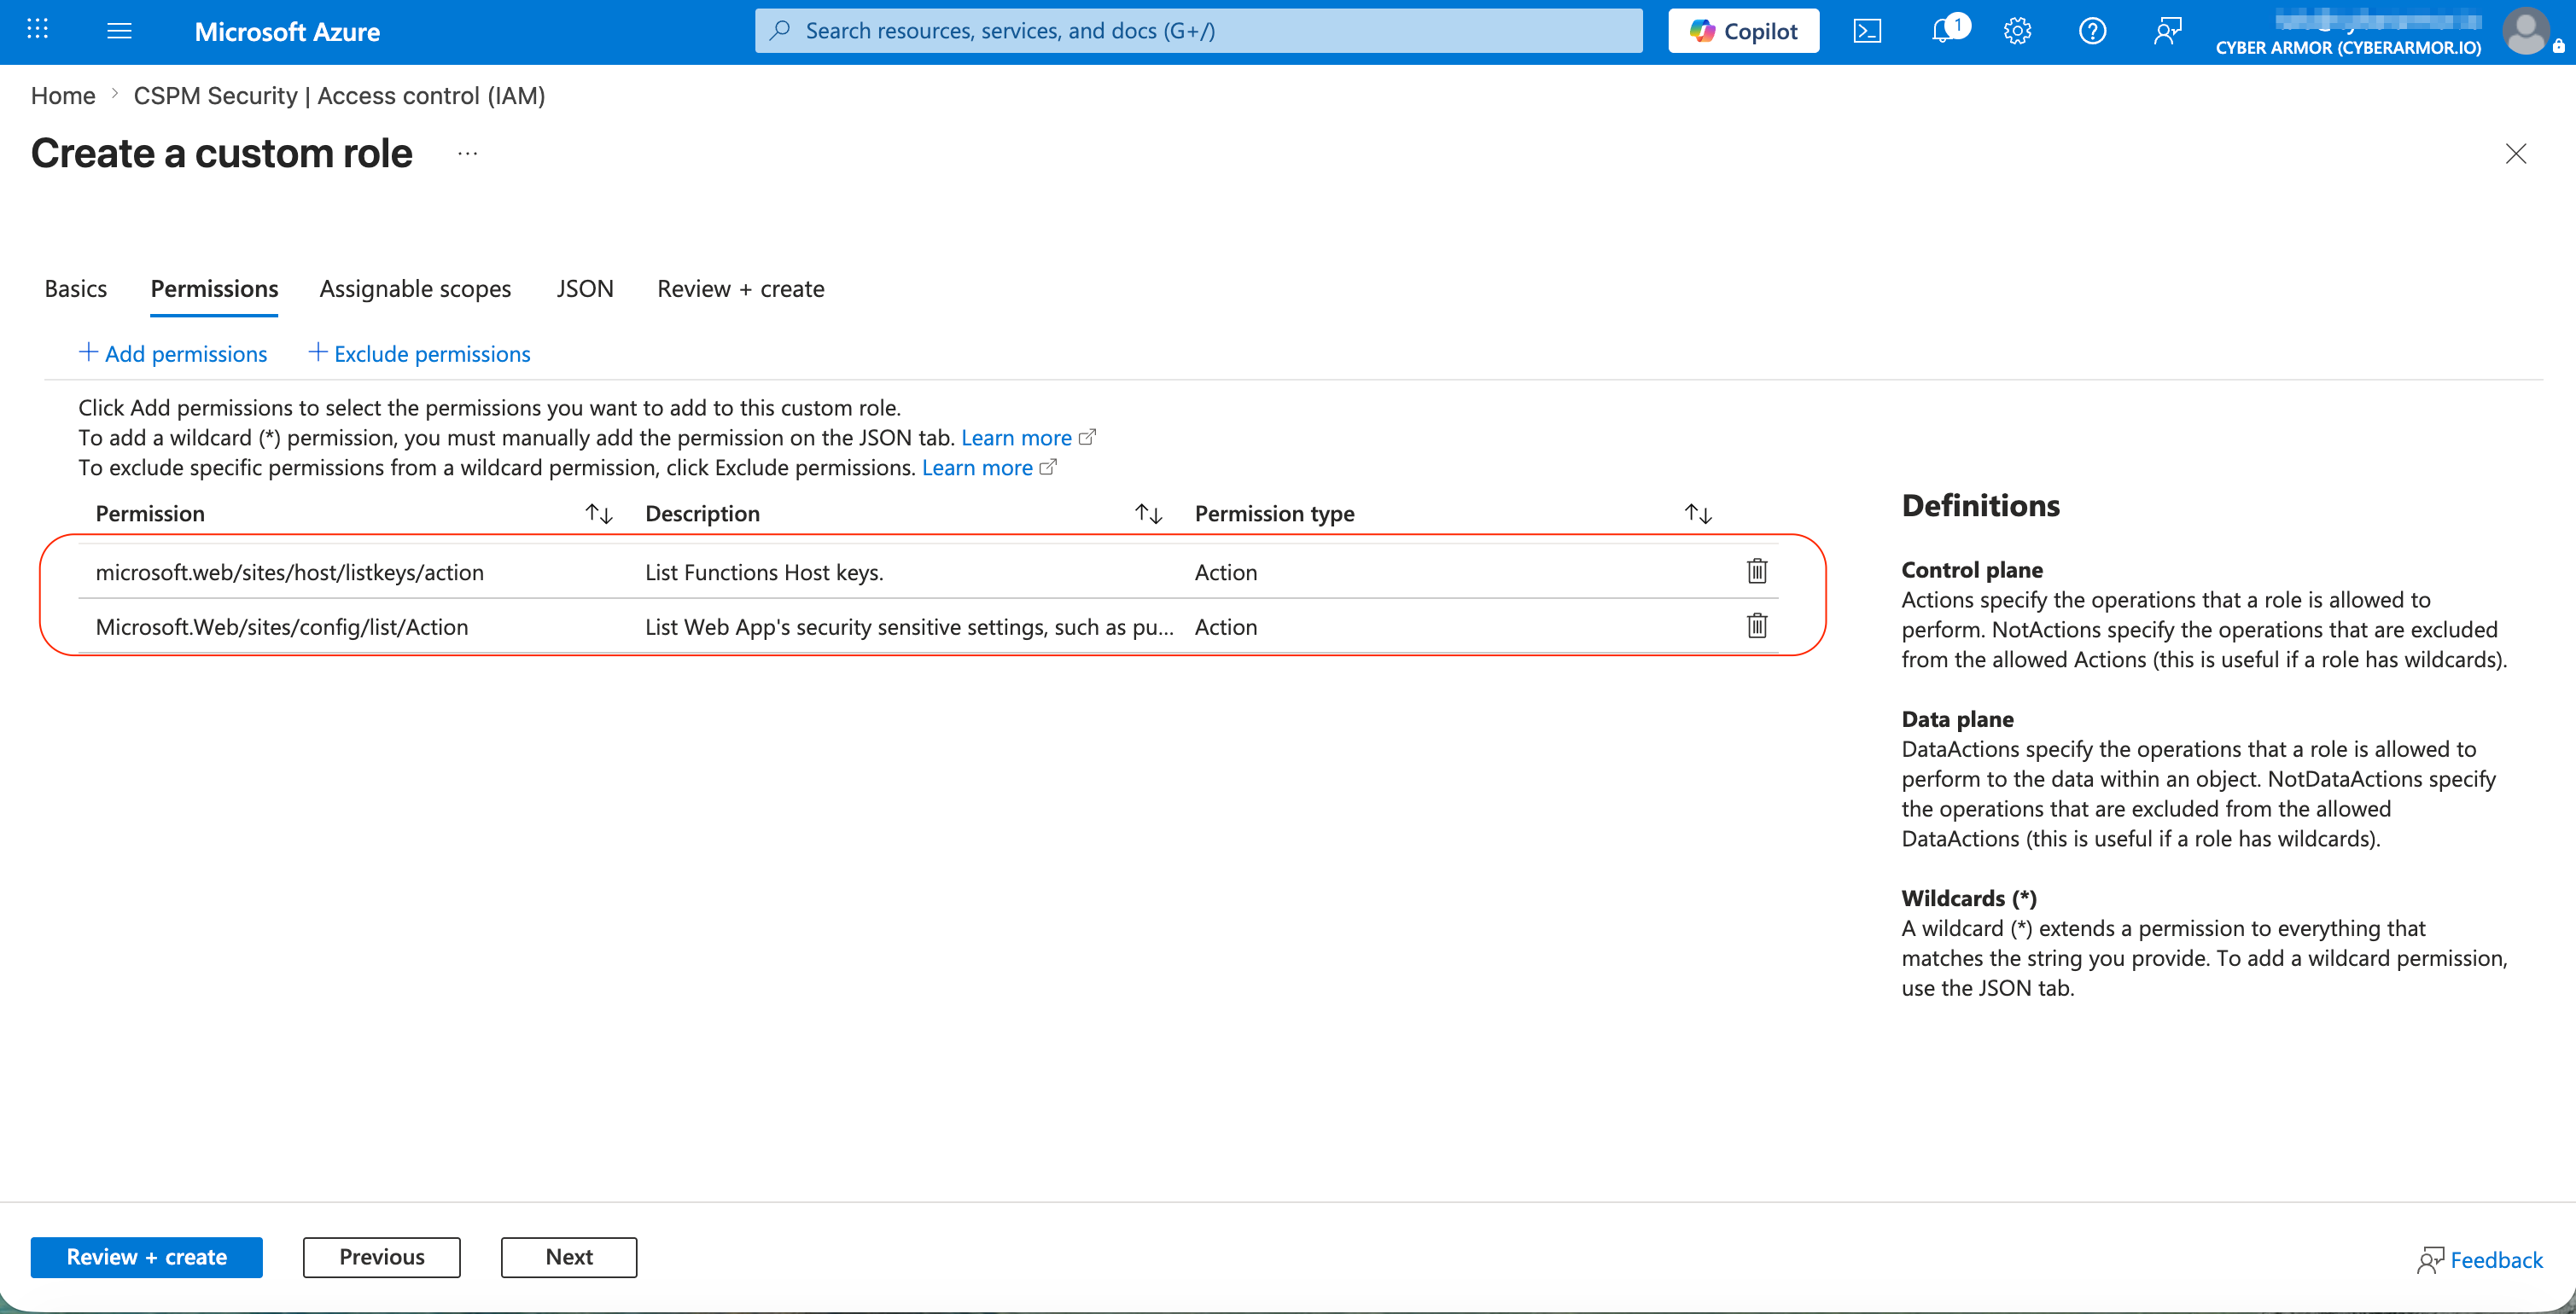
Click Add permissions.
-
Search for and add the following permission:
Microsoft.Web/sites/host/listkeys/action. -
Click Add permissions again.
-
Search for and add the following permission:
Microsoft.Web/sites/config/list/Action. -
Review the selected permissions.
-
Click Review + create.
-
Click Create.
-
Return to the ARMO onboarding wizard and click Continue.
Step 9: Grant access to roles
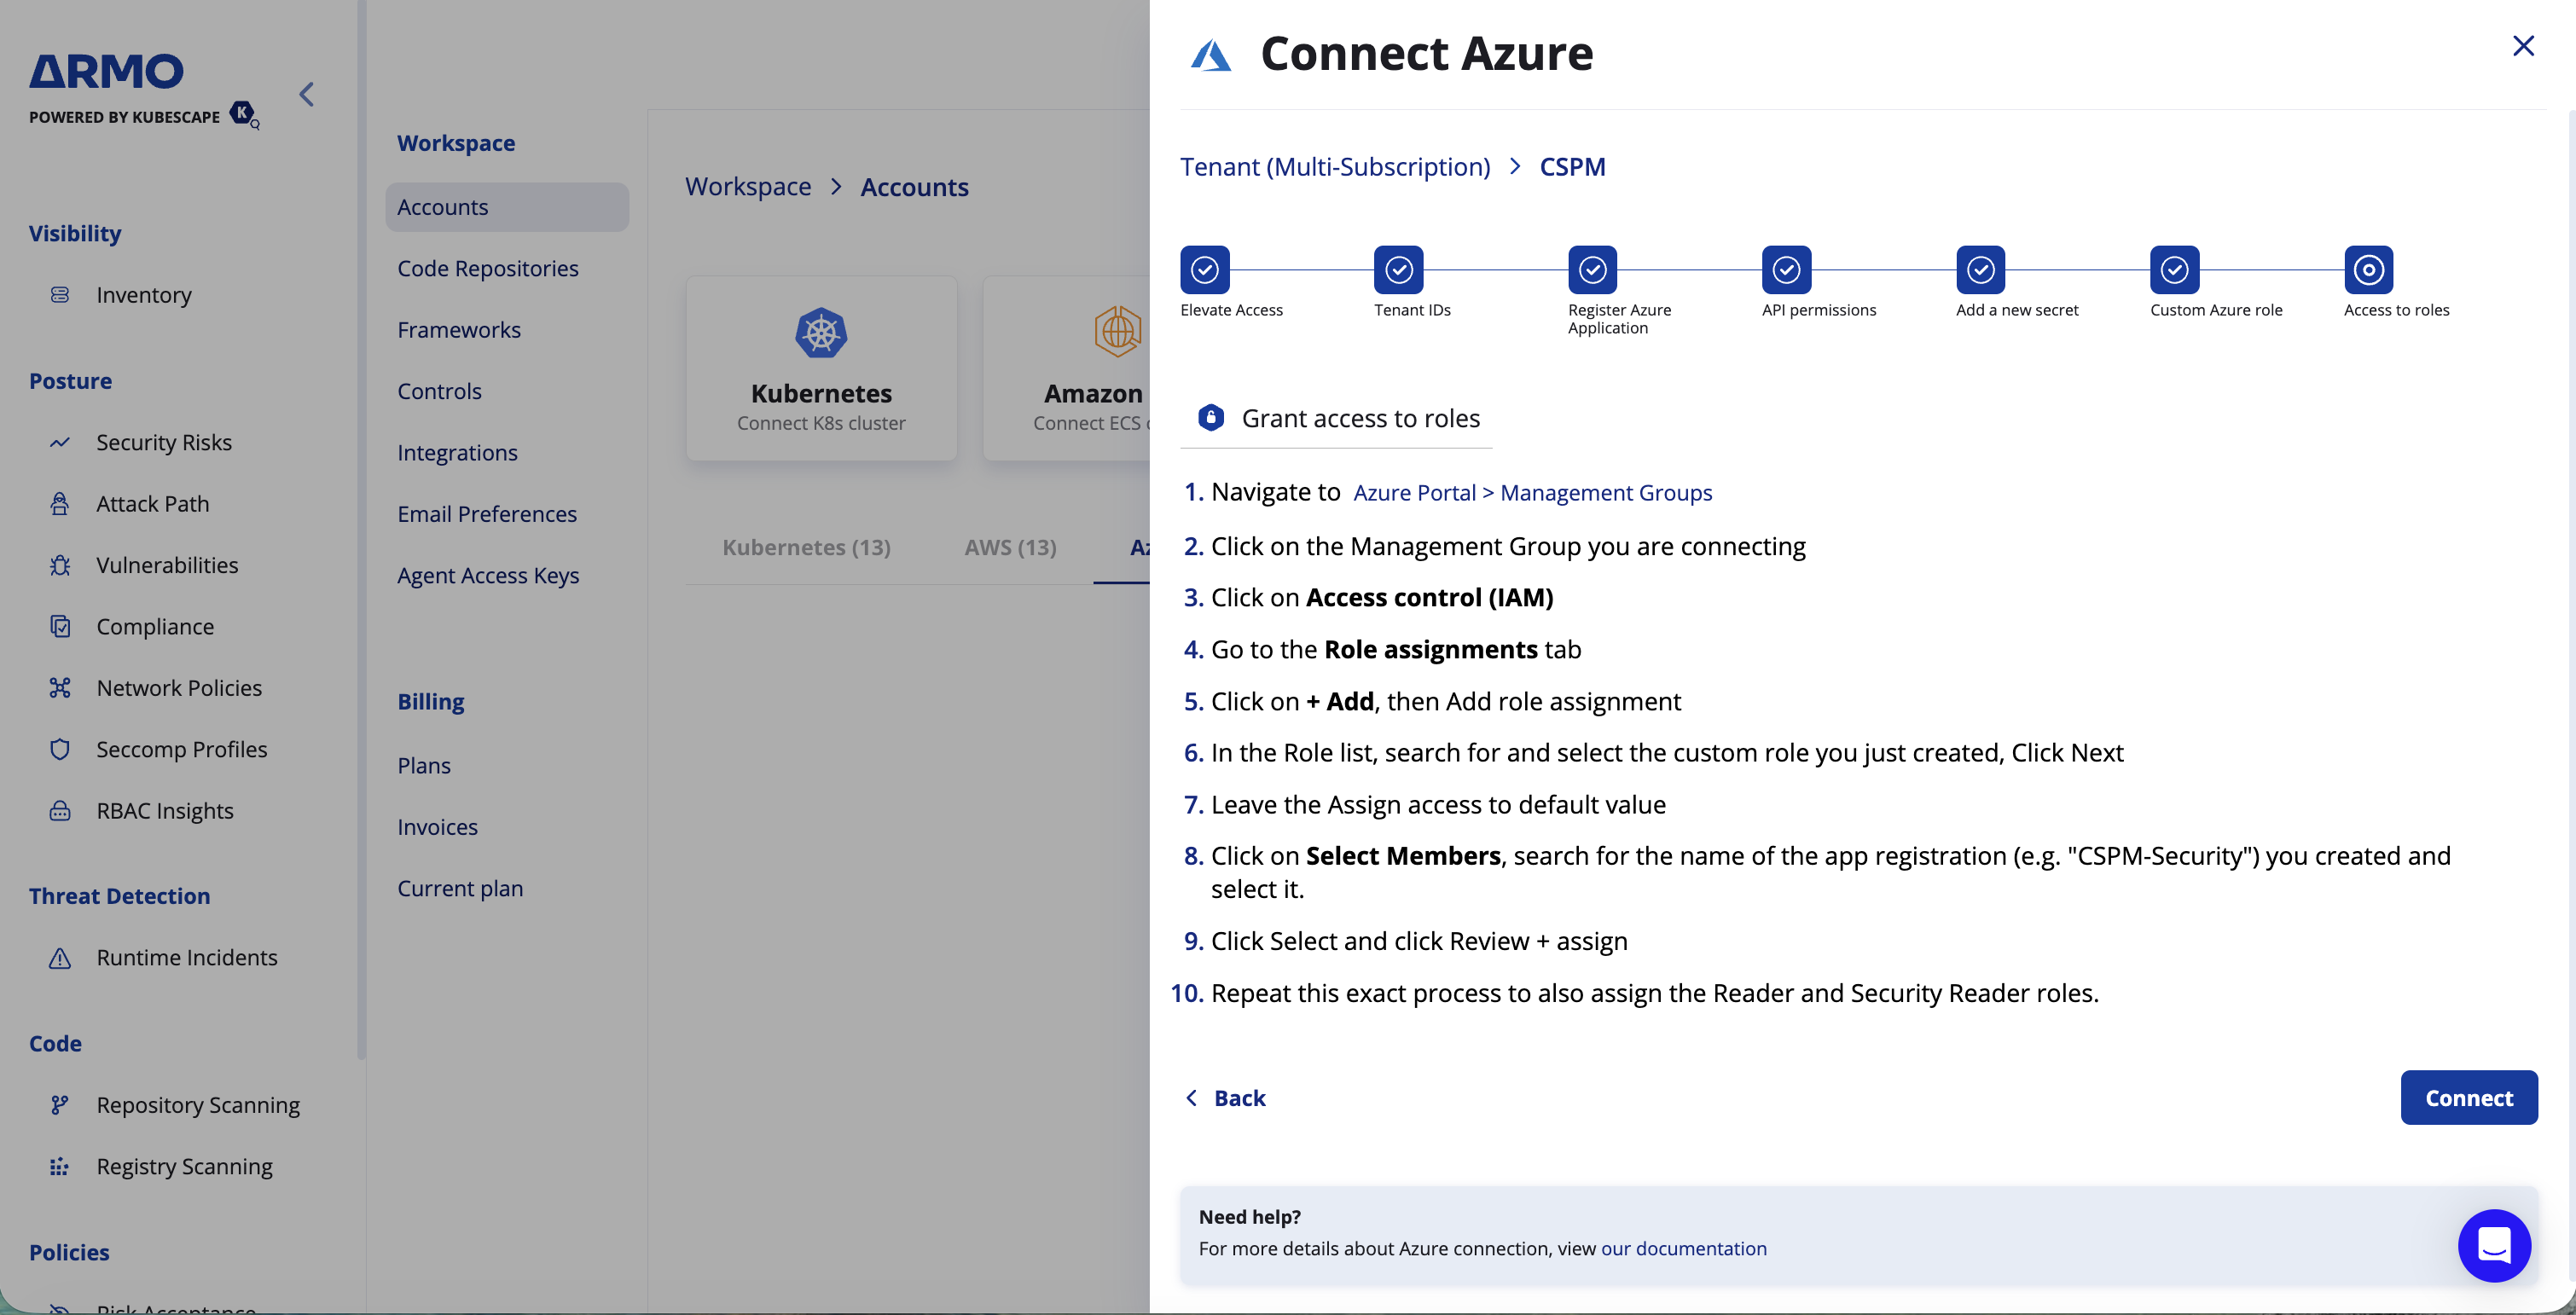
Next, assign the required Azure roles to the application you created.
-
In the Azure Portal, search for Management Groups.
-
Select the same scope you used in Step 8: Tenant Root Group for the entire tenant, or the specific management group you're connecting.
-
From the left menu, select Access control (IAM).
-
Go to the Role assignments tab.
-
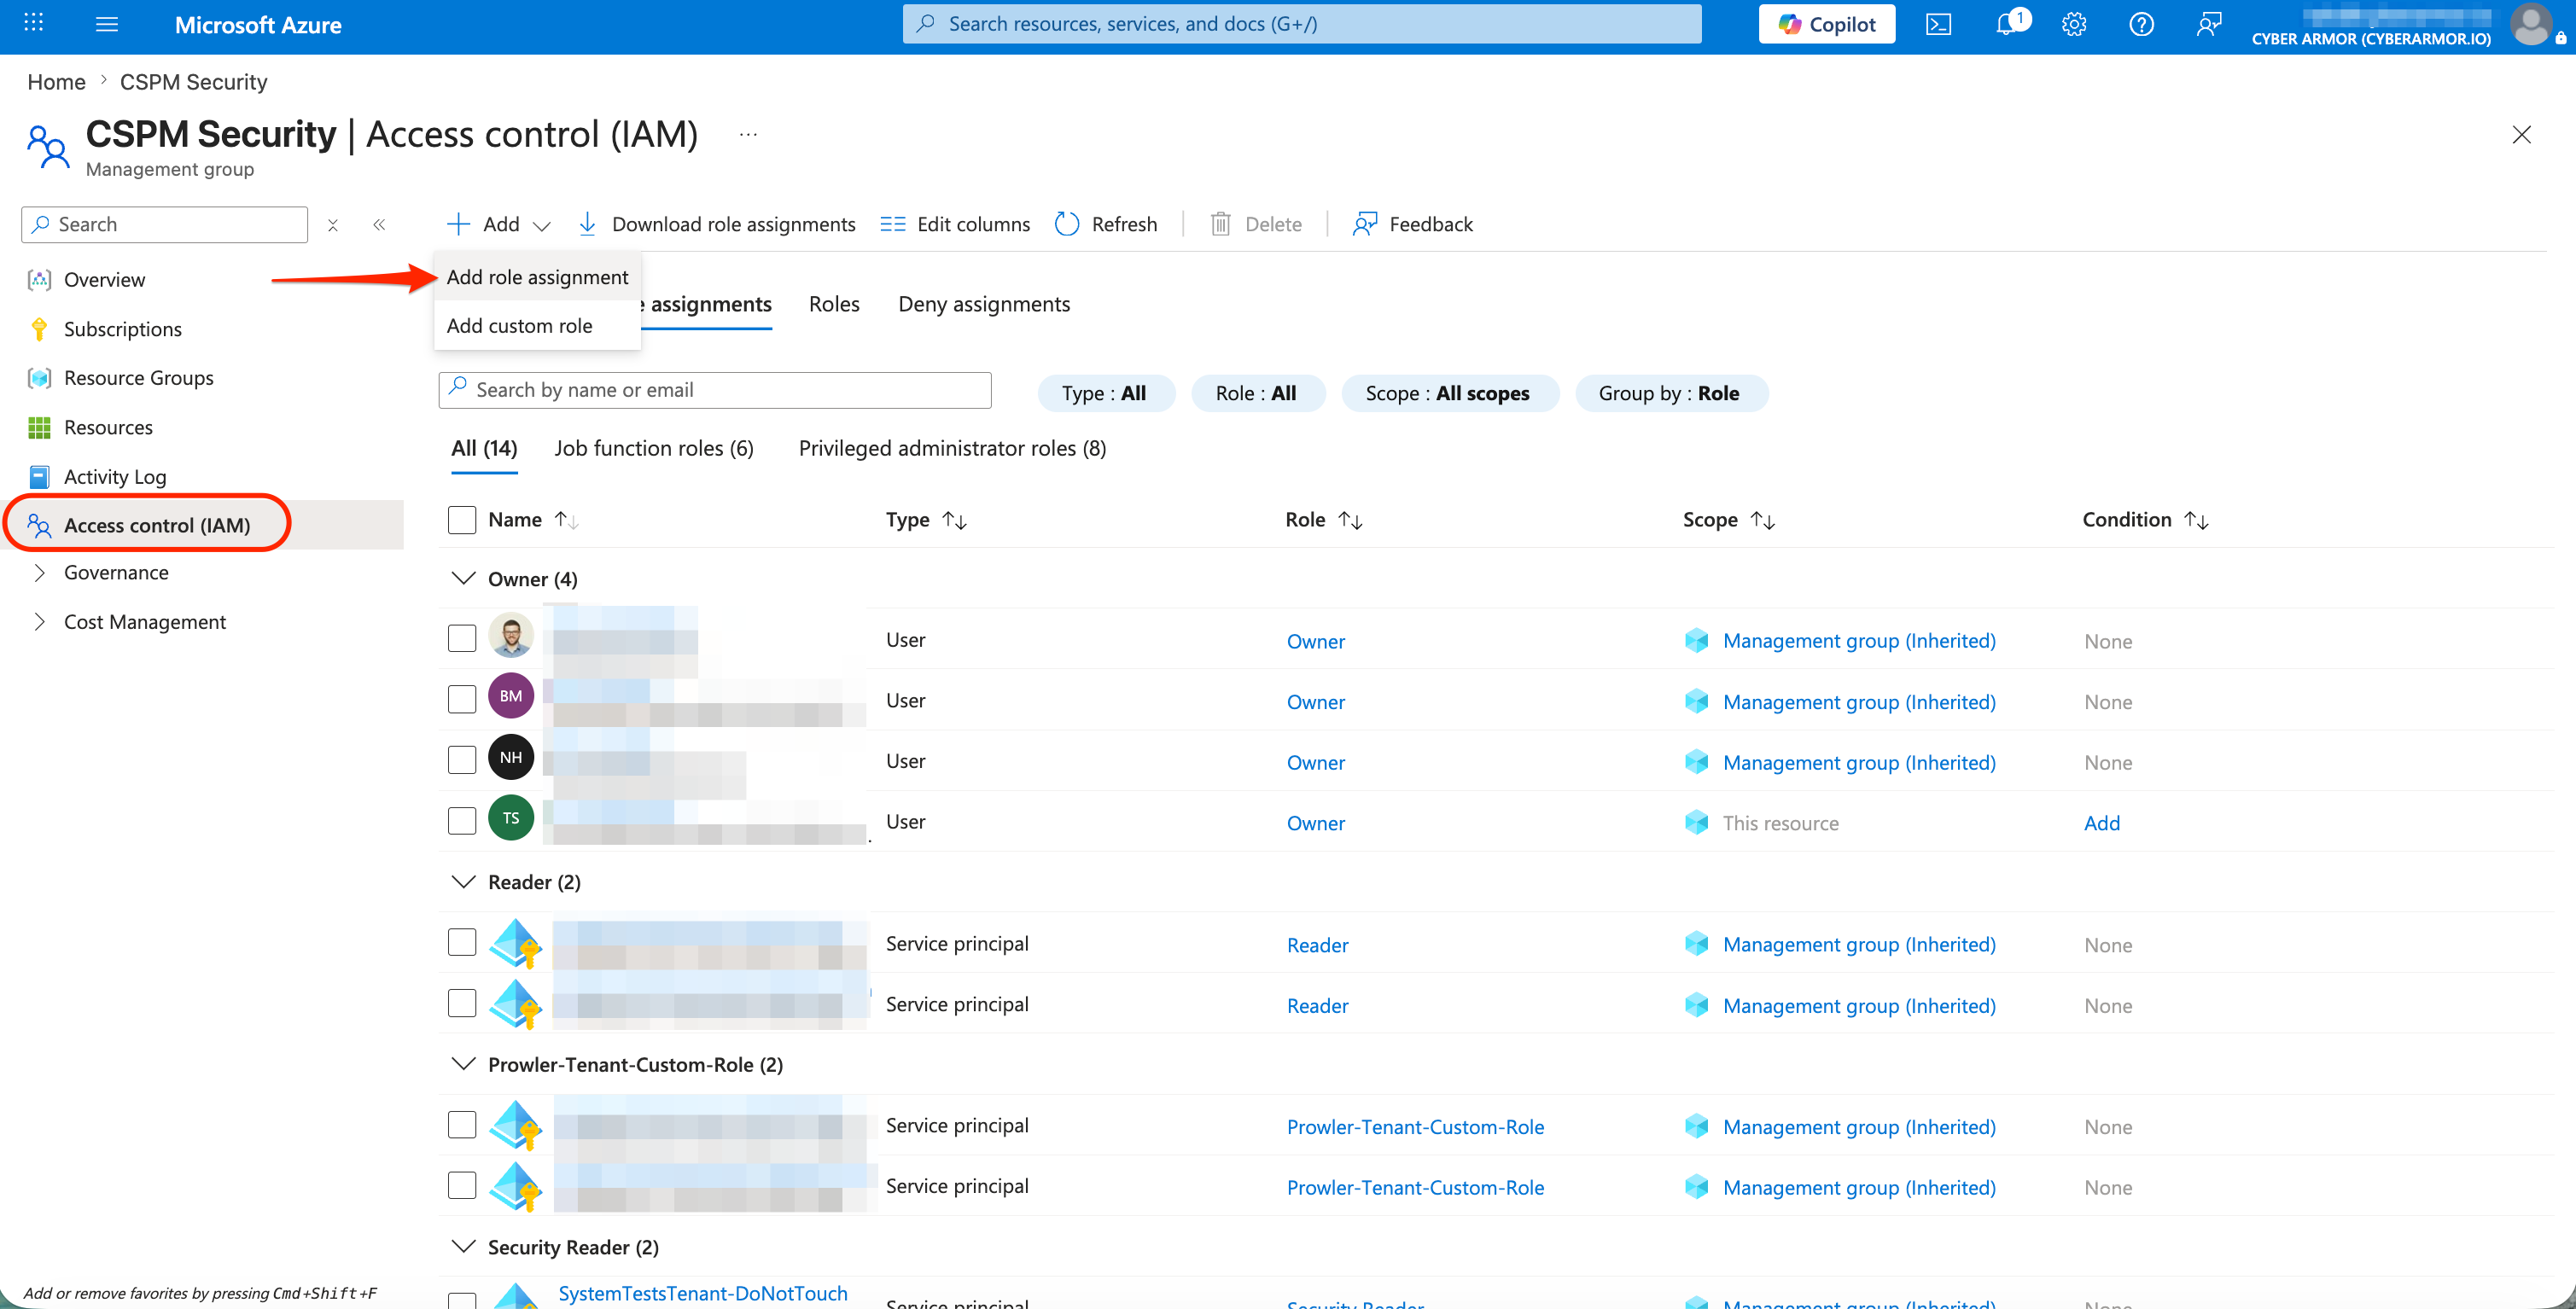
Click + Add.
-
Select Add role assignment.
-
In the Role list, search for and select the custom role you created, for example:
CSPM Access. -
Click Next.
-
Leave Assign access to set to the default value.
-
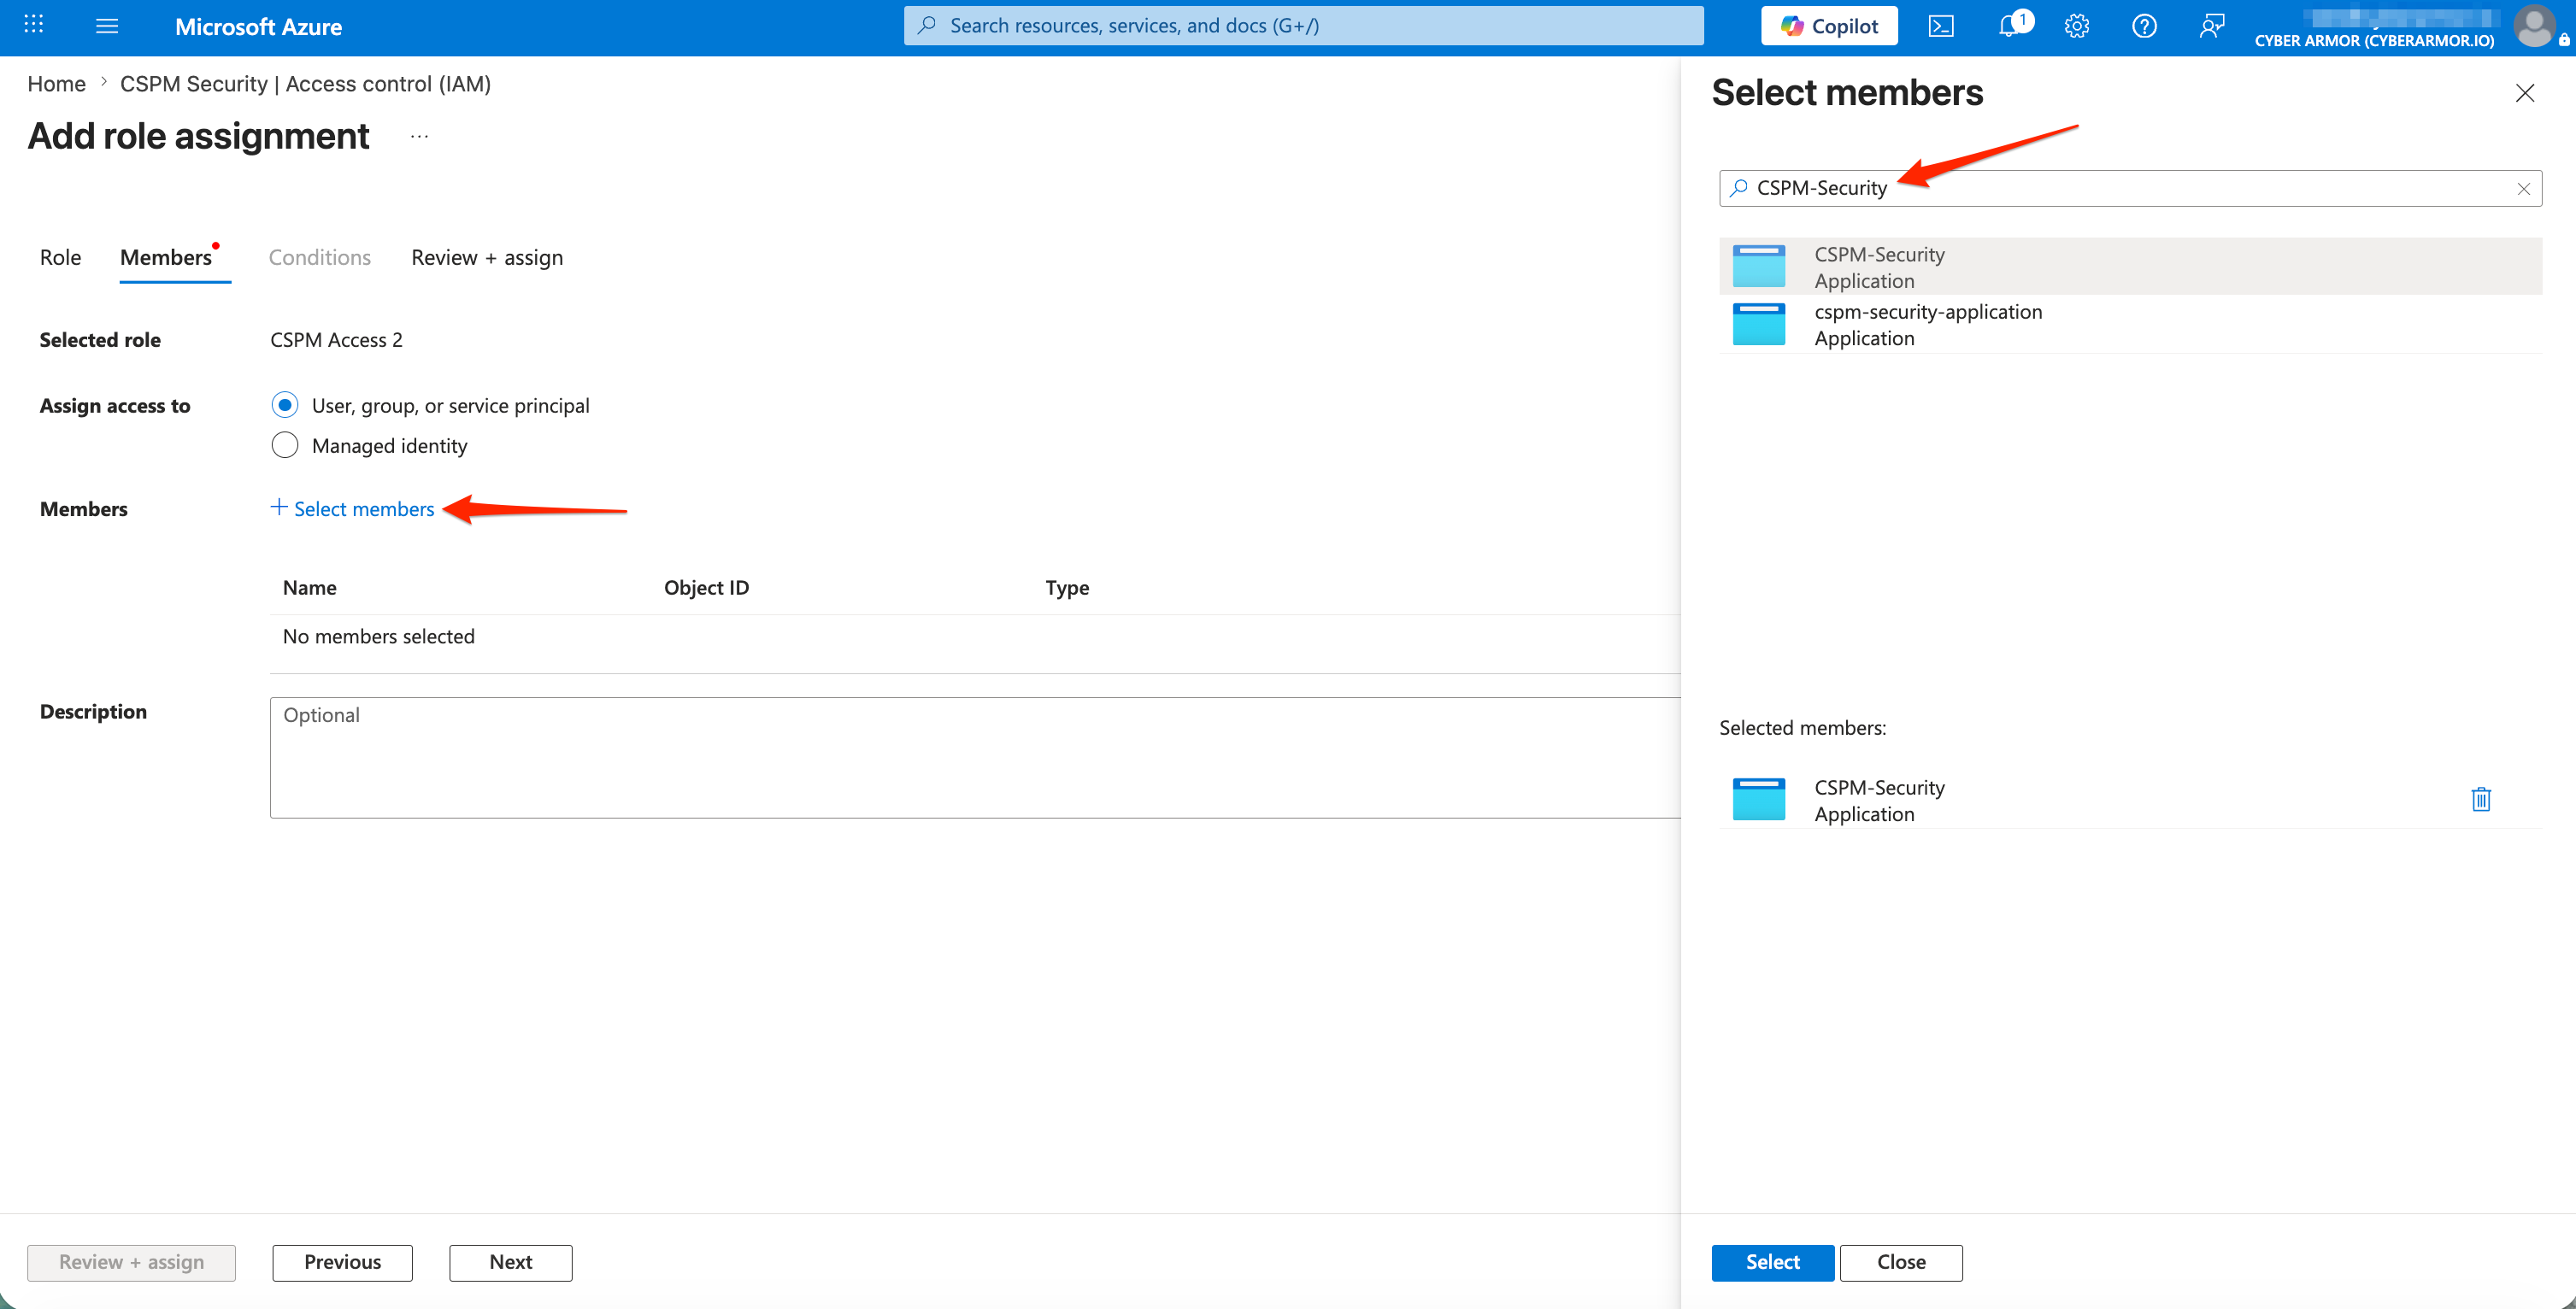
Click Select members.
-
Search for the name of the app registration you created, for example:
CSPM-Security. -
Select the application.
-
Click Select.
-
Click Review + assign.
-
Repeat the same process to also assign the following roles to the application:
- Reader
- Security Reader
-
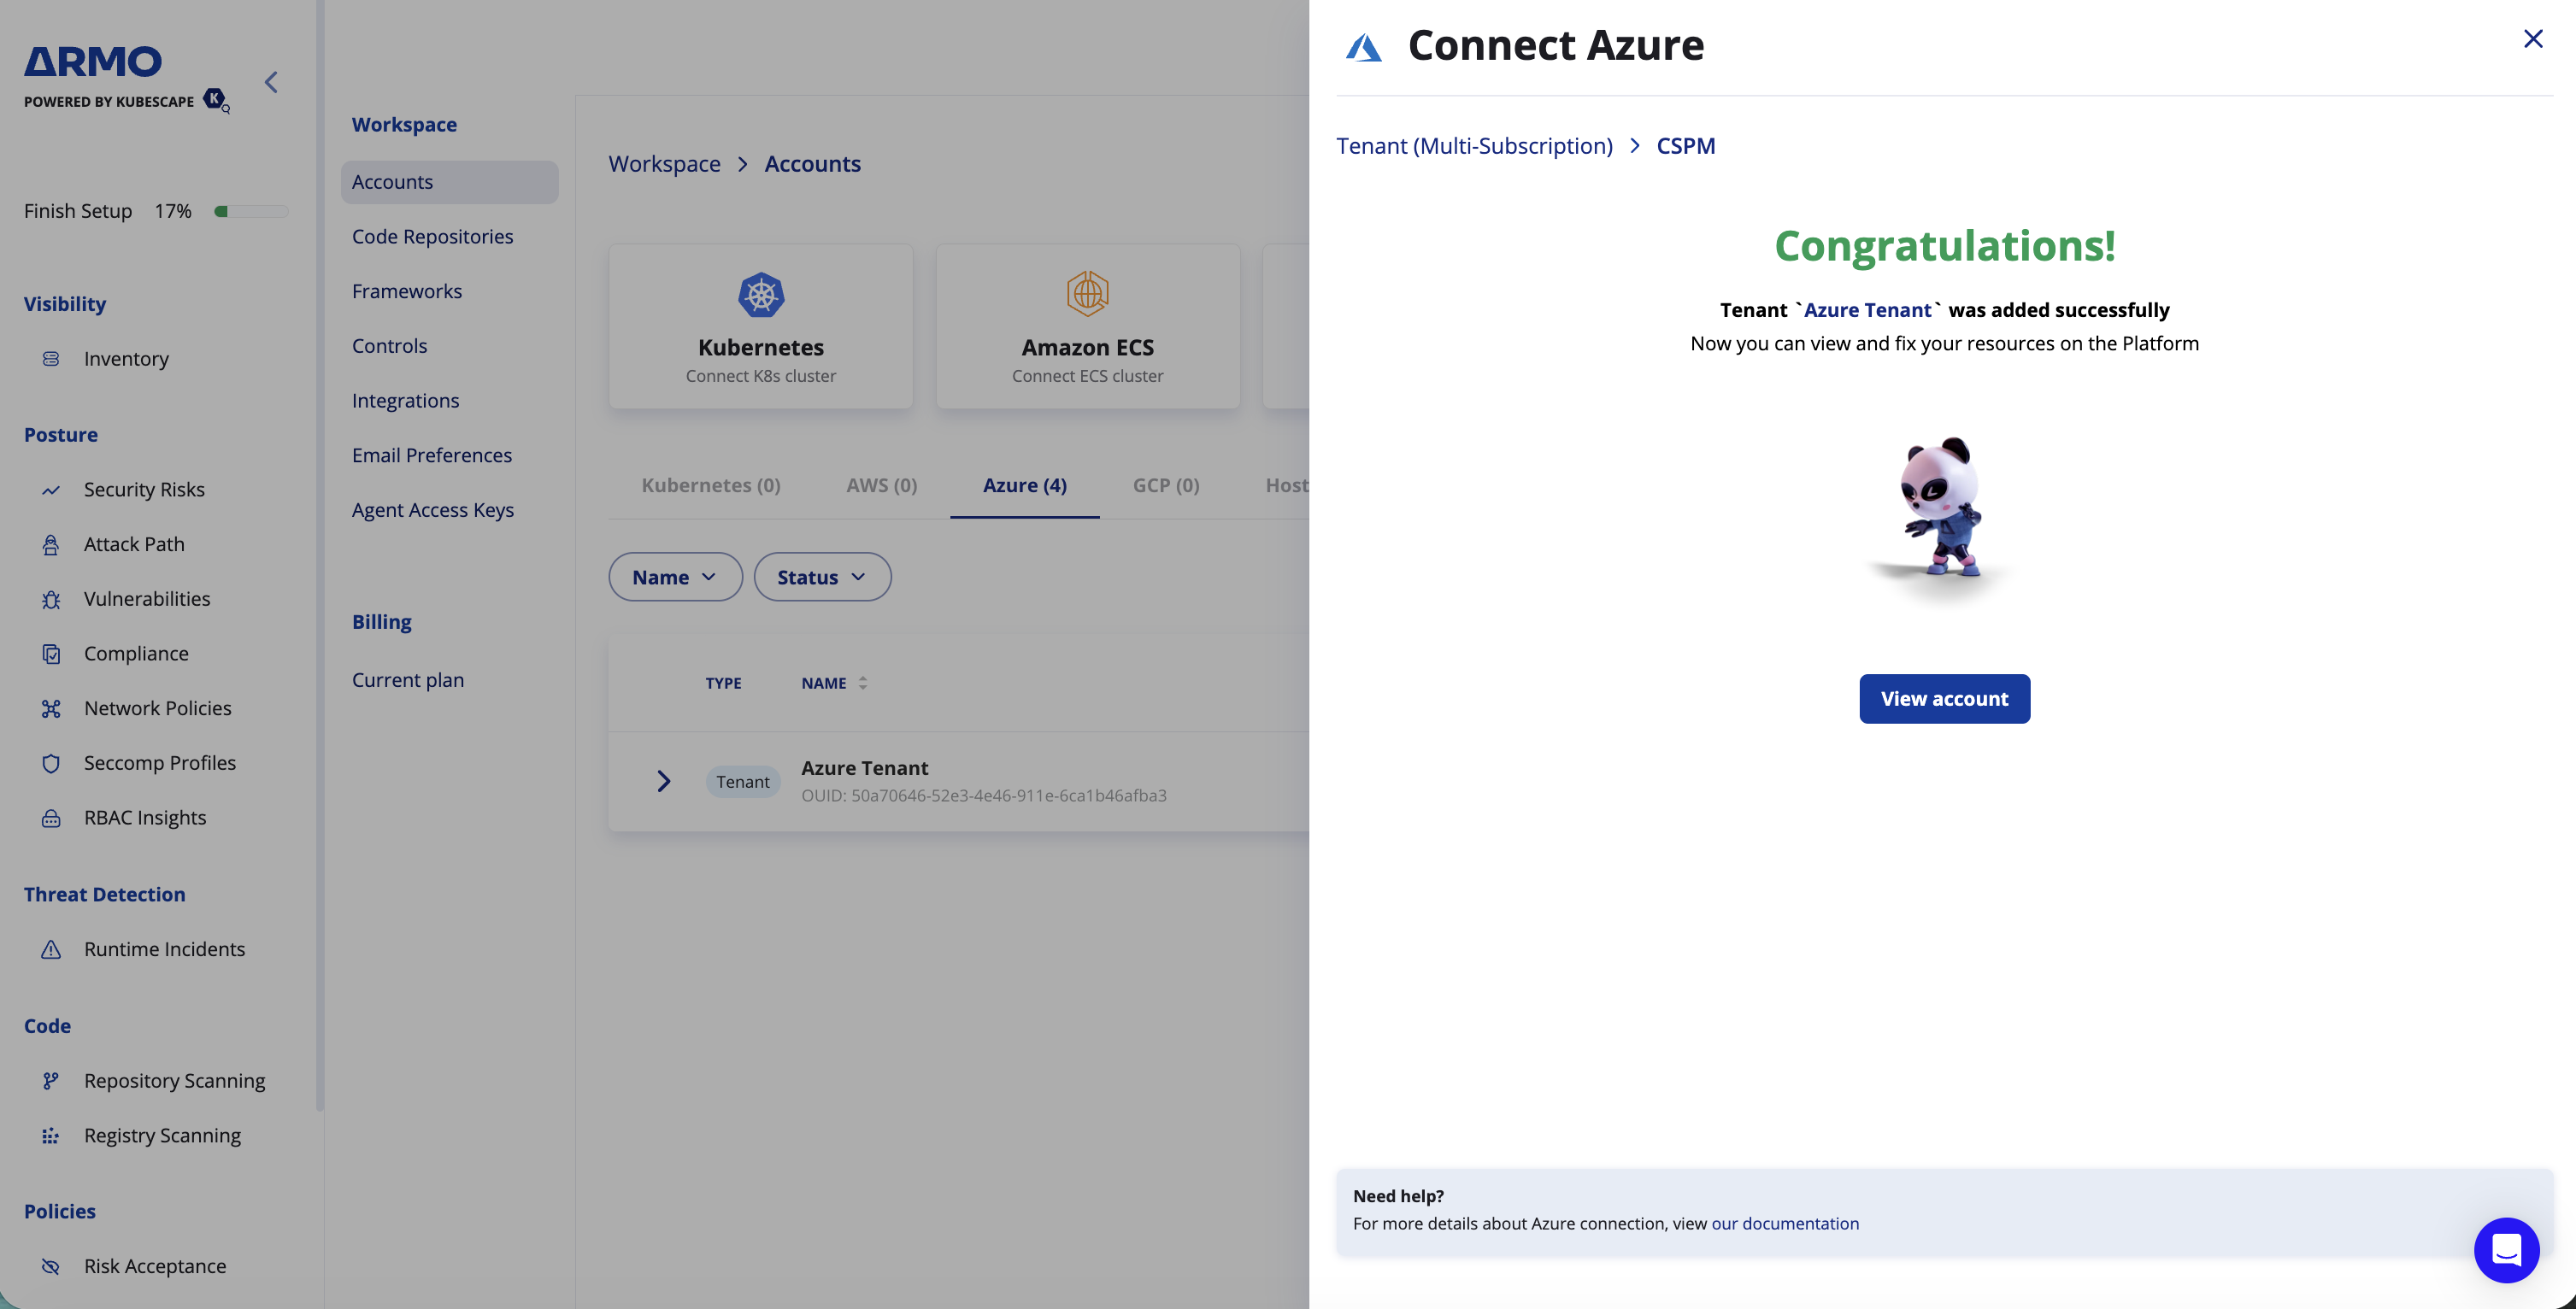
Return to the ARMO onboarding wizard and click Connect.
-
After the connection is created successfully, click View account.
Assign at the management group so subscriptions inherit accessAssign the custom role, Reader, and Security Reader at the management group (or tenant root) you are connecting, so every subscription beneath it inherits the access. If a subscription in scope does not inherit these roles, the connection reports missing permissions for that subscription.
Optional: Key Vault ReaderTo also cover Azure Key Vault in your compliance findings, you can optionally assign the built-in Key Vault Reader role to the same application, at the same scope. It is optional — the connection succeeds without it — and it extends posture coverage to Key Vault resources.
After onboarding
After the Azure tenant is connected, ARMO begins discovering Azure resources under the connected tenant or management group.
Cloud compliance findings and misconfigurations appear in ARMO after the initial discovery is complete.
Elevated access is used only during onboarding to allow permission configuration across subscriptions and management groups. After onboarding is complete, Access management for Azure resources can be set back to No.
Troubleshooting
| Issue | Likely cause | Suggested fix |
|---|---|---|
| Connection fails with no subscriptions found | The application has no role assignments at the tenant root or target management group, so it can't see the subscriptions beneath it. This usually happens when access wasn't elevated during onboarding, so the roles in Step 9 couldn't be assigned at that scope. | Confirm the custom role, Reader, and Security Reader are assigned to the application at the Tenant Root Group or target management group. If you can't see the Tenant Root Group or assign roles there, enable elevated access (Step 3), sign out and back in, redo the role assignments in Step 9, and then retry the connection |
| Connection reports no access to the management group | The application lacks Reader on the target management group, or the Management Group ID is wrong. | Verify the Management Group ID, and confirm the Reader role is assigned at that management group (see Step 9). |
| Connection reports missing permissions on one or more subscriptions | The custom role, Reader, or Security Reader did not propagate to every in-scope subscription. | Assign the roles at the management group (or tenant root) rather than per-subscription, so all subscriptions inherit them (see Step 9). |
| Compliance findings do not appear | Initial discovery is still in progress. | Allow the first scan to complete; findings populate after the initial discovery. |
Updated 1 day ago